Grapple Design

   / Grapple Design #81  
dtd,
IMO, 1/4" is to skinny. I would use 3/8". Why??
With the added jaws there is a better chance of only one of them hitting and oddball shaped object which places more strain and stress on the whole jaw assembly. It will tweak easier being wider since the force is in the center and the farthest jaw from center seeing resistance will tweak easiest. I would also add more reinforcing between each jaw to tie them together for the same reason. Especially since you are using only one cylinder in the center. I think that is why you see the full width grapples having 2 cylinders. But I like the idea of the wide grapple to suit your needs better.

Please don't be offended, again IMO (my 2¢ worth)...
I don't see having the two end jaws in line with the bucket cylinders as adding strength to the grapple itself, other than that is where you bucket is attached to the fel arms. So the bucket is stronger (backed up by fel arm connection), which in turn makes for a more stable grapple base.

But the grapple strength relies on the manner it is constructed. That is, how well each jaw is connected to each other and the single cylinder mount, the pivots on the bucket, resistance to twisting and tweaking, etc.
I guess what I'm trying to say is although they are all intertwined, failure of the grapple (strength issues such as bending, tweaking etc) is not related to the loader arms.

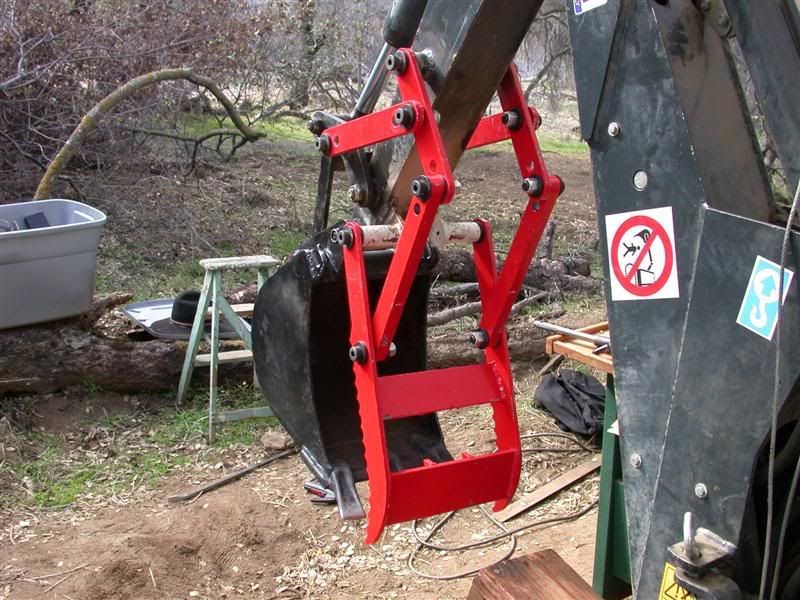
As an example, I made a thumb for my backhoe. The thumb looks and works like a miniature grapple jaw and was made of 3/8" thick material. The power force points were almost directly in line with each jaw. So I thought with my clever design like that, it would work great and not tweak. It was only 12" wide too.


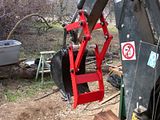
Even designed like that, since I did not have enough bracing in between the two jaws, I still tweaked it and had to reinforce it more. I grabbed an oddball shaped log and one jaw wanted to go farther down than the other...and it did. Just sharing from real experience.
 
   / Grapple Design #82  
I fully agree with Rob. 1/4 inch grapple arms will be too flexible and are likely to be damaged when grappling anything other than light brush. 3/8ths would be standard. Having said that, I suspect that the grapple arms on the PowerTrac 425 grapple bucket might be 1/4" (you'd need to confirm that) so with a relatively light duty set up (the PT425 has bucket lift of only 800lbs) you might get away with it.
 
   / Grapple Design
  • Thread Starter
#83  
Done deal 3/8" it is. Still the welding of the flat stock question rather than plasma cutting sheetstock !!! Any input?
 
   / Grapple Design #84  
IslandTractor said:
I fully agree with Rob. 1/4 inch grapple arms will be too flexible and are likely to be damaged when grappling anything other than light brush. 3/8ths would be standard. Having said that, I suspect that the grapple arms on the PowerTrac 425 grapple bucket might be 1/4" (you'd need to confirm that) so with a relatively light duty set up (the PT425 has bucket lift of only 800lbs) you might get away with it.

They're 3/8" unless I'm mistaken... yet, I've still bent the pointed end of one slightly by pinching logs and pulling them at an angle...

Not concerned about it enough to try straightening it -- in fact I think I've essentially straightened it out in use -- likely by pulling the opposite direction.

The pointed ends on the PT grapple arms aren't reinforced with any webbing or anything... there's only one crossbar, back about a foot or so from the end.
 
   / Grapple Design #85  
dtd24 said:
Done deal 3/8" it is. Still the welding of the flat stock question rather than plasma cutting sheetstock !!! Any input?
Again, my opinion...
I don't think there's anything wrong with welding the flat stock together. Weld both sides and be sure you get excellent penetration and then grind the welds down almost flat. It should be as strong as the parent material. Since it will probably be harder and less ductile than the parent material in those areas, I would consider putting the cross braces right there, so they overlap the weld areas sort of perpendicular to the length of the weld beads.
 
   / Grapple Design #88  
Rob,

Thanks. That was actually the first time that I did any real heavier metal work. I used to do body work for a living, no heavy metal repairs there. I have spent a lot of time reading the welding forums trying to learn some of the tricks of the trade.

Kurt
 
   / Grapple Design #89  
KAB said:
Rob,

Thanks. That was actually the first time that I did any real heavier metal work. Kurt

That makes it doubly impressive. :cool:
 
   / Grapple Design #90  
For what it's worth, I used 3/8" , and I agree with 3RRL, 1/4" is just a little too flimsy. If I had gotten "a deal" on some 1/2", I would have used it, for sure! ;)

So far, after a couple hours of use, I don't see any un-due flexing or bending on the 3/8" welded stock. I took Pineridge's repeated advice about the gussets between the grapple forks, especially near the tips, and I do think it adds quite a bit of rigidity to the set-up.

Having the end jaws in-line with the bucket cylinder attachment points might make some sense, IF, that is also where the bucket has additional reinforcement?
However, I think the most stressed points in the entire equation are the grapple-cylinder mounts. The hydraulic force wants to spread the grapple away from the bucket, thereby pushing the mount backward, at the end attached to the bucket, and forward where it attaches to the grapple.

BottomLine, build it strong, but don't over-think it, it's pretty straight forward.
 
   / Grapple Design
  • Thread Starter
#91  
I ran the electrical switch this weekend. I ended up having to use a on/center off/ on switch because I ran the power off an aux fuse panel I installed when doing my lights. If I used the on/on switch I wanted to it would have always been on and drained my battery. I encased the switch in a radio shack project box. I am very happy with the location.

Next weekend HYDRAULICS!!!!!

I also ordered the steel so I will be starting on that side shortly.
 

Attachments

  • Aux Fuse Panel.jpg
    Aux Fuse Panel.jpg
    88.7 KB · Views: 332
  • Grapple Switch.jpg
    Grapple Switch.jpg
    108.9 KB · Views: 357
   / Grapple Design #92  
Have you looked on Ebay for Grapples? I think they have some that will fit. or will make up for you.
 
   / Grapple Design
  • Thread Starter
#93  
What fun is that JJ? The grapple is going to be very useful, and yes I have researched all available grapples. I like the process of the project as well. Keeps me out of trouble!!!!!
 
   / Grapple Design #94  
dtd24 said:
I ran the electrical switch this weekend. I ended up having to use a on/center off/ on switch because I ran the power off an aux fuse panel I installed when doing my lights. If I used the on/on switch I wanted to it would have always been on and drained my battery. I encased the switch in a radio shack project box. I am very happy with the location.

Next weekend HYDRAULICS!!!!!

I also ordered the steel so I will be starting on that side shortly.

DTD, good catch on the battery draining issue, but, just a word of caution, it wouldn't be too difficult for that switch to be left in one of the [ON]positions. You might still consider using something coming off of the ignition switch, that way if tractor is OFF, so is the grapple switch.

Just my 2 cents. proceed as you see fit.
 
   / Grapple Design
  • Thread Starter
#95  
I agree with you skunk, I need to look at the tractor some more to see how I can get that done. The fuse panel on the tractor has fuse openings, but the metal bar on the back doesn't continue all the way through. I was trying to leave all custom stuff on it's own. How would I send power to my entire aux fuse panel, only when ignition is on?
 
   / Grapple Design #96  
If the aux panel is stock, I'm suprised it's not on the ignition already?

But, if it is not, you will need to find the switched side of the ignition (back end) and tap there, using a stand-alone, or pick a seldom used that has plenty of capacity and tap into it.

I used my 12v Aux "cigarette lighter" circuit, which had a 10a fuse on it.
I tapped into it, and ran a 3a stand-alone just for the solenoids.
Each solenoid draws 1.67a, and there is no way you can both ON. using our switch set-ups, so, I felt 3a gave enough protection.
 
   / Grapple Design
  • Thread Starter
#97  
I installed the diverter valve and hooked up all the hydraulics this weekend with some help from my father and a friend of his. Happy to say my dump/ curl works. I guess I won't know if the front quick connects actually work until I installl the grapple. It won't be long now.

Here are some pics
 

Attachments

  • Diverter Valve 1.jpg
    Diverter Valve 1.jpg
    167 KB · Views: 322
  • Diverter Valve 2.jpg
    Diverter Valve 2.jpg
    132.6 KB · Views: 288
  • Front Quick Connects.JPG
    Front Quick Connects.JPG
    173 KB · Views: 323
  • Front Quick Connects 2.jpg
    Front Quick Connects 2.jpg
    173.1 KB · Views: 297
   / Grapple Design #98  
Looks Good DTD!

Check your PM's, I've been trying to reach you:D
 
   / Grapple Design #99  
Looking good DTD! You should be good-to-go soon!

Nice plumbing work. ;)
 

Tractor & Equipment Auctions

2021 CATERPILLAR 299D3 SKID STEER (A60429)
2021 CATERPILLAR...
2021 CATERPILLAR D5 LGP HIGH TRACK CRAWLER DOZER (A60429)
2021 CATERPILLAR...
2018 INTERNATIONAL LT625 TANDEM AXLE SLEEPER (A59904)
2018 INTERNATIONAL...
Peterbilt 377 Semi-Truck (A56438)
Peterbilt 377...
2025 GPS Trailer (A56857)
2025 GPS Trailer...
2002 Allmand Night-Lite Pro Towable Light Tower (A56857)
2002 Allmand...
 
Top