You are using an out of date browser. It may not display this or other websites correctly.
You should upgrade or use an alternative browser.
You should upgrade or use an alternative browser.
Grapple Design
- Thread starter dtd24
- Start date
- Views: 52150
More options
Who Replied?
/ Grapple Design
#101
Willl
Elite Member
No, I'm talking about your placement of the QD's on the front grill brush guard.
OP
dtd24
Gold Member
Oh, yeah. Still not sure I'm happy with them there. I am looking at it some more. I have some slack to move them a bit if req'd.
3RRL
Super Member
- Joined
- Oct 20, 2005
- Messages
- 6,931
- Tractor
- 55HP 4WD KAMA 554 and 4 x 4 Jinma 284
Looking good dtd, but I have the same concern as Will does.dtd24 said:Oh, yeah. Still not sure I'm happy with them there. I am looking at it some more. I have some slack to move them a bit if req'd.
Your grill guard is stationary so you would need all kinds of slack for when they are connected in case you lift the fel way up. Then you need to have additional slack on top of that for full dump and curl of the bucket. That could get hairy.
Looks to me your right fel arm is naked and you can run the hoses from your diverter valve up that arm with enough slack for complete raise of the fel arms, but it will be a lot less slack running up the stationary fel bracket to the moving arms at that point. Then down that arm over to the middle of your fel connecting support bar...that's where I'd put the QD's. Then from there up to your grapple set up with enough hose slack for full dump and curl. With the QD's there, on that support bar, you can take off the bucket, grapple, whatever and run other hydraulic equipment up front.
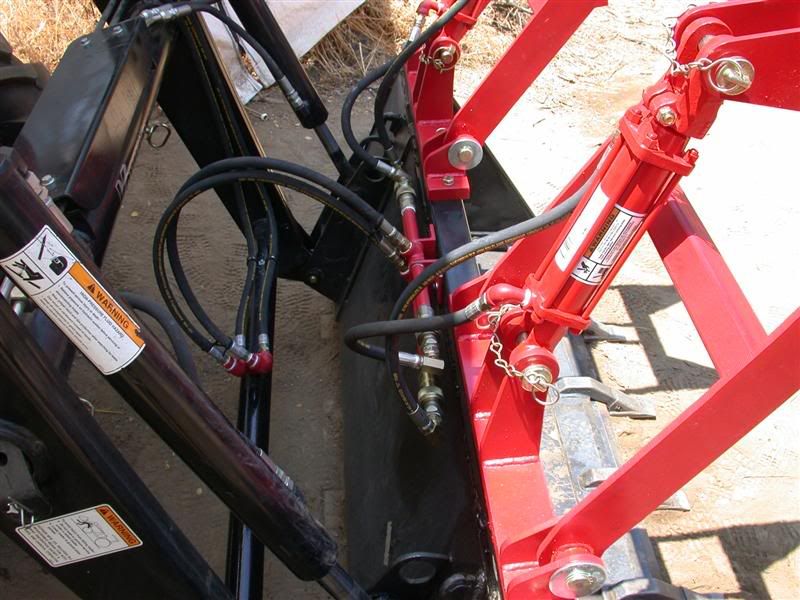
Notice I do not have my QD's there, but I wish I did for when I take my bucket off. At the time I did mine, I thought I would only take the grapples off the bucket, so I will have to change it too.
OP
dtd24
Gold Member
Ok, I will look at the quick connects alittle closer for sure. Tonight I took advice from KennyD (Thank you Ken) and I installed a relay so my aux fuse panel is only live when the ignition is on. Now my grapple switch won't keep me thinking at night if I turned it off or not!
Can't wait to get the steel!!!!
Can't wait to get the steel!!!!
kennyd
Advertiser
dtd24 said:Ok, I will look at the quick connects alittle closer for sure. Tonight I took advice from KennyD (Thank you Ken) and I installed a relay so my aux fuse panel is only live when the ignition is on. Now my grapple switch won't keep me thinking at night if I turned it off or not!
Can't wait to get the steel!!!!
Your welcome, glad to help

SkunkWerX
Platinum Member
dtd24 said:Ok, I will look at the quick connects alittle closer for sure. Tonight I took advice from KennyD (Thank you Ken) and I installed a relay so my aux fuse panel is only live when the ignition is on. Now my grapple switch won't keep me thinking at night if I turned it off or not!
Can't wait to get the steel!!!!
Good, now I can sleep!
I've been waking in the middle of the night, wondering.....
"Did dtd24 move his grapple switch to the OFF position?"
OK, so now we want to see the steel part of this project take shape, you are on the home stretch.
Be sure to post some pics! and....good luck!
OP
dtd24
Gold Member
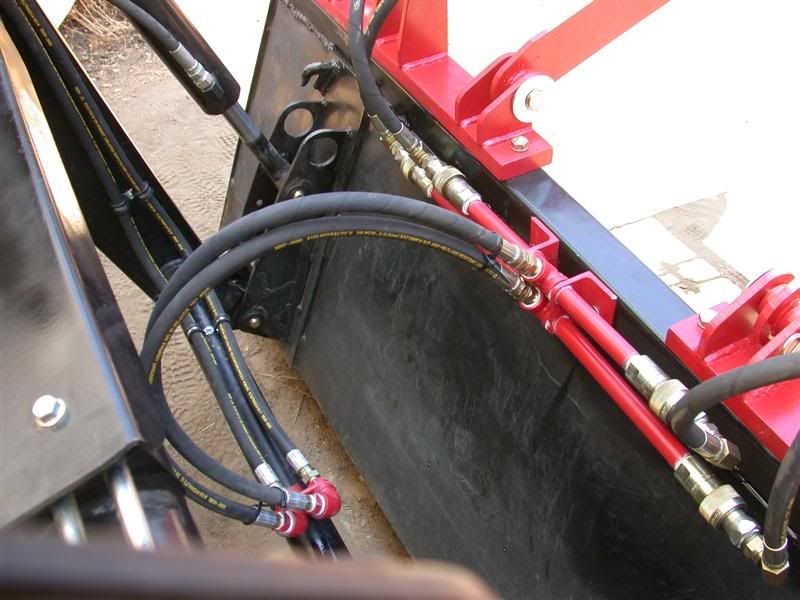
Well I looked at the current spot where I have installed the quick connections. I see what you guys are saying. I will have to re-route them. I think what I will do is take off the lines and use them for the tractor to grapple cylinder hoses. That way I will only lose the two ends. I will make new hoses to go from the diverter to the bucket by way of the FEL arm that moves.
Thanks guys!!!
Thanks guys!!!
SkunkWerX
Platinum Member
Sounds like a good alternate use, rather than be left with a spare purchased hose.
I found that you need a little slack to account for the "hinge" where the FEL supports pivot at the tractor frame mount (See your existing hoses), as well as, providing for the slack needed for the bucket full-dump operation.
-FEL Raised with Bucket fully-dumped was my MAX length needed.
-FEL Lowered, with bucket level on ground is what I called "Normal" position.
-FEL Lowered, with Bucket fully curled (like carrying mode) was the MIN length needed.
Once I examined each condition, I could account for QD positions, length, hose routing, and make sure there weren't any pinch points, which would most likely be at/near your bucket curl cylinder(s).
Hope this helps more than confuses.
Fell free to Email me if you need pics or further explanation.
Your doing well, sounds like you are accounting for all the variables along the way.
OP
dtd24
Gold Member
What I have been doing to size up the hoses is take a piece of 12ga or 14ga electrical wire scrap and route it like I want the hydraulic line to run. I bring the wire right to Parker Hydraulics and they make it perfect. I will get this thing run nice nice!
kennyd
Advertiser
dtd24 said:What I have been doing to size up the hoses is take a piece of 12ga or 14ga electrical wire scrap and route it like I want the hydraulic line to run. I bring the wire right to Parker Hydraulics and they make it perfect. I will get this thing run nice nice!
A peice of old garden hose works real well also
IslandTractor
Super Star Member
- Joined
- Sep 15, 2005
- Messages
- 16,647
- Location
- Prudence Island, RI
- Tractor
- 2007 Kioti DK40se HST, Woods BH
dtd24 said:OK I did all the calculations. Looks like my grapple will add 225 lbs +/- to my FEL. The specs say she is good for 1175 lbs at full lift capacity. Lets say she ends up being 250 lbs, that leave 925 lbs left. Seems ok to me. What do you guys think?
Except for picking up stumps or whole trees, it is pretty hard to get more than 1000lbs of material into a grapple. My CK20 has a lift capacity at pivot pins of 1070lbs and I have a 280lb grapple on it. I can lift ANY amount of brush I can cram into the thing. I often have the grapple so overloaded I almost have to get off the tractor to see where I am going and I routinely stop, raise the grapple higher so I can peek underneath, and then lower and keep going. Point being that 900lbs of capacity is plenty to be useful.
Bigger stumps can weigh more than 900lbs and in theory you could try to load too many logs (I can lift one 15" x 16-18 foot log with limbs attached).
Bottom line is that you'll be fine with that residual net lift capacity.
Attachments

SkunkWerX
Platinum Member
dtd24 said:OK I did all the calculations. Looks like my grapple will add 225 lbs +/- to my FEL. The specs say she is good for 1175 lbs at full lift capacity. Lets say she ends up being 250 lbs, that leave 925 lbs left. Seems ok to me. What do you guys think?
For the extra-work and productivity you get out of the grapple, I would trade a little GBW any day!
(GBW = Gross Bucket Weight , he, he, he... I may have coined a new acronym)
OP
dtd24
Gold Member
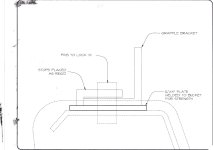
Ok, the metal is all cut up. All the weld chamfers are done, the arms should be welded up for this weekend. We bored a hole in the arm to except a stainless pipe at the bucket connection. I got the idea from the gugliois thread. I think this should aid in stability of the arm, and wear better than just a hole alone in the arm. Perfect spot for another zerk as well.
We have decided to try something alittle different as far as the mounting of the the grapple at the fel. We will create a slid of sorts that the bracket will slip into. Then We will pin the grapple bracket in place to the fel. My stepdad came up with this. At first I was worried about slop, but I think this would be an exclent way to slip on and slip off the fel by myself.
Take a peek at this sketch and chime in!
Attachments
MrJimi
Elite Member, Rest in Peace


OP
dtd24
Gold Member


OP
dtd24
Gold Member
still not sure how to make the pics a link like 3rrl. I have half read a post. I just use photobucket to resize to 65% and then copy/paste the img code. I want them smaller in the board, but clickable any help? Hope the large pics don't hurt slow connection.
The grapple is coming along pretty well though huh?
The grapple is coming along pretty well though huh?
3RRL
Super Member
- Joined
- Oct 20, 2005
- Messages
- 6,931
- Tractor
- 55HP 4WD KAMA 554 and 4 x 4 Jinma 284
Yeah, I'll say it is looking great. One question about those bolts and nuts holding the jaw pivots. Are the nuts run up against a shoulder or stop? Or is there still thread left where you could tighten them and would pinch the joint shut? Otherwise you may need to double nut them...or maybe use Nylock nuts so they don't fall off.
About posting "thumbnails" using your new Photobucket account...
Posting thumbnails is easy and I'll walk you through it.... lol ... But I needed help too figuring it out.
Ok so first thing is to re-size your photos to make them around 50 to 100 kb size to load up to your Photobucket account. This will help the dial up members. I use a Windows Picture Re-sizer that is free to download.
When I open or preview a picture, right mouse click on the photo and one of the options will be to "resize" the photo. I usually use "medium" setting and large only for more detailed ones. Here is the link to the Windows Picture resizer.
Windows Picture Resizer for XP
Or do a search if you don't have XP for the computer system you have.
When you re-size a picture, it makes a copy of the original photo so it is not lost. I keep the resized pictures in a separate folder under TBN photos, under individual folders for each project.
OK, once you have a folder of resized pictures, you can log on to your Photobucket account and also log onto TBN and to the thread you want. So now you have 2 web browsers open at the same time.
Minimize the TBN and go to the Photobucket web browser. I have made sub albums in the Photobucket account for each project too. Make one for "Grapple" and click on it so you are in that sub account and upload those pictures to that.
Once the photos are upload, they will all appear as thumbnails on your screen. You have already done that so you know what I mean.
Below each photo is a square box with the name of the photo and also 4 types of formats, but disregard those.
What you want to do is check that box by the photo name by clicking on the box. You can check more than one photo at a time if you want. It will highlight the photo(s) and puts a red border around it.
After checking the box(s), scroll all the way down to the bottom of the page. There is an option to select/unselect all and also 3 rectangles below that.
You want to click on the one that says "Generate HTML and IMG code".
Click on it and another screen pops up with 5 more rectangles.
You want the 3rd rectangle down that says "IMG clickable thumbnails for message boards - recommended".
Highlight all that is in the box and Right mouseclick on it to copy it.
Then open up the TBN browser and "paste" the information into the reply post with another right mouse click.
When you "Pre-view" your reply, you should see a clickable thumbnail in it along with your written post. That is why I don't use the "quick reply" so I can check my spelling and also my photos.
Click on the thumbnail in your preview and it should open up. If good, post it.
Sounds harder then it really is, but like anything else, once you get used to it it's not bad at all. lol ... Like tying your shoe laces the first few times.
Try that and keep these instructions in your computer for reference. I should keep a copy of these instructions too, since many many TBN'ers have asked me how to do this.