IslandTractor
Super Star Member
- Joined
- Sep 15, 2005
- Messages
- 15,802
- Location
- Prudence Island, RI
- Tractor
- 2007 Kioti DK40se HST, Woods BH
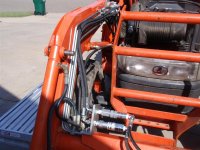
I shortened up the hoses and added the Pioneer 1/4" couplers to mate up with my John Deere lines and couplers already on my tractor. If I was doing it again, I would leave about two inches more hose.....as when the grapple is tilted all the way the hoses are getting a bit tight. It'll work out....but a word of warning to the next guy..
You are not the first to forget that when the grapple is in full dump it stretches the hoses a bit. If the hoses are the correct longer length however they can vulnerable to catching on an obstruction when the bucket is fully curled. The best way I have figured out to deal with this is to wrap a bungee cord around the middle of the hoses and attach the hooks to the torque tube or to the welded hose connector on the torque tube. If the bungees are just slightly stretched with the grapple curled it will hold the hoses out of harms way but leave enough stretch in the bungee so you can still stretch it out for full dump. If you have a shorter bungee just use a ziptie at the middle of the hoses and hook one end of the bungee there. I should note that the bungee should not be one of the heavy duty solid rubber types but rather a pretty stretchy type.