You are using an out of date browser. It may not display this or other websites correctly.
You should upgrade or use an alternative browser.
You should upgrade or use an alternative browser.
Hoe, Hoe, Hoe
- Thread starter Runner
- Start date
- Views: 8442
More options
Who Replied?
/ Hoe, Hoe, Hoe
#1
crzysnake137
Bronze Member
- Joined
- Dec 31, 2005
- Messages
- 51
- Tractor
- John Deere 125
Mega Drooling here!!! You should do a thread on the install process,,,
Ductape
Elite Member
You must have been extra good this year !! 
I'm just hoping i don't end up with a stocking full of coal !!
I'm just hoping i don't end up with a stocking full of coal !!
Chris2520
Platinum Member
Runner. I am glad you seen the light. you will really enjoy
that. i just could not imagine not haveing a hoe.
<----- Everyone needs a Hoe.....
congrats on the best attchment to will ever need...
Chris....
that. i just could not imagine not haveing a hoe.
<----- Everyone needs a Hoe.....
congrats on the best attchment to will ever need...
Chris....
OP
Runner
Elite Member
- Joined
- May 12, 2007
- Messages
- 4,284
- Location
- Missouri
- Tractor
- 2024 Cub Cadet Ultima ZTXS5 54, 2007 John Deere 2520, 1989 John Deere 185, 1960 Panzer T70B
Crzy - Will do - I looked at another thread on here about doing the install yourself (on a 41-- series machine) and that's what inspired me to go ahead and give it a try.
Ductape - All I can say is Santy must have been looking the other way....
Chirs - You guys with the hoes just looked like you were having too much fun.
It was freezing rain and dropping into the 20's when I got it home, so didn't spend much time messing with it yesterday.
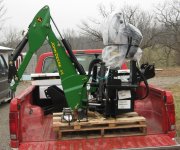
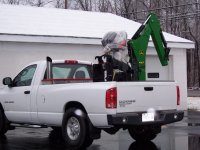
Just for anyone wondering, you can get a whole 46 backhoe in a pickup:
Ductape - All I can say is Santy must have been looking the other way....
Chirs - You guys with the hoes just looked like you were having too much fun.
It was freezing rain and dropping into the 20's when I got it home, so didn't spend much time messing with it yesterday.
Just for anyone wondering, you can get a whole 46 backhoe in a pickup:
Attachments
Lil43
Bronze Member
Chris2520
Platinum Member
Lil43 said:Just for anyone wondering, you can get a whole 46 backhoe in a pickup:
A 447 fits without too much problem either.
Lil43 is the the stacks on the dodge real or just for looks.
it really looks cool...
Chris....
Chris2520
Platinum Member
Runner said:Crzy - Will do - I looked at another thread on here about doing the install yourself (on a 41-- series machine) and that's what inspired me to go ahead and give it a try.
Ductape - All I can say is Santy must have been looking the other way....
Chirs - You guys with the hoes just looked like you were having too much fun.
It was freezing rain and dropping into the 20's when I got it home, so didn't spend much time messing with it yesterday.
Just for anyone wondering, you can get a whole 46 backhoe in a pickup:
Runner , what size bucket did you go with. I went with a 16 inch.
it seems to work well for most things....
I cut 293 feet of storm drain 3 feet deep through root and rock right
before it got cold.
Chris....
OP
Runner
Elite Member
- Joined
- May 12, 2007
- Messages
- 4,284
- Location
- Missouri
- Tractor
- 2024 Cub Cadet Ultima ZTXS5 54, 2007 John Deere 2520, 1989 John Deere 185, 1960 Panzer T70B
Chris - I went with the 13" bucket. Seemed like the best compromise since I plan to be digging lots of stumps, a few rocks and maybe a water line or two.
I see a thumb in my future too....
Lil43 - I don't think the big bad Dodge even knew that 447 was back there. On the other hand, the "84 F150 squatted about 4 inches with the 46.
According to the sticker on the side, it weighs 758 lbs, not counting the subframe.
I see a thumb in my future too....
Lil43 - I don't think the big bad Dodge even knew that 447 was back there. On the other hand, the "84 F150 squatted about 4 inches with the 46.
According to the sticker on the side, it weighs 758 lbs, not counting the subframe.
Chris2520
Platinum Member
Runner said:Chris - I went with the 13" bucket. Seemed like the best compromise since I plan to be digging lots of stumps, a few rocks and maybe a water line or two.
I see a thumb in my future too....
Lil43 - I don't think the big bad Dodge even knew that 447 was back there. On the other hand, the "84 F150 squatted about 4 inches with the 46.
According to the sticker on the side, it weighs 758 lbs, not counting the subframe.
I think i read somewhere. after everything is installed.
with a 16 inch bucket , subframe and all brackets. . it weighs right at 1000 pounds.
996 i think.
Chris....
Lil43
Bronze Member
Chris2520
Platinum Member
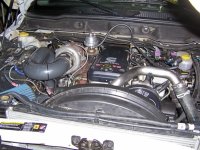
Now your talking my lauguage.....
is your intercooler air to air or air to water.....
I like Big Turbos......
Chris....
is your intercooler air to air or air to water.....
I like Big Turbos......
Chris....
Lil43
Bronze Member
Chris2520 said:Now your talking my lauguage.....
is your intercooler air to air or air to water.....
I like Big Turbos......
Chris....
Hey Chris
Thanks,ya I,m still running the factory air to air intercooler.The turbo,s (two) aren,t really that big just a 58 over a 66,but enoph that I,ve seen 60psi of boost a couple of times!
Jeff
Chris2520
Platinum Member
She looks like she will Git er Done.......
on Utube there are several Duramax's with over 1000 HP....
pretty neet to see a Dulley burn the tires all the way down the street....
Chris.....
on Utube there are several Duramax's with over 1000 HP....
pretty neet to see a Dulley burn the tires all the way down the street....
Chris.....
OP
Runner
Elite Member
- Joined
- May 12, 2007
- Messages
- 4,284
- Location
- Missouri
- Tractor
- 2024 Cub Cadet Ultima ZTXS5 54, 2007 John Deere 2520, 1989 John Deere 185, 1960 Panzer T70B
Still no install yet, but have been reading instructions. Looks to be fairly simple, however, I can't find any torque #'s for the bolts holding the backhoe to the subframe. I guess "good 'N tignt" will just have to do...
Skipholiday
Platinum Member
Awesome
You have to be smiling..
BTW what was the total cost?
You have to be smiling..
BTW what was the total cost?
OP
Runner
Elite Member
- Joined
- May 12, 2007
- Messages
- 4,284
- Location
- Missouri
- Tractor
- 2024 Cub Cadet Ultima ZTXS5 54, 2007 John Deere 2520, 1989 John Deere 185, 1960 Panzer T70B
It was $5800 including tax and 13 inch bucket.
Question for any 46 hoe owners:
While looking the thing over last night, I noticed that there are only bushings on one side of some of the joints, like the ones where the bucket cylinder ram attaches to the links. I also noticed that the parts diagram on the JD site only shows bushings on one side which surprised me.
So, I guess the bushings are only to act as spacers and not necessarily as a wear surface?
OP
Runner
Elite Member
- Joined
- May 12, 2007
- Messages
- 4,284
- Location
- Missouri
- Tractor
- 2024 Cub Cadet Ultima ZTXS5 54, 2007 John Deere 2520, 1989 John Deere 185, 1960 Panzer T70B
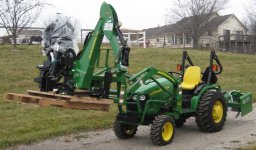
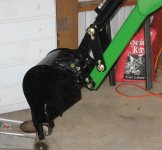
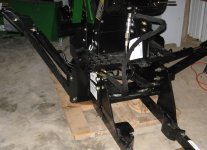
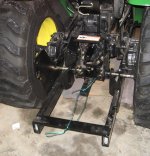
As promised, here is the write up for the install on the 46 backhoe.
First, some tools you might need (in addition to regular wrenches and socket set):
-torque wrench that goes up to 280 lb-ft
-air wrench (not required, but makes it a lot easier to tighten down the big hoe/subframe attaching bolts)
-drift
-rubber/plastic hammer
-mover's dolly
-floor jack
-couple of big pieces of cardboard
A note about the instructions: at first, I only saw the installation instructions in the manual that is taped to the operator's station. However, I found that there was a much more comprehensive set of installation instructions in the bag containing the mounting hardware that gives all the required torque numbers, etc.
Assembly Procedure:
1. Remove bolts/straps holding the stabilizer legs and hoe to the pallet. Note, the main bolts holding it on to the pallet (under the stabilizer mounts) go all the way through the pallet and if you don't remove them before you set it down, you can't get them out - don't ask how I found this out...).
2. Remove wire/pins holding the stabilizer hydraulic rams in their shipping position and mount them and stabilizers to the hoe.
3. Attach bucket. I thought this would be the easiest part, but getting the pins through all the pieces, including the two bushings that are sandwiched between the linkage and the bucket, takes some time and patience. Before you use your plastic hammer to drive the pins into their final position, you need to make sure the holes for the retainers line up with the holes in the bucket pretty well. After you get the pins in position, use the drift to line up the holes perfectly so the retainers will go in. I greased all the pieces up real well before sliding in the pins.
Incidentally, the instructions say "use bushings as needed". Mine had enough play to take all the bushings. Also, when installing the first pin, you can use the seond one to line up the other end of the bucket/bushing assembly so it goes together easiser. When you're installing the second one, you just have to do the best you can.
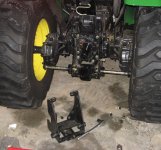
4. Remove all the three-point hitch stuff and the old draft arm pin mount. Install new draft arm pin mount with new bolts provided. Torque the bolts as indicated. Note, you will re-use the old PTO shroud, draft arm pins and drawbar.
5. Install subframe hangers.
-use furniture dolly to roll subframe under tractor
-install hangers on the loader mounts, but don't tighten the nuts, you need to be able to reposition them.
-instructions say to place the hangers so that the outer sideof the hanger is 7 1/2 inches from the loader frame plate, but 6 3/4 inches worked on mine.
-slide the subframe into place (while lifting up on the rear to get the hooks in place on the draft arm pins) and raise the front of the subframe up to test fit the pin/hanger placement.
-torque hanger nuts.
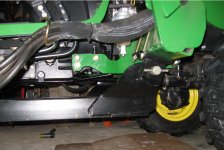
6. Attach subframe to backhoe.
-can leave backhoe on pallet, but need to jack it up to get clearance to attach frame and bolt into place.
-power beyond hydraulic line may interfere a little when fitting the subframe to the hoe - mine did and I had to reposition it slightly to get the pieces to mate.
-set the subframe on cardboard to protect it while you slide it into position.
-torque bolts - this is where the big, bad Harbor Freight 100-600 lb-ft torque wrench comes in, you need 280 lb-ft on the hoe/subframe attaching bolts.
-bolt behind hose and the two on the bottom are hard to get to - need to torque the bottom ones after the unit is on the tractor.
Well, guys, that's about it for now. Hate to leave you with a cliff-hanger, but I ran out of time before dark yesterday, so did not have time to actually mount the unit up or try it out. I will do that in the near future and report back.
Overall, everything went together smoothly and all the parts fit as advertised. It took me about 5 hours to get this far, but I'm a slow worker and tend to screw around a lot in between steps. I am not the worlds greatest mechanic, but did not feel overwhelmed by any of this.
Hope this has been of some help.
First, some tools you might need (in addition to regular wrenches and socket set):
-torque wrench that goes up to 280 lb-ft
-air wrench (not required, but makes it a lot easier to tighten down the big hoe/subframe attaching bolts)
-drift
-rubber/plastic hammer
-mover's dolly
-floor jack
-couple of big pieces of cardboard
A note about the instructions: at first, I only saw the installation instructions in the manual that is taped to the operator's station. However, I found that there was a much more comprehensive set of installation instructions in the bag containing the mounting hardware that gives all the required torque numbers, etc.
Assembly Procedure:
1. Remove bolts/straps holding the stabilizer legs and hoe to the pallet. Note, the main bolts holding it on to the pallet (under the stabilizer mounts) go all the way through the pallet and if you don't remove them before you set it down, you can't get them out - don't ask how I found this out...).
2. Remove wire/pins holding the stabilizer hydraulic rams in their shipping position and mount them and stabilizers to the hoe.
3. Attach bucket. I thought this would be the easiest part, but getting the pins through all the pieces, including the two bushings that are sandwiched between the linkage and the bucket, takes some time and patience. Before you use your plastic hammer to drive the pins into their final position, you need to make sure the holes for the retainers line up with the holes in the bucket pretty well. After you get the pins in position, use the drift to line up the holes perfectly so the retainers will go in. I greased all the pieces up real well before sliding in the pins.
Incidentally, the instructions say "use bushings as needed". Mine had enough play to take all the bushings. Also, when installing the first pin, you can use the seond one to line up the other end of the bucket/bushing assembly so it goes together easiser. When you're installing the second one, you just have to do the best you can.
4. Remove all the three-point hitch stuff and the old draft arm pin mount. Install new draft arm pin mount with new bolts provided. Torque the bolts as indicated. Note, you will re-use the old PTO shroud, draft arm pins and drawbar.
5. Install subframe hangers.
-use furniture dolly to roll subframe under tractor
-install hangers on the loader mounts, but don't tighten the nuts, you need to be able to reposition them.
-instructions say to place the hangers so that the outer sideof the hanger is 7 1/2 inches from the loader frame plate, but 6 3/4 inches worked on mine.
-slide the subframe into place (while lifting up on the rear to get the hooks in place on the draft arm pins) and raise the front of the subframe up to test fit the pin/hanger placement.
-torque hanger nuts.
6. Attach subframe to backhoe.
-can leave backhoe on pallet, but need to jack it up to get clearance to attach frame and bolt into place.
-power beyond hydraulic line may interfere a little when fitting the subframe to the hoe - mine did and I had to reposition it slightly to get the pieces to mate.
-set the subframe on cardboard to protect it while you slide it into position.
-torque bolts - this is where the big, bad Harbor Freight 100-600 lb-ft torque wrench comes in, you need 280 lb-ft on the hoe/subframe attaching bolts.
-bolt behind hose and the two on the bottom are hard to get to - need to torque the bottom ones after the unit is on the tractor.
Well, guys, that's about it for now. Hate to leave you with a cliff-hanger, but I ran out of time before dark yesterday, so did not have time to actually mount the unit up or try it out. I will do that in the near future and report back.
Overall, everything went together smoothly and all the parts fit as advertised. It took me about 5 hours to get this far, but I'm a slow worker and tend to screw around a lot in between steps. I am not the worlds greatest mechanic, but did not feel overwhelmed by any of this.
Hope this has been of some help.
Attachments

rtdiggr
Platinum Member
I know it probably shouldn't be said but i will say it anyway, keep an eye on the bolts,especially the large ones that connect the hoe to the subframe. I have lost one bolt and the other have been loose a couple of times.Runner said:Still no install yet, but have been reading instructions. Looks to be fairly simple, however, I can't find any torque #'s for the bolts holding the backhoe to the subframe. I guess "good 'N tignt" will just have to do...
Shane
Chris2520
Platinum Member
Runner said:As promised, here is the write up for the install on the 46 backhoe.
First, some tools you might need (in addition to regular wrenches and socket set):
-torque wrench that goes up to 280 lb-ft
-air wrench (not required, but makes it a lot easier to tighten down the big hoe/subframe attaching bolts)
-drift
-rubber/plastic hammer
-mover's dolly
-floor jack
-couple of big pieces of cardboard
A note about the instructions: at first, I only saw the installation instructions in the manual that is taped to the operator's station. However, I found that there was a much more comprehensive set of installation instructions in the bag containing the mounting hardware that gives all the required torque numbers, etc.
Assembly Procedure:
1. Remove bolts/straps holding the stabilizer legs and hoe to the pallet. Note, the main bolts holding it on to the pallet (under the stabilizer mounts) go all the way through the pallet and if you don't remove them before you set it down, you can't get them out - don't ask how I found this out...).
2. Remove wire/pins holding the stabilizer hydraulic rams in their shipping position and mount them and stabilizers to the hoe.
3. Attach bucket. I thought this would be the easiest part, but getting the pins through all the pieces, including the two bushings that are sandwiched between the linkage and the bucket, takes some time and patience. Before you use your plastic hammer to drive the pins into their final position, you need to make sure the holes for the retainers line up with the holes in the bucket pretty well. After you get the pins in position, use the drift to line up the holes perfectly so the retainers will go in. I greased all the pieces up real well before sliding in the pins.
Incidentally, the instructions say "use bushings as needed". Mine had enough play to take all the bushings. Also, when installing the first pin, you can use the seond one to line up the other end of the bucket/bushing assembly so it goes together easiser. When you're installing the second one, you just have to do the best you can.
4. Remove all the three-point hitch stuff and the old draft arm pin mount. Install new draft arm pin mount with new bolts provided. Torque the bolts as indicated. Note, you will re-use the old PTO shroud, draft arm pins and drawbar.
5. Install subframe hangers.
-use furniture dolly to roll subframe under tractor
-install hangers on the loader mounts, but don't tighten the nuts, you need to be able to reposition them.
-instructions say to place the hangers so that the outer sideof the hanger is 7 1/2 inches from the loader frame plate, but 6 3/4 inches worked on mine.
-slide the subframe into place (while lifting up on the rear to get the hooks in place on the draft arm pins) and raise the front of the subframe up to test fit the pin/hanger placement.
-torque hanger nuts.
6. Attach subframe to backhoe.
-can leave backhoe on pallet, but need to jack it up to get clearance to attach frame and bolt into place.
-power beyond hydraulic line may interfere a little when fitting the subframe to the hoe - mine did and I had to reposition it slightly to get the pieces to mate.
-set the subframe on cardboard to protect it while you slide it into position.
-torque bolts - this is where the big, bad Harbor Freight 100-600 lb-ft torque wrench comes in, you need 280 lb-ft on the hoe/subframe attaching bolts.
-bolt behind hose and the two on the bottom are hard to get to - need to torque the bottom ones after the unit is on the tractor.
Well, guys, that's about it for now. Hate to leave you with a cliff-hanger, but I ran out of time before dark yesterday, so did not have time to actually mount the unit up or try it out. I will do that in the near future and report back.
Overall, everything went together smoothly and all the parts fit as advertised. It took me about 5 hours to get this far, but I'm a slow worker and tend to screw around a lot in between steps. I am not the worlds greatest mechanic, but did not feel overwhelmed by any of this.
Hope this has been of some help.
Nice pics runner.
Looks like you are really makeing some headway.
You should be digging a trench , in no time.....
Chris....