jgoodma1
Bronze Member
Well, I've been wanting to rig up a contraption for carrying my chainsaw on my Kubota L4060 so I wouldn't have to put it in the bucket when I'm in the woods cutting up downfallen trees. I know there are kits on the market like SawHaul, but I didn't want to spend $180 on the thing and I'm not crazy about the polyethylene scabbard on the SawHaul. I keep my saw sharp and just with just sliding my Stihl scabbard on and off the bar, I quickly cut through the top and bottom edge of the scabbard from it rubbing against the teeth of the chain. I also don't know how to weld and even if I did, I did not want to design something where I would be grinding away paint and having to repaint raw steel. I think this idea would be pretty adaptable to most compact and subcompact tractors.
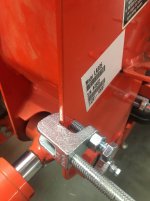
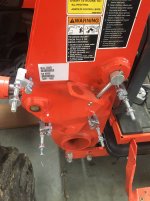
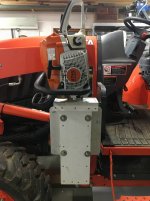
The u-bolt attachment method for the SawHaul only gives you 2 connection points and I wanted something a bit more rigid than that. What I came up with was using beam clamps (top-of-beam type) that just clamped to the steel plate on the driver's side of the FEL where the FEL arm and cylinder attach.
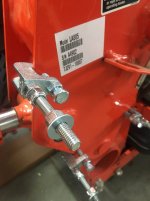
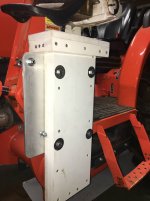
So, I attached 4 beam clamps that receive 3/8" threaded rod. The locations of the 4 clamps just need to be accessible, not interfere with the loader cylinder, and fit within a 12" x 12" square area. The reason for that 12x12 dimension is that I attached a leftover piece of 12" x 12" x 1/4" thick aluminum plate to 4 pieces of 3/8" threaded rod, each 4" long and threaded onto and projecting equally from the 4 beam clamps. I then screwed a nut all the way onto each piece of threaded rod and tightened each nut against the beam clamp to act as jam nuts and prevent possible loosening. I then held up the aluminum plate to the projecting pieces of threaded rod and marked their locations on the backside of the aluminum plate. I drilled 0.50" diameter holes through the aluminum plate in each of the 4 locations. Then I screwed 4 nuts 3/4" onto the threaded rod to act as standoffs, slid a washer onto each rod up to the nut, slid on the aluminum plate, slid on another washer, and then screwed on another nut. All the nuts I used were nylon lock nuts to prevent any of them from loosening from vibration.
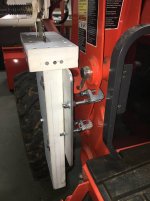
With the mounting plate in place, I now attached the scabbard that will hold the saw. I made my own scabbard out of cellular PVC. For those of you not familiar with this material, it is used in the home building business as a substitute for lumber in exterior trim and siding installations. I had a millwork manufacturing business and used this material extensively. It can be cut and shaped with standard woodworking/carpentry tools. It also can be screwed together without pre-drilling, without fear of it splitting like wood. It comes in a variety of thicknesses from 1/4" thick up to 1-1/2" thick. In the case of building the scabbard, I used 5/8" thick material that is readily available from lumberyards that cater to the professional builder. It comes in standard dimensional lumber widths, as well as 4x8, 10 ,12 & 18' sheets. A couple of the better known brands are Azek and Versatex. You won't find this thickness and size assortment at big box stores. Another great feature of this material is that it can be glued with standard PVC cement that is used with PVC plumbing pipe. PVC cement "solvent welds" the material together and it cannot be pulled apart. In the case of my saw scabbard, I both glued and screwed the material together.
So, this PVC material is much thicker than the polyethylene used for the SawHaul scabbard and will be much more durable. And, a new scabbard can be easily made again if for some reason in the distant future, you need to do that. I'm not going to go into the specifics of making the scabbard, because it's pretty self-evident from the attached photos. Depending on the size of your saw and bar, make the scabbard accordingly. With my saw, I made a 4" wide, 5/8" deep, 20" long slot. I used 3 layers of 5/8" PVC. The front and back layers were 7" wide and 20" long, with 1-1/2" wide filler pieces along the edges for the middle layer to create the 4" wide slot (1.5 + 4 + 1.5 =7). I screwed a 1-1/2" tall block in place at the bottom of the slot for the tip of the bar to rest on. This block can be replaced if needed. I built up a rim at the top, the top layer of which is removable for replacement if it gets chewed up from sliding the saw into and out of the scabbard.
After making the scabbard, I bolted it to the aluminum mounting plate, with the four 3/8" x 3-1/2" bolts passing through the 1-1/2" wide area along the sides of the scabbard, and through the aluminum plate. I again used a washer and nylon lock nut to secure the bolts.
It works great, is rock solid and easy to remove, and easy to repair, if necessary. It also drops the saw a little lower than the SawHaul so it's easier for a vertically-challenged, (and old) guy, like myself, to lift the saw high enough to easily slide it into the scabbard.
The u-bolt attachment method for the SawHaul only gives you 2 connection points and I wanted something a bit more rigid than that. What I came up with was using beam clamps (top-of-beam type) that just clamped to the steel plate on the driver's side of the FEL where the FEL arm and cylinder attach.
So, I attached 4 beam clamps that receive 3/8" threaded rod. The locations of the 4 clamps just need to be accessible, not interfere with the loader cylinder, and fit within a 12" x 12" square area. The reason for that 12x12 dimension is that I attached a leftover piece of 12" x 12" x 1/4" thick aluminum plate to 4 pieces of 3/8" threaded rod, each 4" long and threaded onto and projecting equally from the 4 beam clamps. I then screwed a nut all the way onto each piece of threaded rod and tightened each nut against the beam clamp to act as jam nuts and prevent possible loosening. I then held up the aluminum plate to the projecting pieces of threaded rod and marked their locations on the backside of the aluminum plate. I drilled 0.50" diameter holes through the aluminum plate in each of the 4 locations. Then I screwed 4 nuts 3/4" onto the threaded rod to act as standoffs, slid a washer onto each rod up to the nut, slid on the aluminum plate, slid on another washer, and then screwed on another nut. All the nuts I used were nylon lock nuts to prevent any of them from loosening from vibration.
With the mounting plate in place, I now attached the scabbard that will hold the saw. I made my own scabbard out of cellular PVC. For those of you not familiar with this material, it is used in the home building business as a substitute for lumber in exterior trim and siding installations. I had a millwork manufacturing business and used this material extensively. It can be cut and shaped with standard woodworking/carpentry tools. It also can be screwed together without pre-drilling, without fear of it splitting like wood. It comes in a variety of thicknesses from 1/4" thick up to 1-1/2" thick. In the case of building the scabbard, I used 5/8" thick material that is readily available from lumberyards that cater to the professional builder. It comes in standard dimensional lumber widths, as well as 4x8, 10 ,12 & 18' sheets. A couple of the better known brands are Azek and Versatex. You won't find this thickness and size assortment at big box stores. Another great feature of this material is that it can be glued with standard PVC cement that is used with PVC plumbing pipe. PVC cement "solvent welds" the material together and it cannot be pulled apart. In the case of my saw scabbard, I both glued and screwed the material together.
So, this PVC material is much thicker than the polyethylene used for the SawHaul scabbard and will be much more durable. And, a new scabbard can be easily made again if for some reason in the distant future, you need to do that. I'm not going to go into the specifics of making the scabbard, because it's pretty self-evident from the attached photos. Depending on the size of your saw and bar, make the scabbard accordingly. With my saw, I made a 4" wide, 5/8" deep, 20" long slot. I used 3 layers of 5/8" PVC. The front and back layers were 7" wide and 20" long, with 1-1/2" wide filler pieces along the edges for the middle layer to create the 4" wide slot (1.5 + 4 + 1.5 =7). I screwed a 1-1/2" tall block in place at the bottom of the slot for the tip of the bar to rest on. This block can be replaced if needed. I built up a rim at the top, the top layer of which is removable for replacement if it gets chewed up from sliding the saw into and out of the scabbard.
After making the scabbard, I bolted it to the aluminum mounting plate, with the four 3/8" x 3-1/2" bolts passing through the 1-1/2" wide area along the sides of the scabbard, and through the aluminum plate. I again used a washer and nylon lock nut to secure the bolts.
It works great, is rock solid and easy to remove, and easy to repair, if necessary. It also drops the saw a little lower than the SawHaul so it's easier for a vertically-challenged, (and old) guy, like myself, to lift the saw high enough to easily slide it into the scabbard.
Attachments
-
 CHAINSAW CARRIER 1.jpg583.8 KB · Views: 759
 -
 CHAINSAW CARRIER 2.jpg669.3 KB · Views: 652
 -
 CHAINSAW CARRIER 3.jpg562.9 KB · Views: 621
 -
 CHAINSAW CARRIER 4.jpg725 KB · Views: 693
 -
 CHAINSAW CARRIER 5.jpg639.9 KB · Views: 718
 -
 CHAINSAW CARRIER 6.jpg553.3 KB · Views: 732
 -
 CHAINSAW CARRIER 7.jpg571.6 KB · Views: 748
 -
 CHAINSAW CARRIER 8.jpg672.6 KB · Views: 946
Last edited:

