Horse barn project

   / Horse barn project
  • Thread Starter
#11  
Nice job! I have the floating floor in our stable as well, although my building sits on a 8x8 PT sill (each time I clear a little more property to expand the riding arena I end up moving the building).

The first floating floor I installed I used spruce, knowing that I'd be relacing it in 3-5 years. Two years ago I replaced one of the 10x12 stall planking with popular that I milled from our property. I used three 12' 6x6 (two along the edges and one down the center) for support and I can say that after two winters the planking is as solid and as flat as the day I laid it down. Literally no wear at all and the floor provides the spring needed to ensure the horses don't suffer from leg ailments. Glad I took the advice of a local gentlemen who swore by it's use for stall floors. I guess there's a reason popular is used for planking flat beds, it sure does stand up!

Regards

Someone told me that about poplar, it slipped my mind I guess. If I can find some I may try it this time, we've got a couple local guys that mill rough cut lumber. Come to think of it, we've got a couple big poplars that I was going to cut anyway, if they're solid we might use them.

Sean
 
   / Horse barn project #12  
Great start to your barn. Did you have to use a knee wall due to size? We built a 30x26.5' barn on slab. Centre aisle is 10' wide. Stalls (2 plus spare) have hemlock planks over concrete. We take the hemlock out once a year and pressure wash. No signs of rot - 6+ years. We also have had no issues with splintering with the hemlock. Centre aisle have rubber matts with drains below. There are 10x10' double sliding doors opposite each other for good ventilation plus I can drive truck/tractor and trailer through the barn. We have a loft upstairs for hay and a hay elevator. Horses have exterior and interior doors to stalls - exterior entrance has a roof overhang.

Keep the pics coming...

Lloyd
 
   / Horse barn project
  • Thread Starter
#13  
We used the knee (frost) wall because the area under the stalls will be open for drainage and also to give us room to hang the planks. The main area of the barn will be a slab with a raised lip to keep any water away from the walls and to make it easier to scoop against a concrete edge.

We're planning a concrete slab with a short wall on the outside of the barn to give us a manure storage area that I can scoop with the tractor when it gets full. I don't mind shoveling sh** once, but two or three times gets old in a hurry.

We decided to go with ground floor hay storage. We only need about 200 square bales a year, neither of us likes stairs any more (not getting younger that I've noticed), and we're hoping the ground level storage will help keep dust in the barn down a bit.

Both our normal stalls will have interior/exterior doors, so they can come and go as they please during the day. We don't have as much shelter as we'd like for them outside until I can get a run-in shed built in a few years, so they can get out of the summer sun in the barn if they want.

Sean
 
   / Horse barn project #14  
We decided to go with ground floor hay storage. We only need about 200 square bales a year, neither of us likes stairs any more (not getting younger that I've noticed), and we're hoping the ground level storage will help keep dust in the barn down a bit.

Just keep in mind that hay stored on a concrete floor will absorb moisture and mold. If you only keep a few bales at a time you will probably be ok, but if you get all your bales at once andthey sit for a while your bottom couple of rows will probably get moldy. There are thing that you can do to try to eliminate that though.
 
   / Horse barn project #15  
Just keep in mind that hay stored on a concrete floor will absorb moisture and mold. If you only keep a few bales at a time you will probably be ok, but if you get all your bales at once andthey sit for a while your bottom couple of rows will probably get moldy. There are thing that you can do to try to eliminate that though.

We use wooden shipping pallets to avoid this problem. They work great and when you are done with them, they are great for the burn pile/outdoor fire ring.:D
 
   / Horse barn project
  • Thread Starter
#16  
Just keep in mind that hay stored on a concrete floor will absorb moisture and mold. If you only keep a few bales at a time you will probably be ok, but if you get all your bales at once andthey sit for a while your bottom couple of rows will probably get moldy. There are thing that you can do to try to eliminate that though.

We use wooden shipping pallets to avoid this problem. They work great and when you are done with them, they are great for the burn pile/outdoor fire ring.

That's what we had planned, actually :) A friend of ours does the same thing, although he said he lost a few bales even using pallets. We may try a layer of vapour barrier on the floor under the pallets before we put them down.

The only pitfall I can see is the pallets being a pain to walk on once the hay gets used up a little. If the budget will allow it I may lay some sheets of 1/2 plywood on top of the pallets to allow a better surface to walk on. It would be expensive up front, but the pallets and plywood can be re-used in future years.

The barn we're in now has a great loft area, but it's probably over 30 feet tall too, with room for 20+ horses. Really nice design, the guy who designed it was a good friend of ours, the stall configurations can be re-worked fairly quickly to go from about 7 box stalls to over 20 straight stalls without too much trouble.

We didn't want to go too high, the barn is in an open area and we'd like it to complement the house style.

Sean
 
   / Horse barn project #17  
Additional layers of pallets will do you more good then a vapor barrier. 2 layer of pallets is ok, but 3 is ideal. The moisture/mold issue is caused by the temperature difference (dew point) more then moisture migration. The main two ways to eliminate that are to either increase the distance between (moving that dew point location to somewhere in the pallets) or to insulate between the two (either a 6-8" layer of loose straw or hay prayed with a mold inhibitor, or foam insulation) I haven't ran the numbers, but you may be able to stack right ontop of a layer of 1 1/2" foam insulation. Depending on how many you store at a time it may not be cost effective, but it would be a lot easier to walk on.

Sorry to get off topic, I just didn't want to see you loose a bunch of bales if you didn't know that......the barn looking good though
 
   / Horse barn project
  • Thread Starter
#18  
We backfilled the foundation on Friday, and built up the driveway area in front of the barn with pit-run and crusher-run rock. Started stripping top-soil from the riding ring area, but with the amount of rain we had last week it's a bit damp for that just now.

Unless it's raining tomorrow we should be able to start framing. It's me and two slightly older fellas, so I expect a pretty relaxed pace. Our target is to have the roof on and tight in two weeks, weather permitting.

Sean
 

Attachments

  • DSC01018.jpg
    DSC01018.jpg
    380.9 KB · Views: 179
  • DSC01019.jpg
    DSC01019.jpg
    475.9 KB · Views: 194
  • DSC01021.jpg
    DSC01021.jpg
    361.4 KB · Views: 162
  • DSC01022.jpg
    DSC01022.jpg
    342.5 KB · Views: 184
   / Horse barn project
  • Thread Starter
#19  
First day of framing on the barn project. We got off to a late start once materials arrived, but then things moved along pretty well. After a few days of working together it always gets smoother as you start to anticipate what your partners are going to want next.

We're using tripled 2 x 10 over each 8 foot doorway, and doubled over each window and smaller doors. 2 x 6 walls (exterior).

Sean
 

Attachments

  • DSC01026.jpg
    DSC01026.jpg
    387.3 KB · Views: 249
  • DSC01025.jpg
    DSC01025.jpg
    350.7 KB · Views: 641
   / Horse barn project
  • Thread Starter
#20  
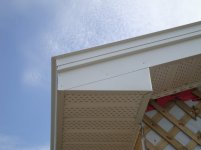
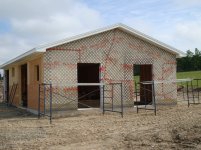
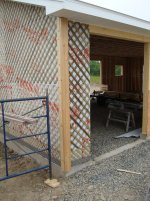
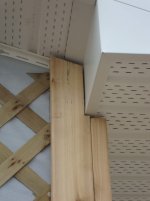
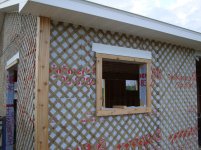
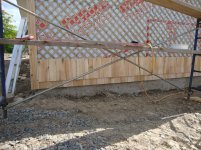
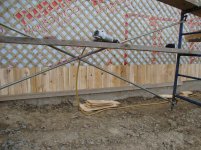
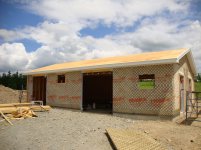
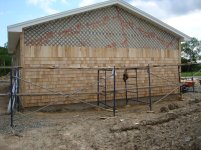
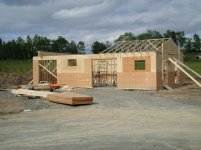
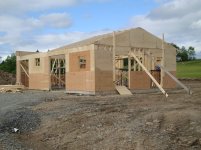
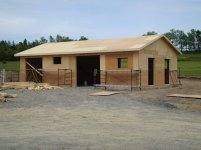
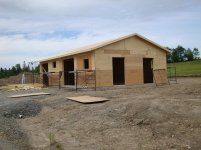
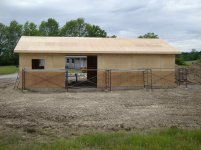
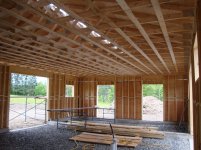
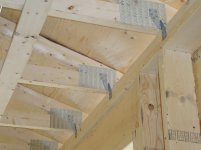
More framing today, we have trusses arriving tomorrow, and should have the roof on before the weekend if all goes well. I've attached a few pics showing the groove in the concrete where the suspended plank floor ends will sit.

Sean
 

Attachments

  • DSC01029.jpg
    DSC01029.jpg
    352.3 KB · Views: 174
  • DSC01030.jpg
    DSC01030.jpg
    344.3 KB · Views: 170
  • DSC01033.jpg
    DSC01033.jpg
    524.4 KB · Views: 170
  • DSC01035.jpg
    DSC01035.jpg
    330.5 KB · Views: 157
  • DSC01036.jpg
    DSC01036.jpg
    454.3 KB · Views: 272

Tractor & Equipment Auctions

Wolverine BC-13-72W, 72" Skid Steer Brush Cutter (A52384)
Wolverine...
2008 Jeep Compass (A50120)
2008 Jeep Compass...
2008 Saturn VUE SUV (A50324)
2008 Saturn VUE...
2017 Bomag BW90 AD-5 Vibratory Articulating Tandem Smooth Drum Roller (A50322)
2017 Bomag BW90...
2019 INTERNATIONAL 4400 SBA 4X2 SERVICE TRUCK (A51406)
2019 INTERNATIONAL...
2011 Nissan Titan SV 4x4 Crew Cab Pickup Truck (A50323)
2011 Nissan Titan...
 
Top