House for my Parents

   / House for my Parents #491  
That'll work too...and in the event you had some very unlevel floors (or didn't want to use any shoe) you can always rip the toekick at an angle on the table saw. (this can start to look goofy with a BIG gap difference in a run of cabinets, but so will shoe mold with a different "reveal")

Any custom cabinetry I've built (not kitchens) going on hardwood/tile, I never had much of a problem with the floors, probably 98% being new-ish homes, which helps (usually :D)
 
   / House for my Parents #492  
What's the height of the toekick "panel"/cover that you received with your cabinets Eddie? (the cabinets are pre-manufactured/not custom, correct?) Does it leave you plenty of room to hide a 3/4" gap from one end to the other, if needed?

I haven't installed a pre-man. kitchen in 10-12 years and only did a couple so I don't remember what the situation was then.
 
   / House for my Parents #493  
That'll work too...and in the event you had some very unlevel floors (or didn't want to use any shoe) you can always rip the toekick at an angle on the table saw.

I started to type out how to do this, for anyone that hasn't done it then figured a couple of drawings would be easier (my typed version read as gooblygook :D)

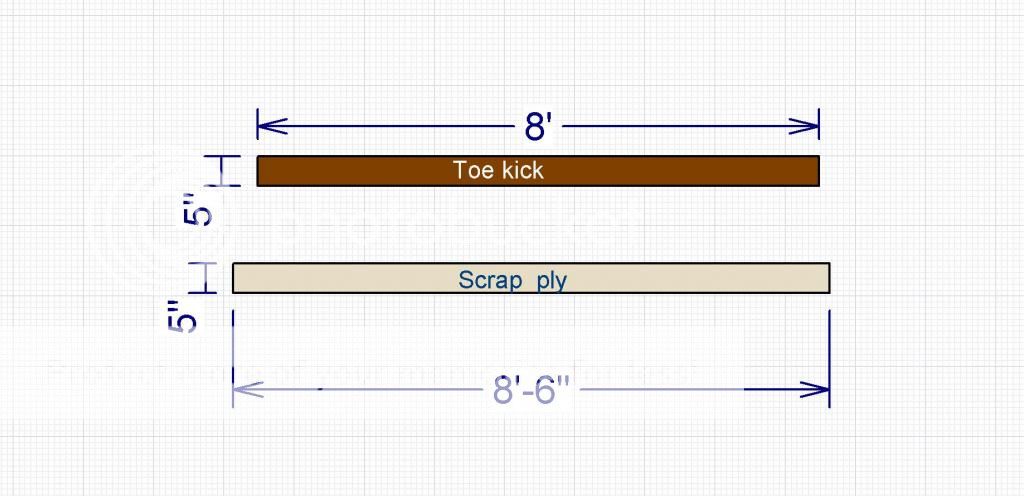
Let's say for instance you've shimmed your cabinets to be plumb (vertically level) along an 8' wall. One end has a 1" gap at the floor (think VERY unlevel floor), while there is no gap at the opposite end.

So, you need a toe kick that goes from 5" (on the 1" gap end) down to 4" on the opposite end. (here's hoping you have at least a 5" tall toe kick on hand :laughing:)

1) Find/cut a scrap (I use plywood) that is 5" wide (the largest meas. needed for your toe kick) x a bit over 8'


2) Tack/nail/double stick tape your toe kick to ply (I like a 23 ga. pinner) like so...


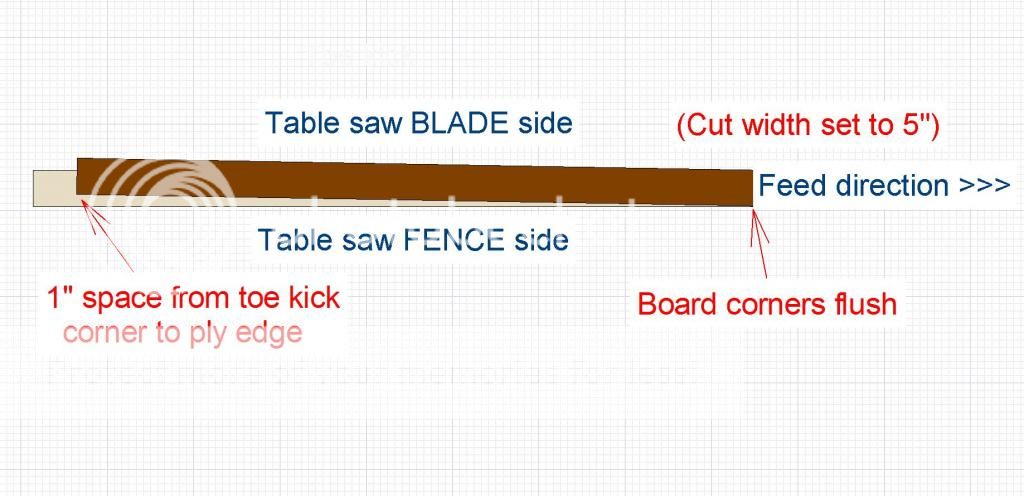
Run it through your table saw, and you've got your tapered toe kick, in the above example 4" on left, 5" on right. (and yes, flip it end for end before installing it on our example, wisenheimers)

I used this method a LOT for boxing out basement windows when finishing up basements, many times each side of the "box" (window jamb) were of different sizes, often tapered. Works like a charm.

If you've got a festool (or other brand) track saw...disregard all the above rigamorale and just set your track on your cut marks and cut away.

**Edit, to add**

Leave yourself a couple inches extra on your toe kick so you can "square" the ends off, this is important if you have to cut much of an angle along the length of the toe kick to get your proper taper.

Aw heck, just re-do the floors to get 'em level. :laughing:
 
Last edited:
   / House for my Parents
  • Thread Starter
#494  
The toe kick on my cabinets goes on the front of my cabinets. While installing them, it became obvious that there is enough of a wave in the slab that I needed to add shims to the sides of several cabinets to get them level. The shims are all on the sides of the cabinets, which are hidden by the tile. When I do the island, I'm thinking that I will have to cut the cabinets if I need to make some adjustments. I'm just curious how you guys do this who install cabinets on top of the tile?

Eddie
 
   / House for my Parents #495  
Eddie, can you not run shoe mold around the bottom of the cabinet? Or am I not "seeing" what you're talking about?

If it's just the sides, you can always add a finished end panel, cut to size. Since I don't really have a clue what your issue is, or what you're afraid it might be, I give up for now. :laughing:
 
   / House for my Parents #496  
Eddie,

I do it the same as JF described. Most kitchens in this area have the floor fully tiled ( under all cabinets ). I have found it very rare to have a floor off more than a 1/2 inch. Most are under a 1/4 inch. Utilize whatever shims you prefer, install the kick plate and finish off with a shoe molding of your choice that will cover the gap. I have never had a customer notice it and you would be hard pressed to see it without getting down on the floor. Also, if I understand you correctly, you install the tiles around the base of the cabinet and shim the cabinets off the subfloor. This would create the same effect if the floor was off except the cabinets are lower by the thickness of the tile. The only difference would be that you don't see a gap. You would then have to rip the kick plate to fit the difference in the opening. Right?
 
   / House for my Parents
  • Thread Starter
#497  
I put the kick plate in before I tile, then grout up to the cabinet. Molding works. I just hadn't thought it through or what it would look like. In this house, two of my cabinets needed shims. They where not off by much, but it was pretty easy to just shim them up to get them perfect.

Eddie
 
   / House for my Parents #498  
Ok, I see what you mean now. I originally thought you installed the kick plate after the tile was installed up to the cabinets. I would assume, that as long as the floor is not off by more than the thickness of the tile you are ok. And if it is, you can always adjust the kick plate to make up the difference.
 
   / House for my Parents #499  
Sorry, I was wondering how you hide the shims when you put the cabinets on top of the tile. I use standard wood shims, that are used for doors. I've used the plastic ones on toilets, but really like how easy the wood ones are to cut and hide. With cabinets on the slab, it's easy to hide the shims with the tile. How do you hide the shims when the cabinets are on the tile?

Eddie


Eddie, morning... When we remodeled, the cabinet guy did all the inside trim in the house also.... He continued the trim around the bottom of the base cabinets using the same stain the cabinets had.... In front of the dishwasher, he put a piece of trim in, using screws so it could be removed..... It looked first class when he was done....
 

Tractor & Equipment Auctions

2015 Dodge Grand Caravan (A53424)
2015 Dodge Grand...
Compact Track Loader Skid Steer (A55851)
Compact Track...
2003 Pierce Tilt Cab Foam Pumper Fire Truck (A55852)
2003 Pierce Tilt...
2013 Chevrolet Impala Sedan (A55853)
2013 Chevrolet...
2014 Nissan Juke (A55758)
2014 Nissan Juke...
Decorative Metal Butterfly (A55758)
Decorative Metal...
 
Top