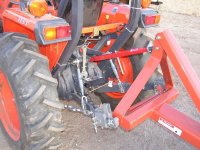
Reddirt, I did have to knock the corners off the top of the blade to allow 360, about an inch from the edge and an inch down the side, cut off at an angle. Before the mod I was always getting hung up on knoles, but now I have plenty off clearance. Tim
Racer,
Did you get the adjustable side links from Kubota or did you find an aftermarket? If aftermarket, where?
Tim,
When I checked my 360 rotation it looked like the same trim of the top of the blade would work for me too. I guess I have an unbranded King Kutter 5'. Overall this now looks like the best solution for my blade: change the side link tabs on the blade to point down not forward. I'm going to see what implications this has on my removable side plates. One plate will need to be removed to accomplish the rotation but it is only connected by two bolts so it shouldn't be a big deal especially considering the infrequency that this change will be made when the side plates are attached.
I think the other good solutions are adding the additional adjustable side link (or shorter fixed length side link) and re-drilling the arm attachment holes forward of their stock locations. All these fixes are pretty easy and any, or a combination, should now lift the blade substantially higher.
The $29 is a good price if it works. The compactractor.com picture shows their adjustable side links have a ball joint at one end. This seems to be what you have from your earlier photos.
The bx23 requires a fork at both ends of the adjustable link because the ball joint is attached to the lift arm that is attached to the tractor. Kubota wants $90.92 for a replacement adjustable side link assembly, part # K2656-38220.
If I can do it without creating a bind at full lift, I'm going to see if I can drill a pair of additional holes in my lift arm lower forks to make them shorter.
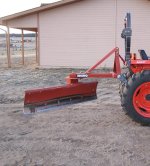
My new lifting links showed up. This was quick. I ordered them on Monday and they are here on Thursday. They look nice. They will shorten the lifting arm by 5-6 inches which will really raise the blade.
The don't fit.
The forked end is too skinny. It is 13/16 wide and I need 1 inch. If 13/16 will work for you then go for it. The ball end worked fine.
I will be calling them tomorrow to see what we can do.
Great work Stan.
I'll bet that makes you happy.
BTW, you clickable thumbnails don't open up in a separate window automatically like a Photobucket account. I see you are doing it our of a TBN. I didn't know you could do that.
OK thanks, I wondered about that.
I think it's a great improvement instead of the image link. It gives you a preview of what you're talking about. Now, if they could make it open in a separate window automatically instead of right mouseclicking to do it, that would be even better.
I don't want to deviate from the thread too much but I was surprised at Racer's thumbnail.
I use Mozzilla Firefox Greg, and the Photobucket thumbnails open in a separate window automatically.

")