Raspy
Veteran Member
- Joined
- Dec 16, 2006
- Messages
- 1,656
- Location
- Smith Valley, Nevada
- Tractor
- NH TC29DA, F250 Tremor, Jeep Rubicon
mx,
There certainly are a lot of ways to do concrete construction and I didn't mean to imply my way was the best or only way to do it. You're right, concrete will crack and you have to deal with it somehow, but as long as you have a good amount of rebar, you don't have to worry about the PEX breaking. I don't like the idea of cutting joints in later because you really don't know how close the tube is too the surface after the pour. During your pour preparation, try to avoid any L shaped pours with inside corners. These WILL crack at the corner. If you must do it that way lay a row of about 6 bars diagonally near the corner.
As I mentioned in my earlier post, a careful tube layout is really important. Uniform spacing specific to the rooms and plenty of tube with 9 or 12 inch spacing in the general areas and 6 to 8 inches in the bathrooms. And extra pass of tubing near the front door and in front of the shower or tub is nice. use the hall to get from the manifold to the bedrooms and don't worry too much about too much tube in that area. Imagine where you will be walking and when. Route the tubing to accommodate your lifestyle. Divide the house into commonly used zones and make those the thermostat zones. Put balancing vales on the manifold so you can regulate the flow to each loop within each zone. This way you can adjust the heat level in each room or turn one room off if needed.
And be sure you have sufficient power in the boiler. I do them with 25 BTU minimum under most circumstances, but with fewer zones you can go higher.
I have some running with about 75 BTU/ft with single thermostats. If you get down to about 10 BTU/ft you'll get very poor response and will have to leave the system running all the time. This leads to inefficiency.
I'll talk to you about thermostat strategies if you wish.
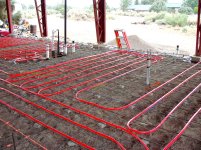
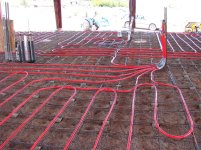
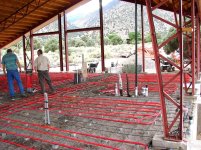
Without wanting to start an argument here, I'd simply point out that the pictures Spiker sent of his layout are a poor example of how to do it. Random looping with no uniform spacing, far too much space or too little tube per square foot and no protection for the tubing where it enters and exits the slab. These will haunt the system later and make the heating uneven. No offense intended, just a good example to learn from.
John
Wedge,
No insulation under the slab.
The house is on a slight slope and the inside of the footings and stem walls are insulated with 2" Blue Board down 3 to 5 feet.
It sits on decomposing granite ground with 1 to 5 feet of 1 1/2 inch rock (depending on which side of the house) , then a compacted layer of sand.
The heat is held back about 1 1/2' from the outside.
Underslab insulation only slows the heating of the ground under the house. That ground becomes additional mass. Without air movement or water under there, there is no loss to the surroundings straight down. Just mass that absorbs at a slightly faster rate than if if was insulated.
I also was interested in having the maximum stability of the slab and leery of supporting the slab on insulation that would deteriorate and crush down over time.
For someone that wants underslab insulation, the best way I've seen is to use void forming. Or just insulate the first two feet in around the perimeter, below the slab, and let it form a bridge from the footing to the uninsulated area.
This is designed as an 8" slab that is used as partial solar storage. I plan to supplement the heat with wood because I like wood heat so much and have a lot of oak and pinion available.
The slab energy source will be oil primarily. I've found that a low grade heat in the slab, to make it "invisible" to the touch, and a nice fire to add ambiance, is about as good as it gets.
With this system I can leave the Garage cold until I want to work on a project, the Pantry always cold, the Guest Bedroom cold until guests arrive, the Master Bedroom warm in the morning and cool at night and the Great Room/Kitchen very warm all evening. The boiler waste heat will heat the Laundry Room and, partially, the Garage. All of this control comes very simply with setback thermostats and manifold balancing valves. It also means very little loss because only the zones being used are warm and the floor is never hotter than necessary.
John:
what you have there is a home with heating, the person posting to is building a pole barn like mine for working in and keeping warm enough to do something in it.
My barn has heating tubes laid out well and at 280' per loop so making tight bends like yours will kill water flow very bad for in-floor heating systems. This was a mistake made by my co-worker who did his barn used nice tight bends like yours his flow cant get up as the 250 spools he put in were OK but many tight bends killed the flow rate. as far as too little loops I followed a radiant contractors recommendation as far as keeping 6" apart from loop to loop at the perimeter of the slab and farther apart on the interior of the slab. Under the lean-too is for ice melting only and will not be run ever unless I decide to enclose it and even then only part of it.
I have the center beams with tubes moved away from there center beams of the building slab with tubes wider apart in those areas. Reason for this was due to adding anchors later for holding equipment to the BARN floor. Where cars or tractor will be parked I also moved the tubes apart some as I later plan (cost permitting) install a maintenance trench down that section of floor. I had planned on installing slab penetration protection for the tubes but a combination of a wall going there and time constraints I didnt get to it. Where they exit they are well protected against the interior wall should be flush once it is dry-walled.
I also would not think about doing radiant flooring without first installing insulation under all of my floor in Ohio here due to water tables, and ground temps. the ground will pull heat out of a slab like crazy here and is mostly clay stays wet and can frost down to 40" pretty quick. With the Rebar on your slab it pretty much overkill for a home floor I have seen heavy factory floors with less steel in them! My slab is 5~6" thick 6KPSI mix with fiber mesh in it on top of the 6x6 10GA mesh the tube is tied to.
Remember not everything is a one size fits all budgets building plans (usage) has a lot to do with it. Mine will be warm all the time but probably not 70 degrees as that is too warm anyhow. exterior walls are almost 8" and will be heavily insulated. (my next step) planning on some 2+" of CLOSED CELL spray foam once I can save up the $ and then a layer of fiberglass between stud walls and either sheet rock or maybe plywood interior walls on 1st floor. It is being setup for car repair and some equipment mechanical work...
Mark
Floor sensors are generally good when you have a radiant system inside a forced sir system. Such as a radiant kitchen in a house with forced air. Or, if you have a shop that is hard to heat, but want a nice inviting floor. Excellent for working at a lathe, for instance.
But floor sensing will not accurately control the environment because it knows nothing about the air temp and other heat sources.
You could use a floor sensor in the shop and wall thermostats in the living spaces or bedrooms and have better results.
Always choose a setback thermostat and plan to use it as a timer and air sensor both. I'll go into that more if needed.
If you have a very high ceiling, plan on a paddle fan or equal to overcome the stratified heat. This problem is also dealt with by using the thermostats as timers and having a relatively high BTU input to the slab. In other words, blasting the slab for a short period to greet you when you get up, but not long enough to heat the whole house and waste energy by heating upper layers of air.
These are all well proven strategies that I'm touching on to whet your interest and steer you. More info as needed.