You are using an out of date browser. It may not display this or other websites correctly.
You should upgrade or use an alternative browser.
You should upgrade or use an alternative browser.
Installed restricted orifice on my hydraulic toplink today
- Thread starter rjkobbeman
- Start date
- Views: 17456

/ Installed restricted orifice on my hydraulic toplink today
#41
picker77
Gold Member
- Joined
- Feb 4, 2006
- Messages
- 385
- Location
- Central Oklahoma
- Tractor
- JD 3032E, dual remotes, TnT, tooth bar, grapple
No, had to have those made at my JD dealership. I had 3/8" hoses made. The cylinder I used needed SAE 6 males at the cylinder, and of course standard JD QC males at the other end.Thanks man, I got this post book marked, did you have to buy hoses for the side link or did the cylinder come with it?
Whatever cylinder you use, be sure to double verify what port size and connector your cylinder requires before you have hoses made. There are like five different kinds and some of them look a LOT alike. In fact, I'd take the cylinder to the hose shop with me if I were you, to avoid screwing the pooch like I did. I had mine made up with 3/8 NPT males, got home, and they didn't fit. Ended up putting a pair of 45 degree SAE 6 male to 3/8 NPT female swivel adapters on to make them work. Luckily, as it turned out the 45's were a good idea anyway, they made the hoses easier to route and install, LOL.
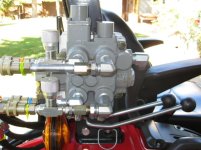
Here are some pictures of my hydraulic top link and side link.
Thanks man, where did you get the sidelink ram it looks like it is made for the side link?
MtnViewRanch
Elite Member, Advertiser
- Joined
- Mar 19, 2005
- Messages
- 10,648
- Tractor
- Mahindra 7520, Mahindra 3215HST, Case 580 extendahoe, Case 310 dozer, Parsons trencher, Cat D6,
Thanks man, where did you get the sidelink ram it looks like it is made for the side link?
It was, I made it. :thumbsup: I have made a few of them for other TBN members.
")
MtnViewRanch
Elite Member, Advertiser
- Joined
- Mar 19, 2005
- Messages
- 10,648
- Tractor
- Mahindra 7520, Mahindra 3215HST, Case 580 extendahoe, Case 310 dozer, Parsons trencher, Cat D6,
Mtn view, are you using a handle type or electric valve for controls? I wonder if I could use a pushbutton and do it like tilt and trim on my old boat? Jy.
I'm using a mono block with 2 valves, 1 with float position that is used for my side link. Sorry that I can't help you out about the electric valves, don't know why you wouldn't be able to use them though. :confused3:
Attachments
OP
rjkobbeman
Platinum Member
First, please let me apologize to user rjkobberman for hijacking his thread, but I thought this info might help somebody else who's getting ready to try this:
Here are some step-by-step photos of my "build a side link cylinder restrictor" exercise. The wire-in-a-slot thing was AKKAMAAN's idea, and it worked fine. The side link action is now really smooth and I can feather it to move as slow as I want.
Photo Key:
Photo 1 -- I used a 3/8 NPT male to 3/8 NPT female swivel for the restrictor's body, and cut threads on the inside of the barrel for about 75% of it's length with a 3/8-16 tap, starting from the long (male) end. Then I cut a 3/4" piece from a 3/8-16 mild steel bolt, cut a screwdriver slot in one end of it with a hacksaw, and used a Dremel and .050" thick cutoff wheel to make a fluid relief slot the full length of the threads. Because the Dremel was handheld during this cut, it's not a perfect .050" slot, it's probably more like .060" or so.
Photo 2 -- After screwing the plug in jam-tight in the barrel, I installed it at the rod end of the cylinder. Resulting cylinder action was noticeably slower, but still too fast for my liking and still a little hard to feather. So I clearly needed yet more restriction, and AKKAMAAN's bent-wire idea seemed the way to go.
Photo 3 -- I cut a piece of stiff .033" nichrome wire and bent the ends 90 degrees, leaving it a bit long to allow some movement back an forth to help avoid future clogging. This resulted in a little more than 1/16" allowed back and forth movement of the wire piece.
Photo 4 -- Another view of the wire in the slot..
Photo 5 -- Reinstalling the restrictor plug and wire in the connector body.
Photo 6 -- End view of the completed restrictor with wire installed.
Once you have the plug and slots made, changing wire sizes is easy to do if you want to experiment. In my case, I got lucky and the .033" diameter wire worked out exactly right the first try.
I did notice that after maybe 8 or 10 full cycles of the side link as I was fooling around testing it, the restrictor body was slightly warm to the touch. I suspect if I jacked it around a LOT it would heat up pretty good. Tiny fluid path, lots of pressure, lots of heat generated. Obviously, this idea wouldn't work well on a long-stroke (loader) cylinder, or a cylinder that gets jacked back and forth a lot. For a small side link, though, it works great.
No worries! Posts often take on a life of their own... but they always seem to provide good info.
jgrreed
Platinum Member
Mtn view, are you using a handle type or electric valve for controls? I wonder if I could use a pushbutton and do it like tilt and trim on my old boat? Jy.
I'm doing this right now with my tractor. It's not cheap, but not nutso either. It's going to be very 'tidy'.
Read this:
http://www.tractorbynet.com/forums/hydraulics/185465-off-2.html
-Jer.
jgrreed
Platinum Member
It was, I made it. :thumbsup: I have made a few of them for other TBN members.
You wanna make me one?? If it's more trouble than it's worth for you, CCM is my fall-back...
-Jer.
MtnViewRanch
Elite Member, Advertiser
- Joined
- Mar 19, 2005
- Messages
- 10,648
- Tractor
- Mahindra 7520, Mahindra 3215HST, Case 580 extendahoe, Case 310 dozer, Parsons trencher, Cat D6,
You wanna make me one?? If it's more trouble than it's worth for you, CCM is my fall-back...
-Jer.
jgrreed, PM sent.
dfkrug
Super Member
- Joined
- Feb 3, 2004
- Messages
- 7,619
- Location
- Santa Cruz Mtns, CA
- Tractor
- 05 Kioti CK30HST w/ Prairie Dog backhoe, XN08 mini-X
Here are some step-by-step photos of my "build a side link cylinder restrictor" exercise. The wire-in-a-slot thing was AKKAMAAN's idea, and it worked fine.
Yes, excellent pix and write-up, PICKER. Since DIY restrictors comes up
again and again, we can link to this thread.
