Installing Windows

/ Installing Windows #1  

downsizingnow48

Elite Member
Joined
Jul 29, 2013
Messages
2,749
Location
Sacramento, California
Tractor
Kubota B21
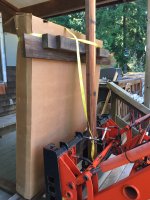
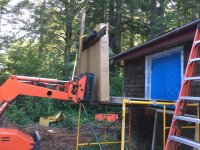
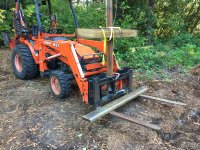
I am replacing the windows in the Mendocino place, they were cheap aluminum sliders 25 years ago and have not aged well. The new windows are double hung, I think about 60-70 lbs each. Getting them into the openings, sill height 5-6 ft, is not easy. Using pieces of lumber from the scrap pile, I made a simple brace, then used welding clamps to attach it to the pallet forks. With the brace I was able to safely carry the windows over rough ground around the house. The loader forks then make it easy to get the windows into working position. Once on the scaffold, installation was a piece of cake.
 

Attachments

  • window1.jpg
    window1.jpg
    2.4 MB · Views: 206
  • window2.jpg
    window2.jpg
    3.4 MB · Views: 226
  • window3.jpg
    window3.jpg
    4.3 MB · Views: 199
/ Installing Windows #4  
Over 20 years, I've replaced every window in this house. Originally they were steel casement crank out types. Needed a reciprocating saw to cut the steel frames into several pieces to remove. Then added new wood frames and double hung thermal units. Did it all by hand on a stepladder.

More recently, I pulled the two smaller windows in the front dormer and one in the rear dormer and replaced them with the largest slider units I could fit into the available space without having structural issues. Front is only 3' tall, but the rear is 5', almost a sliding door size. Removed the sliding sections to reduce weight and carried each piece upstairs to install from inside. Both are considered 'egress' size, so now I use them for roof access when I need to do something out there instead of climbing a ladder.
 
/ Installing Windows #5  
Windows leak, sometimes when new and often when old. Always install pan flashings under your windows and head flashings above. Caulking windows to the wall lasts as long as the caulk and that isn't long. Of course, if the windows never get wet then they can't leak. Overhangs are our friends.
 
/ Installing Windows
  • Thread Starter
#6  
I was impressed with the sealing job the original homebuilder did. Of the nine windows I am replacing, none showed any sign of leakage. This is the California north coast which is pretty wet. The windows were sealed to the sheathing with RV style window putty which was still soft and sticky 25 years later. Then flashing paper was stapled to the sheathing and caulked to the window flanges. 2x4 trim all around, also fully caulked. In addition the head trim had a fabricated drip cap made of copper sheet metal.
 
/ Installing Windows #8  
Nice job with the flashing tape around the opening. Did you use tape around the window after it was in place? I've tried quite a few different brands of flashing tape and wasn't overly impressed with any of them until I discovered Zip Tape. That stuff is amazing!!!!!!
 
/ Installing Windows
  • Thread Starter
#9  
Thanks Eddie. Yes, I used Zip tape for the bottom pan, you are right, it is amazing. About 4 inches up on either side plus the bottom, all corners, no gaps, no wrinkles. I used a product called Fortiflash for the sides and top flashing. It is thinner, stickier and more flexible than the usual window flashing tape. Then I caulked behind the top and side window flanges with siliconized caulk, I like it better than pure silicon. I got some ordinary 4" sticky rubber flashing, and will use that temporarily over the window flanges to cover the screws and flange edges. After the winter I will be replacing the siding, so at that time will replace the 4" tape with the wider Fortiflash tape which I really like.
 
/ Installing Windows
  • Thread Starter
#11  
That is what the stretchable Zip tape does. In the diagram attached, it shows how to use it for a one piece, no seams, no gaps, no wrinkles installation. I am not sure when it came into use, this is the first time I have used it.
 

Attachments

  • ziptape.jpg
    ziptape.jpg
    609 KB · Views: 128
/ Installing Windows
  • Thread Starter
#12  
Last two windows positioned for installation tomorrow morning. I got three stages of that lightweight scaffolding decades ago. Do not need it often but sometimes it is about the only way to get the job done. Now, the three pieces of scrap lumber that made a makeshift brace for the pallet forks. They have served with distinction and can go back into semi retirement on the lumber scrap rack.
 

Attachments

  • windowsA.jpg
    windowsA.jpg
    197.9 KB · Views: 126
/ Installing Windows #13  
That is what the stretchable Zip tape does. In the diagram attached, it shows how to use it for a one piece, no seams, no gaps, no wrinkles installation. I am not sure when it came into use, this is the first time I have used it.

Nice diagram. The more I use Zip tape, the more I like it. Foil tape is good for some things, but Zip tape is what's impressed me the most!!!!!

McCoys sells it for $25 a roll, and the only other lumber yard that has it in my area sells it for $35 a roll. Crazy how much more they get for it, but when McCoys is sold out, I've gone and paid the price for it when I really need it.
 
/ Installing Windows #14  
3M also makes a great sealing tape, a good bit more flexible than the ZIP tape and conform's very nice to a new window's nailing flange & any fasteners. Also better in the cold weather without any primers.


proxy.duckduckgo.jpg
 
/ Installing Windows
  • Thread Starter
#15  
No local store carries Zip or 3M in stock. I had to get the Zip from Amazon at about $50 for a 75 ft roll. Will get some of the 3M stuff too and give it a try.
 
/ Installing Windows
  • Thread Starter
#16  
Screws did not come up. Each window gets 42 screws, every three inches on the top and every six inches on the sides and bottom. Having the right screw can make a difference. I used these #10 x 1" stainless steel screws, square drive, with a "auger" point. They drive in straight and quick with no cam-out.
 

Attachments

  • screws.jpg
    screws.jpg
    134 KB · Views: 112
/ Installing Windows #17  
Those look like good screws. My new favorite all around screw that I use on just about everything that doesn't need to be 3 inches or longer are Hardie Screws.They have a thick shave, an over sized head and they are coated to deal with the elements. I like them a lot!!!
 

Marketplace Items

Towmotor/Lull/JLG/Barber-Greene Manuals (A63117)
Towmotor/Lull/JLG/B...
1998 Volvo VNL64T Sleeper Truck (A62679)
1998 Volvo VNL64T...
KBH Tender Trailer (A63688)
KBH Tender Trailer...
2017 Ford Escape SUV (A61574)
2017 Ford Escape...
(2) UNUSED 17.5L-24 TIRES W/ 6 LUG RIMS (A64280)
(2) UNUSED...
2016 John Deer 5075E (A60462)
2016 John Deer...
 
Top