JD4520 and CCM toplink - Have questions

   / JD4520 and CCM toplink - Have questions #1  

eepete

Platinum Member
Joined
Sep 30, 2009
Messages
963
Location
Efland, NC
Tractor
JD 4520, Kubota B21, JD 318
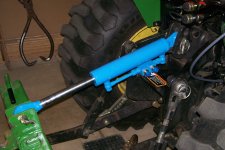
I've got a CCM toplink I want to put on my JD 4520. I've got two problem/questions about it all:

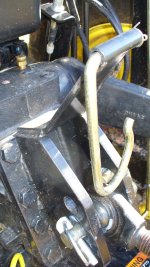
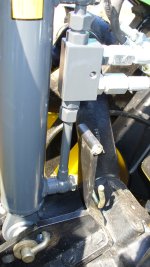
1) The toplink holder is welded on, not bolted on so it can not be removed. Mine came a bit bent, but it seems like the hoses/connections will need to be away from the tractor (toward the implement) in order to avoid crunching the hoses and fancy valve against the toplink holder. Anyone else gone through this? I saw one post where someone crunched their CCM, but nothing relating to the 4x20 series.

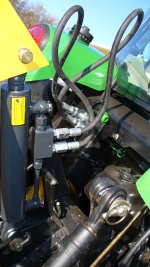
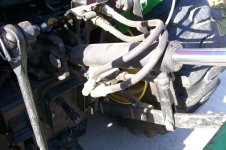
2) I thought it would be a good idea to bleed out the hydraulic fluid in the cylinder. Just trying to avoid mixing different types of hydraulic fluid. So I connect up just one hose, and the other hose was in a bucket. The bucket end did _not_ have the quick connect on it. As I moved the 3rd SCV valve I could hear the tractor load up a bit, and saw the hose flex. But neither position made any fluid come out. So this means there is something I don't understand correctly, and it's a good time to stop and ask for help.

I searched and read a lot of the posts on CCM toplinks, but didn't see these two items dealt with. TIA for any help, will post pix when it's done for the next person to try this combination.

Pete
 
   / JD4520 and CCM toplink - Have questions #2  
Eepete, I have a JD 3320 and have a similar concern. I have looked at the CCM and Surplus Center toplinks, and am for certain that the check valves and hoses will contact the power beyond bracket on my tractor when the hitch is fully raised. I think the answer for your question one is to just unbolt the banjo bolts on the cylinder and flip the whole check valve/tubing thing around. That way it will be more toward the implement end of the cylinder rather than the tractor end.
 
   / JD4520 and CCM toplink - Have questions #3  
Which hose did you attach to the tractor? I would try with cylinder rod retracted, apply fluid to the opposite end of the rod.

Here is a picture I posted a week or so back showing the topntilt on my 4520.
 
   / JD4520 and CCM toplink - Have questions
  • Thread Starter
#4  
@cocre: That is what I suspect was the solution. On your 3320, can you remove the toplink holder? It would seem I can just flip the cylinder 180 so the connections are out at the implement end, but this means that the cylinder rod is toward the tractor. I take it your suggestion allows the fixed end to still be on the tractor, helping in hose routing and insuring that the movable part of the cylinder is toward the implement and not the tractor. Am I understanding this correctly? The banjo bolts are the 90 degree bolts that connect to the cylinder, yes? I keep reading the term, but have not seem a picture or description.

@Steve: I keep think I must have messed up and put pressure on the wrong end even if that should be so obvious it's impossible. The cylinder ships retracted, so I connected the fixed end to the tractor and drained from the cylinder end. I'm reading into your post that my connecting one end to purge the hydraulic oil in the cylinder should be possible - the fancy check valve just wants to see 600 psi difference to allow flow. Attache one hose (to the _correct_ end of the cylinder), put the pressure to it, fluid that's in the cylinder comes out the other hose as the cylinder extends. Then I put the QC on the draining hose, hook it up, and I'm good to go with a minimum of "foreign" fluid in the tractor.

tnx to both of you for a reply

Pete
 
   / JD4520 and CCM toplink - Have questions #5  
eepete
How about some pics of your dilema? Might help decipher what you refer to as the toplink holder.
Here is a pic of how mine is mounted. Not sure this is the same as the one frustrating you. ??
 

Attachments

  • 101_0115.jpg
    101_0115.jpg
    439.6 KB · Views: 359
   / JD4520 and CCM toplink - Have questions #6  
On my 3320 I can remove the hook part of the toplink holder (it is held on by a cotter pin, but not the actual bracket. Well, I can remove the bracket, it is held on by two bolts, but the same bracket that holds the hook holds the power beyond stuff in place, so it has to stay.

Yes, the banjo bolts connect to the welded fittings on the cylinder. I believe you should be able to just flip the check valve stuff around and not the entire cylinder. I bet kennyd or JJ know for sure.

I have put together a 2 section Prince SV hydraulic valve that mounts to my ROPS that will be used for a TnT. I intend to buy the toplink cylinder before Christmas, and the tilt cylinder sometime after. I have pondered the setup for some time but still have concerns about the toplink cylinder/check valves/hoses contacting the power beyond stuff. I think by reversing the check valve it will clear.
 
   / JD4520 and CCM toplink - Have questions
  • Thread Starter
#7  
@beenthere: Tnbs for pix. I'll have to have the connections facing up, which means they might run into the welded on bracket that holds the swinging toplink holder. The tractor is in the cold and dark now, so I'll take some pix of it and post tomorrow morning.

@cocre: OK on what the banjo bolts are. Flipping the value stuff would solve the problem as far as hitting things. Then, when it's on, I'll have to see how close it gets to the toplink holder.

@everyone: There's an underlying assumption in all this stuff. That assumption is that it is desirable to have the fixed part of the cylinder on the tractor, and have the rod that comes out of the cylinder be at the implement end. This would be the least amount of movement on the hose lines. I'm curious if this is the only reason for this orientation, or is there something else I'm missing.

Pete
 
   / JD4520 and CCM toplink - Have questions #8  
I just got the one from the Surplus Center and am going through this now myself. I have to mount it "upside down" also, plus rotate the DPOCV 90* by loosening the compression fittings.

No pics just yet...
 
   / JD4520 and CCM toplink - Have questions #9  
I also turned the check valve so the hoses made a better loop (see pic). And this photo shows how I removed any 'foreign oil' from the cylinder (by hand). Not trying to say that is how it can work for you, but stumbled on this when fitting the CCM toplink to my Deere 4300. One of the handiest upgrades I've done. :)
 

Attachments

  • 101_0125.JPG
    101_0125.JPG
    566.3 KB · Views: 340
   / JD4520 and CCM toplink - Have questions #10  
I also turned the check valve so the hoses made a better loop (see pic). And this photo shows how I removed any 'foreign oil' from the cylinder (by hand). Not trying to say that is how it can work for you, but stumbled on this when fitting the CCM toplink to my Deere 4300. One of the handiest upgrades I've done. :)


With the I Match pictured the tilt cylinder will help with both implement use and make hooking up easier too when on uneven ground.
 
   / JD4520 and CCM toplink - Have questions
  • Thread Starter
#11  
Ok, it's a new day with more light and fresh coffee. I was connected to the wrong end of the cylinder, which is why I couldn't blow out the old oil. I guess any stupid user mistake that doesn't cost money or break anything is OK, but I'm sorry I wasted your time on it. While swap and try again today.

Two pictures enclosed. Easy one 1st. The close up of the cylinder is the banjo bolts, yes?

Other pix shows the toplink area on the tractor. The hook is flipped down, it flips up OK. You can see that on the JD 4520, the holder bracket for the toplink holding hook is welded on, not bolted on. So the problem is that as the CCM cylinder raises up, the hoses will hit this bracket. Flipping the fancy DPOCV valve makes the hoses clear. The hoses will come out at about the middle of the cylinder housing. The limiting factor is when/if the top of the banjo bolt hits the bracket.

So if someone can advise that indeed undoing the bolt on the banjo bolt and flipping the DPOCV valve is a OK end user operation, I'll do that. I can then get the old oil out if I can be more observant than I was yesterday. Then, with the box blade on, I'll have to pull in the toplink all the way and _carefully_ raise the 3PH and see if everything clears. Hoses out the top look like the best, so I won't have to do what Kenyd is going to do. It looks to me as if rotating the DPOCV valve would have the hoses hitting the top arms of the 3PH. I will of course post a picture and summary of actions taken so that the next user can see at least one solution that worked.

I have a funny feeling that there's a iMatch in my future. Connecting stuff up with the CCM toplink adds yet another "on and off the tractor many times" line it up procedure. I have some questions on that but I'll leave that for a separate post- one problem at a time.

On my complaint list for Deere, I'd have to add the welded on bracket vs. the bolt on bracket. It would be nice to know if they are doing this to add more strength to the toplink pin holding brackets. I seem to recall reading that on the 3000 series, this bracket was bolted on.

Pete
 

Attachments

  • toplink_holding_bracket.jpg
    toplink_holding_bracket.jpg
    493.4 KB · Views: 246
  • banjo_joint.jpg
    banjo_joint.jpg
    91.2 KB · Views: 206
   / JD4520 and CCM toplink - Have questions #12  
Pete,
To get the hoses right you may need to consider some swivel fittings or angle fittings that are available at most NAPA stores, hydraulic shops or dealer. You simply need the right combination of fittings to allow the hoses to route to the couplers without hitting or chafing anything.

About the float detent, typically you would push the lever all the way forward to "float".


I haven't bothered with the bracket for the top link, the only time I am not using I Match is for a phd and the heavy duty box blade in the picture. Next time I pick up steel I will modify the boxblade to I Match. I decided yesterday to go ahead and buy a new PA 30 planetary auger for the skid steer mounting Monday. At that point everything I use will be IMatch. One of the benefits of having this setup is your top cylinder and or tilt cylinder is always attached. When changing implements in the yard (not riding around) I simply lay the cylinder down and it rests against the pto shield no problem (when the IMatch is removed).
With a lot of attachments to choose from the IMatch makes swapping them easy and is a no brainer to me.

I see you have a separate tlb and no reference to a loader on the 4520, if you don't have a loader on your 4520 you might consider using the loader valve to run these circuits to the rear of the tractor. I had four quantity 48" hoses made at NAPA to accomplish this and reused the quick connectors for a cost of $120. This way the joystick is used to control the top and tilt hitch. The third outlet is used for remote implement cylinders such as the hydraulic toothbar or drawn implements with hydraulic controlled wheels.
 
   / JD4520 and CCM toplink - Have questions #13  
@Pete: Yes, that first picture is a banjo fitting. I see no reason why flipping the thing around would cause problems. If it does, just disasssemble the thing and flip the actual valve around too. So you flip the whole thing to move the valve away from the tractor and flip the valve to correct the flow direction, but I believe the second step is unnecessay.

Yes. On the 3x20 open cab series, the toplink holder bracket is bolted on with two bolts right where you add hydraulic fluild to the transmission. But the bracket also is used to support the power beyond hydraulics for use of a backhoe. So on my 3320 the support has to stay.

Which length toplink cylinder did you buy?
 
   / JD4520 and CCM toplink - Have questions
  • Thread Starter
#14  
Ok, it's all good now.
@Cocre: This is the 18 to 26.5 long CCM toplink. I ordered 30" hoses.
Here are the pix:

1) This shows what everything looks like when the box blade is level and on the ground. I think the hoses are dressed out OK.
2) This is a odd angle, as you can tell by the trees in the background. I wanted to show were everything was. This is the 3PH as high as it will go with the toplink fully retracted. It looks like the lower hose hits the bracket for the 3rd SCV, but it doesn't.
3) This is a closeup showing how close the toplink cylinder connections gets to the non removable toplink holding bracket. I did have to put an old glove on it and use a precision adjuster (8 pound sledge) to move it up about .75 inches. This also shows why the DPOCV had to be flopped around.
Note also that the top position for the toplink can never be used. If I understand things correctly, that's only for very light attachments so if I had to use this it would be back to the manual adjust toplink. Have I mentioned how much I don't like that welded bracket?
4) If the pin where the toplink attaches to the tractor is over as far as it can be toward the lynch pin, the pin that curves up to the next mounting hole can hit the cylinder (you can see a little ding mark). So I put two .75" washers on there to keep things in place.

Will do one more post right away to show range of tilt available for the box blade.

@Steve: Sound like I need to get another decal from the dealer and swap it so that float is in the right position. Is there any way that valve could be installed backwards so that float is really pull towards you, or did the dealer just mess up the decal?
No loader on this, hard to justify when I have the B21 TLB even if it is limited to 1000#. I've thought about using the joystick for all this, it's kind of a how far down the dark side you want to go. Would need the tilt cylinder and then the hose extensions. And the iMatch is looking mighty fine about now. I'll price it all and see. I would use a normal cylinder for the tilt, not the CCM one since price of failure is less and slop from bouncing around is less of an issue. I'll probably really like the toplink and bite the bullet on it all, but one step at a time.

Pete
 

Attachments

  • small_atach_pin.jpg
    small_atach_pin.jpg
    464 KB · Views: 205
  • small_fullup_closeup.jpg
    small_fullup_closeup.jpg
    391.1 KB · Views: 192
  • small_fullup.jpg
    small_fullup.jpg
    432.5 KB · Views: 214
  • small_normal.jpg
    small_normal.jpg
    618.3 KB · Views: 190
Last edited:
   / JD4520 and CCM toplink - Have questions
  • Thread Starter
#15  
Here are the angles I can get on the box blade with this arrangement. Camera and tractor are very close to horizontal, box blade resting on the ground.

Pete
 

Attachments

  • small_max_dig.jpg
    small_max_dig.jpg
    410.8 KB · Views: 240
  • small_max_smooth.jpg
    small_max_smooth.jpg
    514.2 KB · Views: 225
   / JD4520 and CCM toplink - Have questions #16  
eepete
Looks like you have made good progress. Do treat yourself to the iMatch, and you won't regret it.

As far as the top link holder bracket....a hacksaw will remove it easily and you won't be bothered by it anymore. :)

I looked at mine today, and see the final hose routing was different from my last pic posted, and the banjo is turned down and the hoses come out to the opposite side from the SCV outlets. I'll post the pic from today. I prefer to not have the long hoses curving up in the air for a neater package.

Enjoy the new addition.
 

Attachments

  • 100_1550.jpg
    100_1550.jpg
    451.6 KB · Views: 209
   / JD4520 and CCM toplink - Have questions
  • Thread Starter
#17  
That's clever how you put the valve at a 90, and then used another set of 90's to get the hose to come out away from the tractor and make a big loop with it. I see that your quick connects are a lot closer to the toplink tie in point that on the 4520 3rd SCV. It is very tidy.

I had 30" hoses made. If I had gone with 40 or so, I could have made a loop. But most of the time 3PH and toplink will be in the position of the 1st photo, and while there is a bump in the air, the full range can be accommodated. A tie wrap will help tidy it up, but I must be mindful of how the hoses move to accomidate the worste case crunch (toplink full retracted, 3PH at maximum height). Between having to flip the valve around because of the existing toplink holder bracket and the greater distance to the quick connects, I have a lot more variability in the distance hence the longer hoses and bigger loops. My dealer said he could put a cylinder on, he just didn't have the DPOCV valve. It would be interesting to see what that looks like, if anyone has gone that route.

The hacksaw is tempting, but the tractor is still too new for that for me. I wish I knew if welding the bracket on was saving a buck over bolting, or if there was a need for more strength in the assembly. To use the top mounting hole, the entire bracket would have to go. So I'll take it in small steps and use each improvement incrementally.

I've done the course grading for an outbuilding and another project, and am ready to do the finish grading and gravel fill leveling with the box blade for the building. Then I've got a bunch of driveway drainage and bank work to do.

I'm sure I'll enjoy it. My course grading had me getting out of the cab too often, and I wanted to get out more than I did. As for the iMatch, everyone keeps saying "get it" so I think that's pretty clear. Thanks for the pix and the post.

Pete
 
   / JD4520 and CCM toplink - Have questions #18  
Pete, don't mess with the Banjo's...loosen the compression fittings near the DPOCV and rotate it.
 
   / JD4520 and CCM toplink - Have questions
  • Thread Starter
#19  
Woops, as you can see by the pix in my earlier post, the horse is out of the barn already. I can see where just rotating the DPOCV and putting 90 degree fittings would probably also have worked, and there would be less "swing" needed for the hoses because the attachment point would be closer to the tractor.

I suspect my approach is because I'm new to the world of hydraulics. I also don't have experience with the doo-dads needed to make the job go better (like 90 degree fittings, swivel fittings, etc.). I know on electrical stuff I'm all over soldering, heat shrink, tie wraps, connectors, the various different types of wire and isolation. But these flexible pipes are new to me. My B21 didn't need modifications, just spiral wrap on wires and hoses that were scraping on metal.

kennyd, should I take it all down and start over, or wait and see if someone posts what your suggesting, play with what I have, and then decide?

Pete
 
   / JD4520 and CCM toplink - Have questions #20  
kennyd, should I take it all down and start over, or wait and see if someone posts what your suggesting, play with what I have, and then decide?

Pete

I think you need to turn the valve maybe 45* to the right (looking from the rear), the bottom hose is bending pretty sharply. I just wanted to point out that you should not loosen the banjo bolts as nothing will be gained.

Taking it "all down" is unnecessary, just turn the valve a little.
 

Tractor & Equipment Auctions

Year: 2019 Make: Jeep Model: Grand Cherokee Vehicle Type: Multipurpose Vehicle (MPV) Mileage: (A59231)
Year: 2019 Make...
2018 CATERPILLAR 12M3 MOTORGRADER (A52709)
2018 CATERPILLAR...
2020 MACK GRANITE (A58214)
2020 MACK GRANITE...
2017 John Deere 5090GN (A53317)
2017 John Deere...
DEUTZ MARATHON 60KW GENERATOR (A58214)
DEUTZ MARATHON...
16001 (A55853)
16001 (A55853)
 
Top