OP
You are using an out of date browser. It may not display this or other websites correctly.
You should upgrade or use an alternative browser.
You should upgrade or use an alternative browser.
Jim's Pole Barn Project - hopefully
- Thread starter jwstewar
- Start date
- Views: 56300
/ Jim's Pole Barn Project - hopefully
#51

Slamfire
Veteran Member
Re: Jim\'s Pole Barn Project - hopefully
Looks like good help, I have to carry my water with me, and the dogs get underfoot nearly as often as your kids.
Looks like good help, I have to carry my water with me, and the dogs get underfoot nearly as often as your kids.
RegL
Platinum Member
Re: Jim\'s Pole Barn Project - hopefully
I had my house moved back in 84 and worked closely with the house movers. After seeing how it's done a shed would be easy on level ground. First get enough lengths of 6x6 to lay two rails at least three times the building's length. get three or four lengths of well caseing or pipe a bit longer than the building is wide. jack up one end enough to get rails and acouple rollers under it and start pulling adding more rollers as you move forward. as you move along keep leapfrogging the rollers that come out from the rear and also sections of rail. Once the building is up on the rollers you could probably pull it by hand. It's important, to keep things from getting out of control, to have a couple people handy with a piece of lumber to throw in front or behind a roller to act as a brake when you want to stop or the building wants to go to fast. Better yet would be to rig up a rigid connection between your tractor and the building. It was amazing to watch those guys move a house.
I had my house moved back in 84 and worked closely with the house movers. After seeing how it's done a shed would be easy on level ground. First get enough lengths of 6x6 to lay two rails at least three times the building's length. get three or four lengths of well caseing or pipe a bit longer than the building is wide. jack up one end enough to get rails and acouple rollers under it and start pulling adding more rollers as you move forward. as you move along keep leapfrogging the rollers that come out from the rear and also sections of rail. Once the building is up on the rollers you could probably pull it by hand. It's important, to keep things from getting out of control, to have a couple people handy with a piece of lumber to throw in front or behind a roller to act as a brake when you want to stop or the building wants to go to fast. Better yet would be to rig up a rigid connection between your tractor and the building. It was amazing to watch those guys move a house.
OP
jwstewar
Elite Member
Re: Jim\'s Pole Barn Project - hopefully
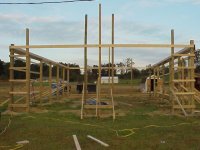
Hadn't posted in awhile because I hadn't made much progress in awhile. Had to go a way for a week for business, a wedding, and a couple of other things got in the way. I finally got all of the poles set and cemented in. I got the PT T & G 2X6s around the bottom to find the level. Was also able to get the 2X12s up on each side, 2X6s on the end and inside of the 2X12s at the top, and got a over half of the girders up. Was also able to get the 4X6s on the side cut off to the appropriate height. Here is a picture looking at the front where the 2 bays are for the car and truck.
Hadn't posted in awhile because I hadn't made much progress in awhile. Had to go a way for a week for business, a wedding, and a couple of other things got in the way. I finally got all of the poles set and cemented in. I got the PT T & G 2X6s around the bottom to find the level. Was also able to get the 2X12s up on each side, 2X6s on the end and inside of the 2X12s at the top, and got a over half of the girders up. Was also able to get the 4X6s on the side cut off to the appropriate height. Here is a picture looking at the front where the 2 bays are for the car and truck.
Attachments
OP
jwstewar
Elite Member
Re: Jim\'s Pole Barn Project - hopefully
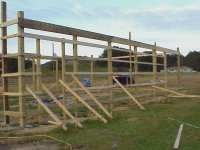
Here is looking at the "right" side. Toward the back you can see where the tractor door will be. When we were putting the PT around the bottom forgot to skip the door. I'll come back and cut the off w/ the recip saw.
Here is looking at the "right" side. Toward the back you can see where the tractor door will be. When we were putting the PT around the bottom forgot to skip the door. I'll come back and cut the off w/ the recip saw.
Attachments
OP
jwstewar
Elite Member
OP
jwstewar
Elite Member

OP
jwstewar
Elite Member

OP
jwstewar
Elite Member
Re: Jim\'s Pole Barn Project - hopefully
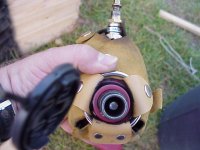
Looking down the "barrel." This little thing is call an air palm nailer. This one is made by "Tradesman." It put the 20d Ring Shank nails in like they were nothing - fast too. I didn't actually time but I bet it would put those 20d nails in, in 5 - 10 seconds definately being closer to the 5. Not as fast as a framing nailer, but a whole lot faster than a normal hammer. Doesn't wear you out either like swinging my 22oz. Eastwing Framer. A couple of points about it. It doesn't require special nails. Any nail will work. It has several heads including the normal one (which we used today), a magnetic one, a finish nail one, one for vinyl siding, and a hammer head. Came w/ extra o-rings (hope I don't need those for awhile) and a 3 year warranty. Unless I can talk Carter Lumber in to giving me a framing nailer w/ my OSB/roofing order, this will be my framing nailer for awhile. Must not use much air. My little (6HP, 33 gal) Craftsman oil-less compressor only ran maybe 7 or 8 times all day and my drain valve is leaking a little bit. Got my $80 worth in one days use. Wish I would remembered I had it yesterday when we hung the first 3 2X12s /forums/images/graemlins/crazy.gif, todays 3 were much easier. /forums/images/graemlins/laugh.gif /forums/images/graemlins/grin.gif Is that a sign that you have too many toys.....err....tools when you don't remember that you have them? /forums/images/graemlins/confused.gif
Looking down the "barrel." This little thing is call an air palm nailer. This one is made by "Tradesman." It put the 20d Ring Shank nails in like they were nothing - fast too. I didn't actually time but I bet it would put those 20d nails in, in 5 - 10 seconds definately being closer to the 5. Not as fast as a framing nailer, but a whole lot faster than a normal hammer. Doesn't wear you out either like swinging my 22oz. Eastwing Framer. A couple of points about it. It doesn't require special nails. Any nail will work. It has several heads including the normal one (which we used today), a magnetic one, a finish nail one, one for vinyl siding, and a hammer head. Came w/ extra o-rings (hope I don't need those for awhile) and a 3 year warranty. Unless I can talk Carter Lumber in to giving me a framing nailer w/ my OSB/roofing order, this will be my framing nailer for awhile. Must not use much air. My little (6HP, 33 gal) Craftsman oil-less compressor only ran maybe 7 or 8 times all day and my drain valve is leaking a little bit. Got my $80 worth in one days use. Wish I would remembered I had it yesterday when we hung the first 3 2X12s /forums/images/graemlins/crazy.gif, todays 3 were much easier. /forums/images/graemlins/laugh.gif /forums/images/graemlins/grin.gif Is that a sign that you have too many toys.....err....tools when you don't remember that you have them? /forums/images/graemlins/confused.gif
Attachments
OP
jwstewar
Elite Member
Re: Jim\'s Pole Barn Project - hopefully
Forgot to mention that I'll be putting the trusses up on the 18th. That'll be my second milestone, I've got 4 major milestones, first was the poles, second w/ be the trusses, 3rd w/ be the roof, and finally completion. I guess there should be 5 if you include the floor. But that is phase 2. /forums/images/graemlins/grin.gif
Forgot to mention that I'll be putting the trusses up on the 18th. That'll be my second milestone, I've got 4 major milestones, first was the poles, second w/ be the trusses, 3rd w/ be the roof, and finally completion. I guess there should be 5 if you include the floor. But that is phase 2. /forums/images/graemlins/grin.gif
