Joist spacing question

/ Joist spacing question #1  

Richard

Super Member
Joined
Apr 6, 2000
Messages
5,085
Location
Knoxville, TN
Tractor
International 1066 Full sized JCB Loader/Backhoe and a John Deere 430 to mow with
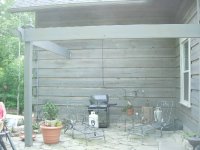
One of three pictures.

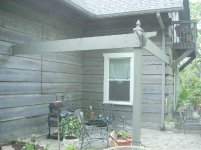
this picture is facing an overhang we're going to "roof". Post is 6x6 set about 12" (perhaps 18, I forget) and in concrete.

The rafters/joists are going to be going from left to right. I'm going to tie them into the log on the right (using hangers) and tie them into the 2x12 you see on the left.

The angle you are viewing is a 13 foot span. We are NOT going to have them on the same plane as this part, they are going to be higher on the right and be flush with the 2x12 on the left. Wife wants a small slant so (in this pic or the following) you will see we are going to move up a single 4x4 and then mount them to the next higher LOG. I'll have to cut both ends so they will be flush with the log and come down to the existing 2X12 you see on the left (which is 12' long)

I'm going to then put some plywood on top and shingle it to match our roof.

Questions:

1. I am planning on using 3/4" marine grade plywood, sufficient/overkill??

2. What kind of spacing might I need/want to use on the spanners so I have enough support strength? I'm going to space them evenly, but my thinking is roughly 16/18" OC. If it takes 14" to make them look "balanced" so be it. I'd rather have 2 extra up there than 1 too few (since I'll be walking on this to clear out the gutters above) /forums/images/graemlins/crazy.gif

3. Will the 2x12 on the LEFT (12' long) be strong enough to support all this attached stuff?

I don't know if I posted on this project a year ago or not, but this is the post I dug for, carried up the hill, set into concrete and the VERY next day the wife says in a VERY small voice...
"will you be mad if we move it 6 inches further out"

/forums/images/graemlins/tongue.gif

I commenced to rip it down and move it out six more inches. That necessitated removing the stringers (right name?) and the post. resetting the post (after digging out new hole and partially filling in old one. And then I had to get a new 2x12 because I'd already cut the original to length /forums/images/graemlins/tongue.gif

Alas, the things we do for our women
 

Attachments

  • 676573-13feet.JPG
    676573-13feet.JPG
    68.8 KB · Views: 676
/ Joist spacing question
  • Thread Starter
#2  
This is the head on view of the 2x12x12. You can perhaps better see the higher log I'm going to tie into. how she plans on hiding the transition of the sloped 2x12 to the horizontal one ....ya got me /forums/images/graemlins/confused.gif
 

Attachments

  • 676574-12feet.JPG
    676574-12feet.JPG
    86.6 KB · Views: 443
/ Joist spacing question
  • Thread Starter
#3  
This is from the inside looking out. The right side will be the receiver for the joist hangers and the left side will essentially be just an inner structure for some kind of skirt, depending on how we finish it out.

come to think of it, I've never seen a skirt hiding 10' 6x6's

/forums/images/graemlins/blush.gif
 

Attachments

  • 676575-Inside.JPG
    676575-Inside.JPG
    92.6 KB · Views: 357
/ Joist spacing question #4  
First thing you need to do is find out what "Code" is in your area. Does it snow? High winds? Heavy rain? etc ...

Just my opinion here, but the first thing you need to address is the 2x12 joist you will be useing to attach your rafters to. A single 2x12 spanning 13 feet will sag in time with the extra weight.

I'd suggest you rip some half inch plywood the width of the 2x12 and sandwich it between another 2X12. Use liquid nails for extra strength and either screw or nail it together. Repace the single joist hanger with a double.

Be sure to use the finished edge of the plywood on the bottom side, then seal it with caulking.

As for the rafters.

If you want to use 3/4 plywoood, then 24 inch centers are plenty. Lots of homes are on 24 inche centers with half inch CDX plywood or OSB. No need for marine grade wood. That's just throwing money away.

Again, depending on your loads, I'd suggest 2x8's for your rafters.

Now if it was me, I'd go about it a littel different then what you described.

I'd run a ridgeboard diagnally from your outside corner to the inside corner on the home. A pair of 2x8's with the plywood would work perfectly.

Depending on the angle of slope you want, is how high I'd set it. Remember to measure your pitch with a framing square to know your measurements.

Minimum pitch should be 2 in 12.

When you know the pitch, then it's easy to figure out the rest of your cuts.

Then I'd cut the rafters from the ridgeboard to your joists every two feet. It's called a hip roof, but your only doing one corner. You can use 2x6's for this.

Install half inch plywood, tar paper and shinglels.

Good luck,
Eddie
 
/ Joist spacing question
  • Thread Starter
#5  
Thanks for the comments.

Went to the store last night & seems the guy there had some ideas... the wife totally went for them soooooooo most of what I said above is now for naught. /forums/images/graemlins/tongue.gif

First, he pointed out what you did about the single 2x12 holding all that weight. I'm to double it just as you said.

Second, though I showed her the diagonal idea as you had, she wants "flat" so to say. Since I have 2x12's, she wanted to keep a similar sized so we're using 2x10's. Picked up 10 2x10x14' (16" OC as I recall). Going to mount them "high" on the right wall (with the window) and going to "bird perch" or something called similar to that, them onto the doubled 2x12's (by cutting a notch in them & have them rest on TOP of the 2x12's rather than butted up to them)

Bought 5/8 BC plywood rather than CDX or marine grade. He said since it'll be protected by shingles we could get by with BC. Since I WILL be walking on it to clear gutters, I felt more comfortable with 3/4 but he said it was waste of money.

Now, you make mention of gluing some plywood BETWEEN the 2x12's. I have seen this done before and understand how it will strengthen.

his recommendation was just to screw two of them together.

My guess is, you might feel simple screwing them together might be insufficient?

Again, thanks for your thoughts.

/forums/images/graemlins/smile.gif
 
/ Joist spacing question
  • Thread Starter
#6  
</font><font color="blue" class="small">( I'd suggest you rip some half inch plywood the width of the 2x12 and sandwich it between another 2X12. Use liquid nails for extra strength and either screw or nail it together. Repace the single joist hanger with a double )</font>

Already have the double joist hanger for the 2 2x12's. Hadn't thought about laminating though.

If I DO, and use 1/2", will that still fit inside a double joist hanger? I would have guessed not.

/forums/images/graemlins/confused.gif
 
/ Joist spacing question #7  
Richard,

It depends on the width of the joist hanger. Measure it and determine if you need the plywood sandwich or not. It is not required for strength. Glue and nail the 2x12's. Use 2 rows of 12d nails at 12" o.c. each side. The sizes you are using seem to be good but I do not know your local code and minimum design loadings. If you have any snow loads in your area you must design the framing (and post and foundation) to accommodate drifting snow from the higher roof on both sides. This gets to be a lot of load and the framing gets very heavy. May not be a problem there.

When you bolt the double 2x12 to the post use a minimum of two 5/8” through bolts. Also add an 18” long 2x6 or 4x6 (better) under the bottom of the 2 2x12’s. This brace can be cut at the bottom to provide some aesthetics to the end.

The minimum slope we like to put shingles around here is 3/12. A flatter slope may cause water infiltration problems but if you do not enclose the area this may be OK and not cause much problems.

…Derek
 
/ Joist spacing question #8  
Not using the plywood between your joists isn't going to be an issue for your application. I suggested it for consideration as the strongest way to go. You really don't need it for what you're doing.

Check the boards before installing them. there will be a slight bow in each one. Put the bow in the up position, so in time, it will settle flat. The bow up will aslo have more strength as oposed to bowing down, or sagging.

It doesn't matter, but for general information, they make joist hangers for doubled up joist, and for 4X material. There's a half inch difference between the two.

Eddie
 
/ Joist spacing question
  • Thread Starter
#9  
Thanks!!

Update: Got 2 more 2x12x16's. Those are always so much fun to carry in a truck /forums/images/graemlins/crazy.gif

Opted to NOT put the plywood between them. Didn't think about the crown before glueing them /forums/images/graemlins/blush.gif

Took the one to be doubled down. Trimmed off the other one and trimmed down the very top of the post. Got the plywood painted (the visible side underneith...well the wife painted it)

All we got done today. Since we live in the county, they told me we can do what we want /forums/images/graemlins/crazy.gif

My personal disposition is to make it as good or better than they would otherwise make code...after all, I figure code is there to give guidance and to make sure everything works.

Don't want any surprises.

I'll try to remember to take more pictures as we go along.

/forums/images/graemlins/smile.gif
 
/ Joist spacing question #10  
I might suggest you use valley shield on the entire roof if it is 3/12 or less. If you're not familiar with it, it is a sticky backed product that comes in 3' rolls similar to tar paper (roofing felt). It seals down to the plywood and helps keep moisture away. If you have snow laying on the roof and then sun hits it , it can melt and work its way back under the shingles. This is especially true if you enclosed an area and heated it. Then the heat escaping up through the roof melts some of the snow and can create these "ice dams" which can then force water back up under the shingles. Just a thought. Jason
 
/ Joist spacing question #11  
Richard; I'm probably reading more into this than I have too, but how do you plan on flashing your new roof to those great looking logs your using for siding? /forums/images/graemlins/confused.gif

On the roof slope issue, please use the icegaurd on anything less that 3/12, then install shingles over that. When you nail thru the icegaurd, the fasteners will self seal due to the icegaurd. Good luck. /forums/images/graemlins/grin.gif

Code, shmode. Codes are devloped to the minimum requirements. Nothing wrong with going to code or better. You may not have a code where you are, and NOT saying your building substandard, but find out what code "WOULD" require and go with that. I've had to repair many structures that were built with the, if it was good enough for grampa, it's good enough for me mentality. Sometimes the way grampa did it was just plain dangerous. I'm trying not to sound like I'm picking on you, just don't want you or yours to get injured or worse. Any new houses going up in your area? Take a dozen donuts with you, and go ask the builder some questions. I've had that happen to me before, ofcourse I like custard filled donuts anyway. /forums/images/graemlins/grin.gif
 
/ Joist spacing question
  • Thread Starter
#12  
Here's where we are. Although since the picture was taken yesterday morning, I got all the plywood installed along with that 'ice guard" or what ever it's called. (The stickey backed base material)

Unfortunately, the wife wanted 5/8 plywood and the nails are 3/4 so seems I'm going to have some showing.

I'm going to install TWO layers of felt/tar paper (30 wt) on top of the ice guard stuff to try to take up some of the nail length. Unfortunately, no one thought ahead for the nails (visible underneith)

My question: When I start on the first course of shingles, do I only flip it (downside pointing up) or do I also turn it upside down, so the FINISHED side is facing downward & visible from below?

I am using dimensional shingles for the roof, but bought a box of 3 tab shingles for my starter row.

appreciate any thoughts.

Oh, and I got some flashing for the top of the roof and we're looking into thoughts on how to flash the left side while also allowing it to float (since the logs will swell/shrink)

/forums/images/graemlins/smile.gif
 

Attachments

  • 683319-roof.JPG
    683319-roof.JPG
    95.3 KB · Views: 262
/ Joist spacing question #13  
For the flashing, I would just let it float against the siding. Fasten it to the roof only. If water comes down the siding, so what - it would have anyway. Most of the water will be coming down the roof and the flashing will keep it on the roof.

What are the squared logs - cedar?

Your idea of flipping the first course seems like a good one to me, and will look better. Not normally done, as far as my experience goes, but I like your idea, and the shingle should do it's job just as well as a starter row.
 
/ Joist spacing question #14  
Richard; Excellent call on the 3 tabs. Cut the tabs off just below the tar strip. Lay the edge you just cut even with the outside edge of the dripedge, tar strip up, and drive 4 roofers in. One on each end about 2 " from the end, and the other 2 somewhat evenly spaced in the field of the "starter strip". These should be just above the tar strip. Work across the lower edge of the roof untill you get to the other end. Then go back where you started, cut about a foot off your first shingle and place cut edge adjacent to the siding, and the bottom like you did on the starter. This will stagger the joints so they don't lineup. On your second course, cut 2' off and use the 1' piece as before. The archetectural laminated shingles are great. Mistakes as far as micrometer correctness are easily covered and eliminated by the nature of these shingles, they don't have those finnicky little tabs like on conventional shingles.

Flashing; I'm not sure how you intend to flash it out. Just make sure you do on the top and side adjacent to the house. The only suggestion I have there is to cut a groove 1/2" deep or so on those logs maybe 3" above, and the same angle as the roof, use step flahing on the sloped side on each course of shingles, and cap it off with a piece of metal flashing to keep water out. I'm sure that was confusing, but if you talk to the guys you got your stuff from, they would know what I'm saying and be able to help more than me on a bloody puter.

Feel free to ask away, I'm sure there will more suggestions coming. But then again, I do tend to kill threads for some reason. /forums/images/graemlins/blush.gif /forums/images/graemlins/grin.gif /forums/images/graemlins/grin.gif

One more thing, I'd start the roofing at that lower intersection to left of your photo. Good luck, I HATE roofing. /forums/images/graemlins/wink.gif /forums/images/graemlins/grin.gif
 
/ Joist spacing question #15  
Looks like your making some good progress.

The nails need to go through the plywood to hold. If they were shorter, they'd pull out. Just paint over them when you're all done and they will disapear.

For the flashing, your goal is to keep the water coming off the roof and away from the building.

For the side flashing, I'd install that on your plywood decking after the tar paper, but before the shingles. I'd just fasten it to the decking only.

On the top edge, I'd attach it to the wall with silicone behind it to form a water tite seal, and rest it on top of your shingles.

The first row is always turned backwards. The top side is always the top side, but the the edge of the back of the shingle goes along the edge of your decking. No need to cut the tabs off, but if you want you can. I've seen it done both ways.

Eddie
 
/ Joist spacing question
  • Thread Starter
#16  
OK...

Thanks for the comments thus far. Note also (if it changes anyone’s thoughts) that the roof extends about 4 feet straight out from the house. In other words, this lower roof has almost four feet of the left/upper sides covered by the larger roof & gutter.

Though I do plan on flashing it somehow, I’ve only noticed water hitting the LOWER logs after a HARD rain. If in fact we were to get water hitting either wall at this lower roof line, I’d venture to say it’s because we have rain flying horizontally and it would have hit it anyway without this roof. /forums/images/graemlins/crazy.gif

Beenthere: They are pine logs

Johnday: I guess I will have to ask the boys at the store. As far as cutting a groove into the logs... I’m not terribly comfortable myself doing that, or even having it done. I do intend on starting roofing at lower left corner.

Eddiewalker: Unfortunately the nails will probably show & the wife is going to hate that. I installed that ice guard underlayment. I’ve then installed TWO layers of 30 wt tar paper in an attempt to soak up some of that thickness. I overlapped every layer so it should be able to withstand a hurricane & still stay as dry as a babies hiney.

Babies DO have dry hiney’s, don't they???? /forums/images/graemlins/blush.gif

/forums/images/graemlins/grin.gif
 
/ Joist spacing question #17  
Richard
With your overhang, and only occasional water on the pine siding, I would just leave a gap so any moisture that gets between the roof and the siding can dry out so the pine lasts longer. But a turned up flashing will help with snow melt, etc and keep it on the roofing too.

I assume you have a good treating schedule for the siding log-ends that project at the corners. Most good preservatives we've had access to in the past are no longer available, such as Penta. But wouldn't want to see you lose any wood in those ends due to decay.

Stapling that roofing on (I normally don't like it done that way, but it is because of wind) may help with the nail penetration problem. Personally, I like the rubber membrane for roofing with that little slope. No seams, no nails, long lasting.
 

Marketplace Items

2010 BOBCAT E80 EXCAVATOR (A64279)
2010 BOBCAT E80...
2003 CHEVROLET SILVERADO 3500 CREW CAB DUALLY TRUCK (A64280)
2003 CHEVROLET...
2017 GMC Sierra 2500 HD 4x4 Crew Cab Pickup Truck (A61573)
2017 GMC Sierra...
JOST FIFTH WHEEL PLATE (A64276)
JOST FIFTH WHEEL...
2014 BOBCAT E42 EXCAVATOR (A64279)
2014 BOBCAT E42...
2017 Nissan Sentra SR Sedan (A61574)
2017 Nissan Sentra...
 
Top