I wanted a leaf vac for my JD 4100.
The JD high-dump system was way out of budget.
I like the trac vac model that uses trash cans because it looks easy to empty into a trailer for off-site comkposting, but it was also a bit out of the budget.
Then, a buddy had an old snowblower with a good 8 HP engine on it that would be perfect for a leaf vac. Based on the "free" engine, I ordered the blower housing and impeller as spare parts form Agri-Fab (the cheapest source by at least 2X).
Turns out the snowblower engine had the wrong shaft for the impeller, so I put the snowblower back together, fixed its minor problems, and sold it to help fund the purchase of a new 7.5HP Briggs Intek with the required "MTD Tapered" shaft.
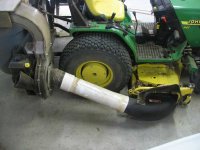
I also wanted to avoid the cost of the exensive vac hose, so I used a piece of 6" PVC DWV pipe. I stretched the end to fit over the mower boot (John Deere Part, fits the deck exactly, ordered through local dealer) by heating it over a gas stove burner (what the wife doesn't know about what happens in the kitchen when she is not home won't hurt her). Heat gun wasn't enough , and the piece wouldn't fit into the oven!
I welded up a collar to adapt to the agri-fab blower housing. it warped a bit. I also strecthed another piece of PVC to make a slip-fit over the end of the longer piece. The outer PVC is fastened to the welded steel collar so it can pivot up and down. Adhesive-backed, fiber-reinforced rubber (duck tape) completes the seal. The tape sees little or no abrasion from the clippings, so it should last a good while.
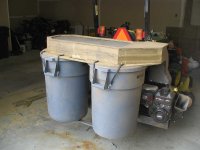
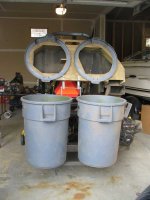
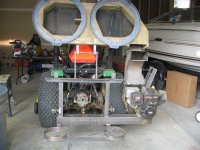
The output of the blower is funnled through a welded sheet-metal chute up into the plywood box that sits on top of the pair of Rubbermaid Brute 44-gallon trash cans. I used the lids from the trash cans to make the interface between the box and the cans. I screwed the lids to the bottom of the plywood box and then cut out the middle 18" diameter area of both the lid and the bottom of the box.
The box was originally vented using a couple of 7" diameter ventilation sheet-metal fresh-air intakes (with bird screens) which I thought would be perfect. Those turned out to be not enough surface area for the airflows involved. I cut out almost the whole top of the box and stapled in a piece of heavy-duty polyester "pet-proof" window screen instead. The fresh air vents were nice in that they directed the dust back, away from the operator's position. With the screen over the entire top, the dust goes straight up. Its Ok as long as I keep moving forward, but if I back up while mowing dry leaves, I get dusted. I plan to add another deflector over the top of the screen.
The plywood box is mounted to a hinge so it can be flipped up and the trash cans simply lift off the frame.
Detailed pics in follow-up posts.
- Rick
The JD high-dump system was way out of budget.
I like the trac vac model that uses trash cans because it looks easy to empty into a trailer for off-site comkposting, but it was also a bit out of the budget.
Then, a buddy had an old snowblower with a good 8 HP engine on it that would be perfect for a leaf vac. Based on the "free" engine, I ordered the blower housing and impeller as spare parts form Agri-Fab (the cheapest source by at least 2X).
Turns out the snowblower engine had the wrong shaft for the impeller, so I put the snowblower back together, fixed its minor problems, and sold it to help fund the purchase of a new 7.5HP Briggs Intek with the required "MTD Tapered" shaft.
I also wanted to avoid the cost of the exensive vac hose, so I used a piece of 6" PVC DWV pipe. I stretched the end to fit over the mower boot (John Deere Part, fits the deck exactly, ordered through local dealer) by heating it over a gas stove burner (what the wife doesn't know about what happens in the kitchen when she is not home won't hurt her). Heat gun wasn't enough , and the piece wouldn't fit into the oven!
I welded up a collar to adapt to the agri-fab blower housing. it warped a bit. I also strecthed another piece of PVC to make a slip-fit over the end of the longer piece. The outer PVC is fastened to the welded steel collar so it can pivot up and down. Adhesive-backed, fiber-reinforced rubber (duck tape) completes the seal. The tape sees little or no abrasion from the clippings, so it should last a good while.
The output of the blower is funnled through a welded sheet-metal chute up into the plywood box that sits on top of the pair of Rubbermaid Brute 44-gallon trash cans. I used the lids from the trash cans to make the interface between the box and the cans. I screwed the lids to the bottom of the plywood box and then cut out the middle 18" diameter area of both the lid and the bottom of the box.
The box was originally vented using a couple of 7" diameter ventilation sheet-metal fresh-air intakes (with bird screens) which I thought would be perfect. Those turned out to be not enough surface area for the airflows involved. I cut out almost the whole top of the box and stapled in a piece of heavy-duty polyester "pet-proof" window screen instead. The fresh air vents were nice in that they directed the dust back, away from the operator's position. With the screen over the entire top, the dust goes straight up. Its Ok as long as I keep moving forward, but if I back up while mowing dry leaves, I get dusted. I plan to add another deflector over the top of the screen.
The plywood box is mounted to a hinge so it can be flipped up and the trash cans simply lift off the frame.
Detailed pics in follow-up posts.
- Rick