Hope you all had a wonderful holiday weekend. I took the list of words that I did not know and using my TBN iPhone app to read this thread while "inspecting" the set up.
I have included my definitions please correct me if I am mistaken:
Top link- That is the top connection of the 3 points, it does not "lift".
Floating toplink bracket-This is were the top link connects to the implements (on the implement).
A "crank" or a collar - This is on the top link, mine is two 4" or so post that stick out on either side of the long tube that the two joints screw into. I now think I understand why it is so hard to hook that part up... it should be loosened from that part "evenly" not just unscrew the one that is closest to the implement. Is there a tool for doing it? I took an old wrench and slid it down the post and used that for leverage.
ROPS - Still confused about this one, maybe the roll bar?
rockshaft lever - The lever I use to pick up and put down the implements.
I set it using the top link... as best as I could, it is pretty level left to right so I left that alone (the bubble was almost perfect and Roy said not to go ****).
About the time that I got that done one of the guys that sometimes works on the equipment showed up and said looks good. He is not out at the farm all the time and he is always busy, so I ask you guys. (You would think that with me on some really expensive they would have me more supervised, haha).
I asked him to show me where all the zerks are so I greased all of them and then he opened the gear box (?) and I got to add more gear oil (?).
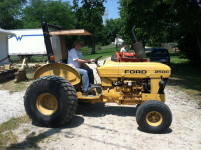
He informed me that the Ford drafts (my definition, rides the hills) the implements but the Kubota does not. I got to "drive" the Ford around because they want me to be able to use both. It was exciting because it is a real manual (the Kubota is a GST) and it has a high and low shifter (there are all sorts of technical terms I will learn when I drive that one.
So on a side note:
Roy, loved your BTW addition... I need those! I do the daily maintenance that is in the owners manual, well daily and I saw how filled the screen gets. Makes me want to wear a dust mask.
Pat32, I finally figured out who the "he" is, its me... but I am a "she" haha! No offense taken, just a little head scratching.
And thanks to all of you for increasing my knowledge, not that it pertains to this question but I got the BH on in 10 min this last time, down from the hour it took me the second time and the 3 hours the time before until one of the guys did it and I watched and "observed".
I also found a finish mower in the weeds, I think I am going to ask if I can tinker with it, front right wheel is off is what I see straight from the get go. There is a nice one for the house yard, but I want this one for the pasture, but that will have to wait until I get the manure spreader chain fixed.
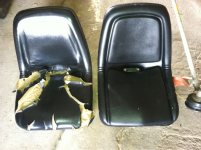
I need to have a thread called Learning to Farm, haha because I learn something new EVERY day, things that most of you already know but would get a chuckle out of. I didn't know that tractors with cabs have heat and AC. I also realize that tractoring on inclines is SCARY (this coming from someone who; rode racehorses, white water kayaked, skydives, base jumps, scuba dives...) I have so much respect for my West Virginia relations that only have hills (you too ShenandoahJoe). I think that the seatbelt as much as the pucker effect kept me on the new seat that I installed on Saturday morning. I have 2 pastures I had not gotten to/ignored because of the incline (which is minimal compared to what I have seen people driving on in WV). The farm owner said to me, "If you want to do this, get your big girl undies on and get your a** in the seat". Needless to say the feeling of getting it done was amazing!:thumbsup: