ericm979
Super Member
valve end:
joystick end:
")
Thank you, that all sounds like good info. I think I have the problems you mentioned but it also looks like the cable is broken off the ball end piece. That's what I thought was the problem and was thinking of welding, the sleeve and sheath problems I didn't realize and understand until now, so again, thanks, that's a lot of help. I think you must have the push-pull directions correct because I can curl the bucket in but not out. What does it mean that if you look closely at the photo with my legs showing, the lower cable assembly is the one that's still working, there's a slight gap at the sleeve doesn't quite fully reach the sheath and you can see the cable is visible, it doesn't look like it's the spiral metal sheath, do you think it's partially broken? If so, would it be a good idea to apply the same fix to it to hopefully head off another failure down the line?What you have in the area we are discussing are three parts. 1) The inner cable, which is likely a woven wire cable with the ball end welded to the end of it. 2) The sheath, which is a spiral wound piece of metal probably with a plastic inner liner and a rubber exterior coating and 3) A sleeve that is threaded on one end and crimped against the sheath on the other. This goes on the end of the sheath and holds the sheath in place while the inner cable moves inside the sheath. It also provides means for adjustment. It looks like your sheath has came apart at the sleeve and the spiral winding has started to undo.
It is a two way cable, it is used to pull one way to curl the bucket up, and push the other way to curl the bucket down (I may have those functions reversed.) Using the cable in pull, the sheath pushes against the sleeve and it takes nothing to hold it in place. When you push the inner cable, if the sheath doesn't stay attached to the sleeve, the sheath will move with the cable and you get no inner cable movement at the other end where the control valve is.
What you need to do is reconnect the sleeve to the sheath. As I mentioned , from my jury rigged temporary solution I know that the forces required to hold sheath tight against the sleeve aren't that great.
As I think about it, I think Pedro is right too much heat might melt the plastic liner inside the sheath and mess it up. Also, over crimping the sleeve may bind up the inner cable and prevent it from moving freely.
I still think my last suggestion of sliding a 3 or 4 inch long piece of poly tubing over both the sleeve and the sheath by splitting the tubing long ways and clamping the poly tube in place over both the sheath and sleeve with miniature hose clamps may be an easy and permanent fix. It is easy to do and sure worth a try. If it doesn't work you can feel free to curse me
I saw those but the joystick didn't have the allen bolts as shown. I rewatched it after seeing your previous post and it made me think I must have missed something and I did, there's a lot of circular recesses on that damn thing and I probably didn't have my glasses on but there is bolt down inside one of them, it was late yesterday evening and I haven't gone back to work on it yet but that will probably do the trick. Thanks.valve end:
joystick end:
I live in central Texas, sub-freezing weather isn't that much of a problem, uh..., except last year, that was an insanity I hope not to EVER have to deal with again! 5-6 deg two nights in a row is just wrong! We're usually more like Brazil. The first time was just just 3 months ago or so.On a related note, did the joystick start sticking when the nights started to get below freezing?
If so, look at the loader control valve and the spring caps on the side of the valve opposite from where the cables attach. If heating the spring caps on the valve body makes it unstick, or if unscrewing them on a warm day makes water drain out, it wasn’t the joystick or cable that was sticking.
…that was my cause of stuck joystick problems anyways. (Many FEL valves are made in Brazil. Humid jungle air in those caps freezes up here. That’s my theory, and I’m sticking with it!)
Great, thanks for that. I would never have thought that 'cable' was actually part of the sheathing. I would appreciate seeing pictures but no rush, I'm really slow and have other things I'm also busy doing slowly.After another trip out to the shop to look at the parts, I have found out more. The sheath is made up of more items than I mentioned. There is the outer rubber casing. Beneath that is the spiral wound metal. Beneath that are a bunch of longitudinal wires laying in a circular pattern that you are assuming are the inner cable. That is actually part of the sheath. The inner cable is actually a solid metal (not woven wire) similar to what I have seen on some emergency brake cables.
So I doubt your ball end is broken off and it is still just your outer sheath that needs to be reconnected.
I have taken some pictures and will send them later today but I am late for an appointment right now.
It is no problem whatsoever to startup your tractor with with the joystick apart. If you FEL is off the ground you can move it too.
You gotta get the cable out and on a hard surface to use that crimper. If the cable needs to come out of either replace or try. Drilling some holes in the crimp area, put wire back in, crimp a bit then weld the drilled holes to the cabling.Thanks for the replies. I have this thing that's for crimping huge electric wires, could you do an adequate job with that?
I haven't taken it apart yet so I'm not even sure what the cable end looks like. Is the threaded part attached with some kind of sleeve to be crimped or is it one piece and is it a standard that can be purchased?
I don't think I would try to crimp it. (Just my opinion). Tony is right, you'd have to get the cable out to crimp it, which is a sizable hassle. Second I would worry about binding up the inner cable from crimping enough to make it hold. Those inner wires on the sheath are loose and are not bound together by anything by the spiral winding that is now compromised, so they wouldn't crimp well)You gotta get the cable out and on a hard surface to use that crimper. If the cable needs to come out of either replace or try. Drilling some holes in the crimp area, put wire back in, crimp a bit then weld the drilled holes to the cabling.
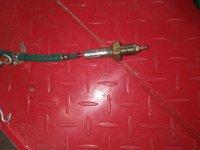
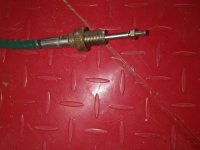
Thank you, that is a big help. You definitely can't get the cable/ball assembly out without disconnecting the other end. I was thinking removing the hex bolt that screws in from the bottom where the cables enter would somehow let that happen but it only does something to the pivoting ball that isn't connected to a cable. Disconnecting the other end allow you to slide the cable in enough to get the ball out of the Triangular Joint as Short Line calls it. It's described in a writeup by dhattaway here which I had read and promptly forgot that rather crucial tidbit.Here are three pictures that help illustrate the situation.
The first picture shows my jury rigged solution to hold the sheath in place. It actually worked for a couple of months until the new joystick/cable arrangement came and I found time to change it. With hind site, there are better and more permanent "jury rigs" I am sure.
Picture 2 shows the cable removed and the sleeve pulled back. Notice the sheath construction of straight wires surrounded by a spiral wrap covered with rubber. Also notice the inner cable construction of a spiral wound metal band.
Picture 3 shows the sleeve pulled into position. At the end of the inner cable is a threaded rod that screws into the ball arrangement on the joystick. I seriously doubt this metal rod has came detached on your cable. I think everything on mine looks similar to the situation you have.
More notes: I doubt very seriously that you can even disconnect the cable from the joystick without also disconnecting it at the other (hydraulic controls) end. And I am still not sure how you would disassemble the joystick. I can now see why Branson sells the cables/joystick unit as one item and not separately. The whole arrangement is so esoteric and complicated, the average mechanic could probably not change a cable alone without a great deal of frustration. I highly suggest you try my solution of a plastic tubing sleeve clamped in place to hold the sheath to the sleeve. Use 4 miniature clamps just to be safe (2 on the sleeve, 2 on the cable. All as close together as possible.) This can be done with the cable in place and no disassembly. Otherwise you will have a major jigsaw puzzle type of repair that would be difficult to re-adjust correctly if you did figure out how to tear it all apart..
That's a great price and looks like it would work if it was long enough but 35" is way too short. Not sure about the threads and movement range either.