Mantle

/ Mantle #1  

forgeblast

Elite Member
Joined
Apr 23, 2005
Messages
4,127
Location
nicholson, pa
Tractor
John Deer 318
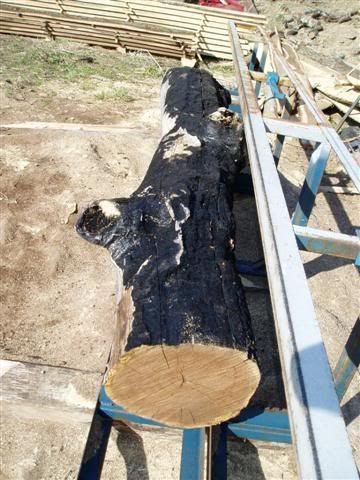
I started this project in August of 2011. I dropped a hemlock tree that was the right size that I needed. I then used a Granberg mini mill to square it up using my husky saw (353).

(here is an example from another mantle I am making for a friend of mine his mantle will be 99鋳 long and as big as I can get from this log. It will be made out of aspen (poplar) so when it dries it will be lighter due to the size of it. It also has to be lighter due to how it will be hung(in between a mortar joint).
range008.jpg

range007.jpg

range014.jpg


From there I let it sit until June of 2012 in the lean to next to my barn.
projects1004.jpg

The weight dropped considerably. I then began to make sure that my design would match up with what my wife had said she wanted. (Double and triple checking at different points along the way made sure that I had it right).
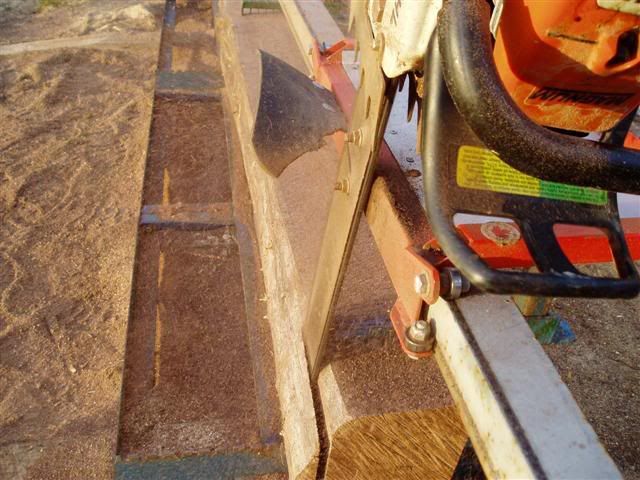
There was not much burn out from using the chain mill. But I didn稚 want the 杜echanical marks of the chain showing.
mantle006.jpg

I took a hand plane and used it to knock all the chain saw marks off the mantle.
This worked wonderfully, great tool for the job.
mantle009.jpg

I was really surprised how well this worked. I also used an Adz but the problem was that they were making the log too smooth. My wife wanted it to look 途ustic? and would say more rustic, nope needs some more. Her rustic for the mantle was what I call 努arzone rustic?
mantle011.jpg

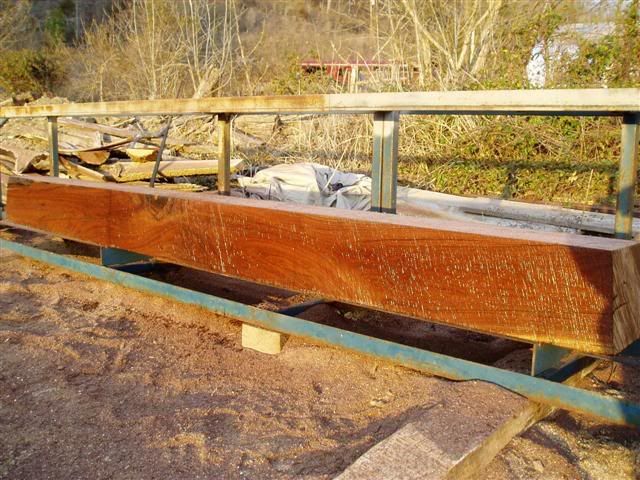
Once I had that done I looked for the best sides and the worse side(my first side using the mini mill became the back).
After the hand plane I attacked the mantle with an adz, draw knife, Bruks woodcarving ax, and a scorp.
mantle014.jpg
(My daughter (3) also helped, I held the ax and she give the mantle a few whacks. The whole time I was telling her 澱e careful mommy will kill daddy with this if you get hurt lol).
mantle015.jpg

mantle016.jpg
 
/ Mantle
  • Thread Starter
#2  
mantle003.jpg

I then took measurements in the house and transferred these measurements to a 1x4 board. I then took the board back into the house to make sure it fit. Once I was sure I had the right size I used the board as a guide to cut the mantle to size. This was the one part where I was worried. I did cut the end that would not be seen. I used a hand saw to cut it and it went real smooth.
mantle024.jpg

The edges are a mix of straight and curved. The top of the mantle has a few not many /forgeblast/mantle024.jpg[/IMG]
mantle025.jpg


Once that was done I sanded going through a lot of disks. I started at 80 and went up to 320 in disks and then hand sanded 400 and 0000 steel wool.
mantle021.jpg

A trick I can share is that the steel wool was in every nook but I used a high powered magnet to pull all the shavings out.
I then tack clothed it, and began the process of developing the colors to match the stain we wanted.
I took every single container of stain out that we owned and using some cut off pieces of the mantle applied one and then two coats. I also started mixing the colors to see how it would look.
We ended using Cabot early American to lay down the first tone. Then I mixed up Minwax Walnut Gel 606 and Formby’s Tung oil to make a more liquid mix that I could use to get into the smaller ax cuts and depressions. The stain was put on with an old t-shirt and then wiped off. I did this twice on each side.
mantle028.jpg

mantle026.jpg

After that 3 coats of poly were put on the sides along with 4 coats of poly on the top.
(the back was not poly’ed)
Then it sat in the house for two weeks to get use to the house.
mantle029.jpg

mantle030.jpg

The three cuts there are to represent our family.
I then searched and searched on how to mount the mantle. The best way and the way that would work for me is to use 10’’ lag bolts drilled and then screwed into the studs. Making sure that at least 2/3 of the bolt would be able to go into the mantle you then cut the head off the bolt.
The chimney needs 2’’ of clearance which it has with the thimble around it. The stove is an lp stove a jotul GF600dv 30-38k btu.
I made a paper mock up of the back of the mantle to see where it would go.
range001.jpg

This way I could drill into it to find the studs and then transfer the holes into the mantle accurately.
mantle1002.jpg

I predrilled and then put the lags in.

I then cut the heads off the lags.
mantle1003.jpg
 
/ Mantle
  • Thread Starter
#3  
We test fit the mantle and then decided where to put in the corbels. The corbels are cast from concrete and were found at a local brick/stone dealer.
I used a 5 min epoxy to put in the holes and then we put the mantle on the wall.
The brown paper is to catch any epoxy that might drip.
mantle1006.jpg


I will also be putting stone under the mantle.
mantle1009.jpg

This was day 1 had to finish screwing down the hardiboard but I had to get the right angle driver from harbor freight to get behind the stove. (moving the stove would have been a bigger pain then working around it. I also had to put in the adjustable box(outlet) extenders.
mantle1009.jpg


You can see the corbels.
mantle1010.jpg


The stone that will be going under the mantle is a mix. I have some stone from my mother痴 uncle who was a rock hound in Az. I have some fossils and a few stones from a Boy Scout camp I worked at and attended.

This the stone in place.
2007.jpg


It was also sealed with two coats of 511 stone sealer. That was the easy part. Grouting was next. I didn稚 cut a single stone. The heart stones that are under the corbels were found as where all the other stones.
mantle3005.jpg
(the one cut piece of bluestone that has the plant impression in it was given to me,
mantle4.jpg

and the fossil of the bug (bee?) is 40-60 million years old got that from my uncle but the picture would not come out.).
The other fossils of shells where found by me when I took a class in geology, but the place where you could get them from was sealed up. (they looked like angel wings according to my daughter.)
mantle3004.jpg

This is the lighting stone which ended up playing a part in the grouting process.
mantle3002.jpg
 
/ Mantle
  • Thread Starter
#4  
I used a sanded grout #19 pewter. I also forgot to pick up a grout bag so I would fill half a ziplock bag and cut the end making a grout bag.
What else went wrong? Power went out as I was grouting a huge thunder/lighting storm came through. Power came on and I was able to get the rest of the grouting down.
2007.jpg


Next day I noticed (now that I had more light) that there was grout on the stone and I had a lot of haze. I used a grout haze remover and a plastic bristle brush to scrub the stone and get it all cleaned up.

I waited another day and then sealed it with a High Gloss sealer. I wanted the stone to pop and so that you can see the colors.
I can finally enjoy it.
mantle3001.jpg

(I Have the molding done, they just need to dry out in the barn(my wife is sensitive to that stain smell.)
 
/ Mantle #5  
Dude, that is outstanding, I love the small details...great job!

I have a walnut cant I milled out with my CSM(one of my very first attempts). The tree had been burned at some point & time & didn't look like much. But when I milled it it was beautiful. I have had it sitting in a shed since 2004 or 5 waiting to me my mantle over a river rock hearth.
woodbug111.jpg


woodbug114.jpg


woodbug120.jpg


I've moved on to a Band mill, but sawdust is in my blood(and pockets):laughing:
 
/ Mantle
  • Thread Starter
#6  
M7 thats awesome!. True about the sawdust it is everywhere when you use the csm. I love the grain in that log, its going to be awesome.
 
/ Mantle #7  
How do you like your Granberg? I read a lot about them and what a great way to mill 'em where they fall.
 
/ Mantle
  • Thread Starter
#8  
The mini mill is great to set up. I found a nice 2x6 and mounted the guide strip on the edge. I wish I could have found a ripping chain before they discontinued them for the 325 pitch. I was told to go with a full or semi chain and I would get the same results. My buddy just won (at an auction) a grinder and I am thinking about taking a chain up there to grind it to 10 degrees to make a ripping chain.
I wanted the mill to so some furniture, or just to make beams if I ever get around to trying to timberframe or any cordwood construction projects. It does it job. The g776 (alaskan mill) is what I would get if I was going to be making lumber. (that and a saw that I could use the ripping chain on).
Since I dont have a big boy tractor yet I really dont have anything to pull the large logs out of the woods. Most of my work is done on site. If its splitting and cutting wood I will cut and split in place. If its mantle work same thing. This one is near our shooting range (which I still have to post a few pics of) and I wanted to clear up the shooting lane.
 
/ Mantle #9  
Nice work. I enjoyed the pictures. I thought the addition of "three cuts that represented your Family" to be an excellent idea, and will assure you of fond memories every time you look at them. :thumbsup:
 
/ Mantle
  • Thread Starter
#10  
Thanks Creekbend, it has really transformed the room. I like connecting my family into these projects my wife and daughter both were both able to put some stone on the wall too.
Since we moved into the house (ten years next year) my wife wanted a mantle to hang stocking for Christmas. Its nice to finally give her that gift.
 
/ Mantle #11  
Yep, 10 degrees is what I filed mine too. You can also go down to zero or anything in between.
 
/ Mantle #12  
Good Morning Forgeblast,
Wow what a beautiful job !!! Just amazing detail, you really put some real effort into that project !

My only small concern, is how close that stove pipe is to the wood... it looks kind of close in the pics, but it may be farther than pics...

Im just thinking out loud, if there ever was a fire in the pipe, would it be a problem ?

In any event, beautiful craftsmanship ! :)
 
/ Mantle
  • Thread Starter
#13  
Thanks Scott the mantle is 2 1/2 inches away from the pipe it only needs to be 2. Its a zero clearence lp stove by jotul.
Thanks M7, did you notice a big improvement once you refiled?
 
/ Mantle #14  
Fb, I never milled with anything more than 10 degrees, so I can't say. What I can say is that read learn & study how to get your chains razor sharp and that makes a huge difference.

I saw a video a long time ago which stated boldly that filing against the tooth produces a longer lasting edge. I was taught back in the 80' to file with he tooth. But, the reason is that filing with the tooth leaves a rough filed lip of the really thin hard chrome coating(which is what does most of the cutting work) hanging off the edge of the tooth that breaks off soon after contacting wood leaving a divit on then cutting edge. Filing against it prevents that ragged edge and keeps a seamless transition from the hard chrome and the steel underneath the chrome.

Both methods can be equally sharp, but the filing in to the cutter definitely holds an edge quite a bit longer.
 
/ Mantle #17  
nice work :thumbsup:

I love the look of hand hued timbers...and I collect both foot and hand adzes...but some flea market vendors etc. must think they are made out of gold by what they ask for them...
 
/ Mantle #18  
FB, that looks great...nice job! There is an old abandoned farm house behind my place. The outbuildings & what must have been a barn still have walls standing 8-10' high. They are all hand hewn Chestnut.....massive...12-16" tall & 8-10" wide buy 12-16' long. Every time I'm back there I just stare at them and think, "I really need to call the land owner and work something out with them to recover these timbers".
 
/ Mantle #19  
That is awesome! Love the 'rustic' look and stonework really makes it standout.
 
/ Mantle
  • Thread Starter
#20  
Thank you all! I appreciate the kind words. The stone sealer really brought out the colors of the stone and my wife was able to hang the stockings there this year (i moved them to the edges after the picture). We also were able to find a lot of old picture frames that fit the house.

hand hewn Chestnut...one of my favorite woods.

I cannot wait for the douglas crosses (blight immune trees) to be released to the public. I plan on putting a lot of them up on our property.
 

Marketplace Items

8 TOOTHED BUCKET FOR MINI EXCAVATOR (A58214)
8 TOOTHED BUCKET...
Water Tank (A61570)
Water Tank (A61570)
2021 CATERPILLAR 302.7DCR EXCAVATOR (A62129)
2021 CATERPILLAR...
KJ K4020 40'x20' Carport Shed (A60463)
KJ K4020 40'x20'...
2013 John Deere 333E (A60462)
2013 John Deere...
1998 FORD F-150 SINGLE CAB TRUCK (A59823)
1998 FORD F-150...
 
Top