Thanks for the reply, Rivco. I like the idea of the angled boom for the reasons you have given. Since I am still in the planning stage, I have a lot of things to consider before starting. Anything you would change on yours now that you have had some time to use it?
You are using an out of date browser. It may not display this or other websites correctly.
You should upgrade or use an alternative browser.
You should upgrade or use an alternative browser.
Members home made attachments / improvements
- Thread starter Barryh
- Start date
- Views: 237778
More options
Who Replied?
/ Members home made attachments / improvements
#151
Rivco
Silver Member
TRUKFXR said:Thanks for the reply, Rivco. I like the idea of the angled boom for the reasons you have given. Since I am still in the planning stage, I have a lot of things to consider before starting. Anything you would change on yours now that you have had some time to use it?
YES!! AND NO!!

After going back and reading Sedgewoods posts on his damaged mini hoe, ( I always thought the PT mini hoe had a 4 x 4" boom... what a shock to find out it's only 3" x 3" x 1/8" wall stock ) I would recommend using 1/4" thick wall stock for the boom/dipper arm. My 180 was a much smaller machine so my mini hoe worked flawlessly.
OP
Barryh
Veteran Member
- Joined
- Jul 5, 2005
- Messages
- 1,588
- Tractor
- Former owner of a P T -180 / Kubota BX-1500 .. A Craftsman Yard Tractor / John Deere 140 H-1 / Cub Cadet 108. And now ( Little Red ) a Power Trac 1425
I bought 4x4 in 1/4 wall because 4x4 tube is what the lacklender bucket requires. 1/8 man that is light duty.Rivco said:YES!! AND NO!!
After going back and reading Sedgewoods posts on his damaged mini hoe, ( I always thought the PT mini hoe had a 4 x 4" boom... what a shock to find out it's only 3" x 3" x 1/8" wall stock ) I would recommend using 1/4" thick wall stock for the boom/dipper arm. My 180 was a much smaller machine so my mini hoe worked flawlessly.
Sedgewood
Platinum Member
Rivco said:WOW !!- That amazes me that Power-Trac would build their minihoes with
1/8" thick wall stock especially on a 3" x 3" ( went back and read your post on the damage ) boom / dipper arm being used on the larger power tracs
Yes, 1/4 inch wall. Eek indeed! I was none too happy to find 1/8 inch wall tubing on the boom. 1/8 is probably heavy enough for a 425 (without a thumb - that's a whole new ballgame) but my 1845 is a much heftier beast. It looks to me like they stuck an 1845 quick attach plate on a 425 minihoe and called it good.
Sedgewood
OP
Barryh
Veteran Member
- Joined
- Jul 5, 2005
- Messages
- 1,588
- Tractor
- Former owner of a P T -180 / Kubota BX-1500 .. A Craftsman Yard Tractor / John Deere 140 H-1 / Cub Cadet 108. And now ( Little Red ) a Power Trac 1425
Ok for anyone interested. I did some work on my electric grapple today. Since we are on the subject of 1/8 inch steel which is what my grapple frame is made of. I decided to use a less wide stance for the grapple. Was reading this thread. Scroll to about the 5th response by Tractor Island.Sedgewood said:Yes, 1/4 inch wall. Eek indeed! I was none too happy to find 1/8 inch wall tubing on the boom. 1/8 is probably heavy enough for a 425 (without a thumb - that's a whole new ballgame) but my 1845 is a much heftier beast. It looks to me like they stuck an 1845 quick attach plate on a 425 minihoe and called it good.
Sedgewood
http://www.tractorbynet.com/forums/attachments/106573-grapple.html#post1211332
It makes sense to me. More of a concentrated bite not only takes less force, but should reduce twisting on the bucket / grapple frame. As J.J. mentioned 600 pounds is really not a lot of power although, I'm confident it´s enough to accomplish anything I need to do around here.
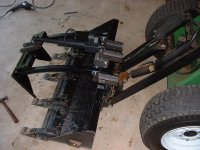
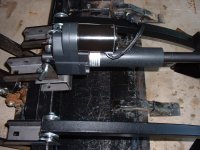
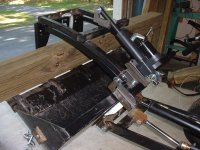
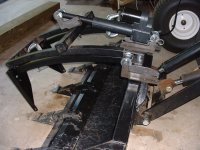
Here are a few pictures. I have everything mounted. Holes drilled bushings in place, but need to turn the mount around for a better cylinder angle. I just started figuring the electric cylinder stroke when I packed it up for the day. Hopefully I will get it done by next weekend for a trial run. If not, I may hang my head in shame and never post again.....
Attachments


Last edited:
Rivco
Silver Member
Barry your grapple project is coming along fine. I think you made the right decision to shorten the width of the grapple. Have you tried the 12 volt actuator attached to the grapple yet ?
OP
Barryh
Veteran Member
- Joined
- Jul 5, 2005
- Messages
- 1,588
- Tractor
- Former owner of a P T -180 / Kubota BX-1500 .. A Craftsman Yard Tractor / John Deere 140 H-1 / Cub Cadet 108. And now ( Little Red ) a Power Trac 1425
Will be hooking it up this weekend for testing the angle and adjusting....Rivco said:Barry your grapple project is coming along fine. I think you made the right decision to shorten the width of the grapple. Have you tried the 12 volt actuator attached to the grapple yet ?
OP
Barryh
Veteran Member
- Joined
- Jul 5, 2005
- Messages
- 1,588
- Tractor
- Former owner of a P T -180 / Kubota BX-1500 .. A Craftsman Yard Tractor / John Deere 140 H-1 / Cub Cadet 108. And now ( Little Red ) a Power Trac 1425
Well I did some more grinding metal mounts and lined everything up. I also decided with the 1/8 inch wall tube frame which seems more than strong enough by itself. To double it up with another section on the top for added twist reinforcement. So I now have a basic tested working grapple.
Loving life so far. Next weekend I will neatly string my wiring through the frame and to the console inside my cab..add some pins to mounts so they don't move or turn. Add two fangs in the form of thick angle iron with sharp points for the front teeth. Drink a beer or two then taker for a spin and hope I don't get pulled over.....
I plan to mount a cigarette lighter receptacle under the dash so it can be used for other 12 Volt accessories. Heater / fan etc.
The grapple appears to work great. It clamps down nicely no binding on either end seems to have plenty of power for its intended use. When it bites down there's a built in clutch so as not to damage the internal screw ball assembly.
On the subject of the 600 pound load / bite, these actuators have a static load rating of 2000 /3000 pounds. So once it does bite down on something it holds it in place without movement which is a big plus when carrying something heavy.
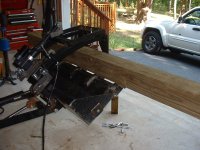
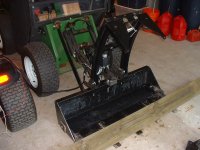
Although I have not driven it around yet I did test it on this 6x6 timber. Seemed to do a nice job of picking up and holding it in place no sweat. I hooked everything up temporarily using my trusty Craftsman tractors electrical system. Taking no chance's of burning up my PT wiring. No worries everything works like it's suppose to.
A few pic's of the grapple testing picking up a 6x6 timber.
Loving life so far. Next weekend I will neatly string my wiring through the frame and to the console inside my cab..add some pins to mounts so they don't move or turn. Add two fangs in the form of thick angle iron with sharp points for the front teeth. Drink a beer or two then taker for a spin and hope I don't get pulled over.....
I plan to mount a cigarette lighter receptacle under the dash so it can be used for other 12 Volt accessories. Heater / fan etc.
The grapple appears to work great. It clamps down nicely no binding on either end seems to have plenty of power for its intended use. When it bites down there's a built in clutch so as not to damage the internal screw ball assembly.
On the subject of the 600 pound load / bite, these actuators have a static load rating of 2000 /3000 pounds. So once it does bite down on something it holds it in place without movement which is a big plus when carrying something heavy.
Although I have not driven it around yet I did test it on this 6x6 timber. Seemed to do a nice job of picking up and holding it in place no sweat.
I hooked everything up temporarily using my trusty Craftsman tractors electrical system. Taking no chance's of burning up my PT wiring. No worries everything works like it's suppose to.A few pic's of the grapple testing picking up a 6x6 timber.
Attachments


IslandTractor
Super Star Member
- Joined
- Sep 15, 2005
- Messages
- 16,647
- Location
- Prudence Island, RI
- Tractor
- 2007 Kioti DK40se HST, Woods BH
Barry, that grapple looks like a really nice project. I haven't followed this whole thread so can only comment based on the photos you just posted. It looks to me like you have a relatively long grapple arm which gives an "overbite". Is that correct? Having an overbite can be helpful for some applications but makes it more difficult to compress a small or narrow load as the compression is limited when the grapple hits the front of the bucket on closing. An underbite doesn't allow you to grab as big a load but permits the grapple arm to come into the bucket and compress the load more tightly. It will be interesting to see how your setup works in real life.
How far can you "dump" the PT bucket? I ask because another factor to consider in determining the length of the grapple arm is that you would ideally like to be able to come down on top of a load (rather than scooping it up) as that gives you flexibility in situations where scooping just pushes the material ahead. I've posted a photo of my store bought grapple in the "top down" mode so you can see what I mean. Using a grapple in this mode is most conveniently done with an upper arm that doesn't extend beyond the bucket bottom as you close as otherwise you will be digging dirt with the upper grapple arm while trying to compress the load.
How far can you "dump" the PT bucket? I ask because another factor to consider in determining the length of the grapple arm is that you would ideally like to be able to come down on top of a load (rather than scooping it up) as that gives you flexibility in situations where scooping just pushes the material ahead. I've posted a photo of my store bought grapple in the "top down" mode so you can see what I mean. Using a grapple in this mode is most conveniently done with an upper arm that doesn't extend beyond the bucket bottom as you close as otherwise you will be digging dirt with the upper grapple arm while trying to compress the load.
Attachments


OP
Barryh
Veteran Member
- Joined
- Jul 5, 2005
- Messages
- 1,588
- Tractor
- Former owner of a P T -180 / Kubota BX-1500 .. A Craftsman Yard Tractor / John Deere 140 H-1 / Cub Cadet 108. And now ( Little Red ) a Power Trac 1425
Hi there Ed,IslandTractor said:Barry, that grapple looks like a really nice project. I haven't followed this whole thread so can only comment based on the photos you just posted. It looks to me like you have a relatively long grapple arm which gives an "overbite". Is that correct? Having an overbite can be helpful for some applications but makes it more difficult to compress a small or narrow load as the compression is limited when the grapple hits the front of the bucket on closing. An underbite doesn't allow you to grab as big a load but permits the grapple arm to come into the bucket and compress the load more tightly. It will be interesting to see how your setup works in real life.
How far can you "dump" the PT bucket? I ask because another factor to consider in determining the length of the grapple arm is that you would ideally like to be able to come down on top of a load (rather than scooping it up) as that gives you flexibility in situations where scooping just pushes the material ahead. I've posted a photo of my store bought grapple in the "top down" mode so you can see what I mean. Using a grapple in this mode is most conveniently done with an upper arm that doesn't extend beyond the bucket bottom as you close as otherwise you will be digging dirt with the upper grapple arm while trying to compress the load.
Yes this thread is getting a little long, but if you have the time go back and see some of the stuff these guys have done. Just good ol american ingenuity and know how.
I plan to tweak it some more next weekend. The bucket does drop down just like yours with the teeth about the same Alignment, and I can adjust the bite somewhat. It goes to the edge and down between the teeth so it looks a little over bite. The brackets can all be turned around for adjustment. I think it will be fine with a few other ideas I have in mind.
Considering I didn't have any welding equipment, and used basic tools I had in my shop. I had to calculate everything in my head on the fly. And envision how it would come together, with the materials I had at hand. Ed, here is a picture of the bite and keep in mind the arms can come back somewhat and as it drops below the bucket teeth it angles closer into the bucket. I understand what you are saying though.
I am pleased with it so far, next weekend will be the real test after I fine tune everything. Thanks for your input it is appreciated. That is one fine tractor you have there. I'm guessing it is not quite as costly as a Kubota, and I'll bet it's more capable too.
Attachments

Last edited: