MF 165 Engine Break Down - Comments welcome Please

   / MF 165 Engine Break Down - Comments welcome Please #1  

dmark1975

Member
Joined
Aug 30, 2011
Messages
44
Location
Dublin, Ireland
Tractor
MF 165
Hi all,

I have attached some pictures of my MF165 (1974) which I have stripped the engine down to investigate oil coming out of the exhaust during operation. Any comment welcome on the pictures to see what you all think. There was no oil or water mixing in cooling system or in oil. Do you think I need to keep going and strip engine further or do you think a clean up and seals will sort problem after I replace the seals on the valves?

Also what could I do to remove the rust and build up?

I will add I am no expert on any but am willing and able!
Thanks in advance
 

Attachments

  • IMAG0309.jpg
    IMAG0309.jpg
    311.6 KB · Views: 567
  • IMAG0318.jpg
    IMAG0318.jpg
    302.5 KB · Views: 1,628
  • IMAG0327.jpg
    IMAG0327.jpg
    288.6 KB · Views: 627
  • IMAG0329.jpg
    IMAG0329.jpg
    992.4 KB · Views: 597
  • IMAG0332.jpg
    IMAG0332.jpg
    313.7 KB · Views: 583
   / MF 165 Engine Break Down - Comments welcome Please #2  
I wish you would have taken a picture of the the other side of the head showing the valves but other than that... awesome great pics.

When you say oil in the exhaust, do you mean its blowing actual liquid drops of oil out the pipe or is it smoking really bad.
Does it use alot of oil? How much do you have to add and how often?

Are you getting any blow by out the blow by tube coming off the valve cover? Is it spitting oil there or puffs of smoke, or nothing at all?

Since you have the head off, go ahead and break it on down and check the valve guides and see how much play you have in them.
I would almost take the head to a machine shop and have a proper valve job done on it but you can lap the valves if the guides are tight.
If you have never compressed valve springs and released the keepers, use caution and a good backstop as they can get away from you.

On the other side of the head, (looking at the bottom of the valves) do you see any signs of a burnt valve?

Any thing odd in the teardown - bent pushrods? bad loose rocker arm?
Take a good flashlight and look down into the holes and look at the surface of the lifters and inspect those really well.

Your cylinders look good (normal), not what I would have expected from what you are saying it was doing.
If you have a way to properly measure the diameter of the cylinders, that would be good to know as well.

Lastly - that corrosion is some of the worst I have ever seen in all my years of doing this, and I have no clue how you will get that out of there while its still in the frame. I am sure there are some cleaners out there that will knock some of that out but thats pretty bad. Did the antifreeze have a rancid smell to it?
 
   / MF 165 Engine Break Down - Comments welcome Please
  • Thread Starter
#3  
Thanks for the reply!!

I was going to take some pictures of the valve heads but I had the block sitting in some degreaser when I took the photos. I will take some and post them before dismantling the valves. I've stripped a lister petter before so have an idea how those springs like to travel!! I bought the correct tool after a near miss :eek:

In reply to some of your questions:

There is evidence of oil contamination at the base of the exhaust @ the manifold where the silencer is attached when the engine is running. I really noticed this after I fitted a cap to the exhaust. It never seemed to spit oil out of the exhaust and I have never intentionally topped the engine up with oil. (Unfortunately I never checked the oil level before I emptied it before strip so I've no idea) I have not noticed any oil coming out of the breather tube either and there is no major evidence of this from looking at the inside of the tube for residue. The smoke is more white than anything but is alittle blue/black.

I did notice that when I began dismantling the two outer rocker nuts were tight and secure but the two inner ones were very loose with approx. 1cm of play on each one which I presume would have affected the rocker shaft and the rods. The wear on the rockers is very even with no grooves or grinding. There was a lot of black smudge in this area and some evidence of small deposits of oil sitting in the pan. Rods appear ok but have slight curve on them. I have put them in degreaser to clean and inspect so will have a look at them next. When I took the head off everything looked pretty good. Head gasket still very intact with no obvious damage anywhere. There was very little deposits in the pistons and used hoover to take out. Looked like carbon deposits.

One of the lifters appears to be higher than the others but need a good light to really have a look at this and try to picture.

As for the corrosion I don't know what to do, I may have no option but to strip it just to enable the descaling of the engine.

I will get back to you with some additional pictures.

I'm terribly excited about doing this but equally scared :eek:
 
   / MF 165 Engine Break Down - Comments welcome Please #4  
Some engines does spitt out some black fluid if they only is used for light work.
Some hours with hard use often fix the problem.
 
   / MF 165 Engine Break Down - Comments welcome Please
  • Thread Starter
#5  
I'm beginning to wonder that myself looking at the internals now Agvg!! The tractor needed a lot of TLC cosmetically and Im assuming it sat up for years before I bought it off a dealer for not bad money! I knew what I was buying but had no idea what to look out for! I like a challenge :)
 
   / MF 165 Engine Break Down - Comments welcome Please #6  
When I read your post I took from it that it was blowing oil out of the pipe, but now that you posted the reply, I feel better about the engine.

I think Agvg is right. Some of the older tractors with some hours on them will smoke (mostly white) when they are first started. Once they come up to operating temperature most of them will clear up enough that you wont notice it. He is also correct in that they need to be worked to keep them running properly. Once they are at operating temp you should be able to go from idle instantly to 75% to 80% throttle with just a brief puff of black smoke till the engine catches up with the injector pump. So a little black smoke under a brief load is somewhat normal. If its a constant heavy smoke, some changes to your settings need to be made, whether its a gear change or a lighter depth of cut on your implement.

How many hours does the hour meter show?

As for the lifters being different heights, that is normal, depending on the position of the cam lobe. So when you tore the engine apart and found the lifter raised higher than the other, that would be raising the push rod, pushing on the rocker arm, making that valve open. That is why some rocker arms feel tight when you wiggle them. If they do wiggle a small bit, that actually is normal is the valves are set properly.
When your piston come to TDC (top dead center) on the compression stroke (firing), you can and should be able to wiggle both the intake and exhaust rockers on that cylinder since you dont want any down pressure on the springs because you want the valves completely closes at that very moment.

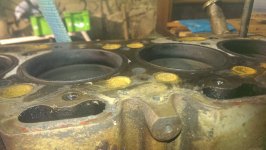
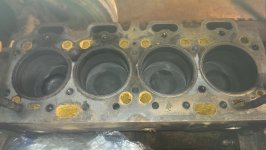
Chances are there is nothing wrong with the motor or the internals, but since its apart, check your valve guides and if you find nothing wrong with them, lap the valves in and put it back together.
Take your injectors and have them tested and check the spray pattern of the nozzles and make sure that chatter with a mist of diesel versus just spraying out a solid stream of it. This will cause some of the smoking issues. You probably need new nozzles if they have never been changed out. Make sure that they look up the two letter code on the injector and set the pressure correctly on them.
For instance I just recently did a set of injectors that had a tag attached under the bottom of the two caps that read A N . So I look up A N for that motor and it tells me working pressure and setting pressure. Working pressure was 2500 psi but the setting pressure is 2600 psi. So they will remove the top cap, loosen the bottom one which is actually a jam nut for the adjuster. They perform a test on all of them and adjust them accordingly to the pressure results.

Be sure to install new sealing washer on the bottom of the injector make sure you have all 4 of the old ones in your hand and that you didnt leave one down in the injector hole or the new one will not seat against the old one and it will not let you injector protrude down into the head where its supposed to be.

Also new crush washers for the return line and the banjo bolts that hold it down. Do not overtighten them, they will break.
 
   / MF 165 Engine Break Down - Comments welcome Please #7  
I have two old tractors that had this problem, both where only used a few hours a year and then for very light use driving a wood splitter and a buzz saw mostly. Now they live a harder life and they are much happier.
Don't think running hours matter, one of them had only 600h on the clock and its 1975 model.
 
   / MF 165 Engine Break Down - Comments welcome Please
  • Thread Starter
#8  
IMAG0329.jpgIMAG0327.jpgIMG_0427.jpgIMG_0419.jpgIMG_0414.jpgIMG_0410.jpgIMAG0332.jpgIMG_0441.jpgIMG_0436.jpg

So the hours shown on the tractor are 5215 but it has been stopped for a long time I suspect as there was few instruments in the tractor when I got it and tacograph was disconnected and numbers are worn/rubbed as shown so it looks like it has been like that for a good long time and was in need of a lot of TLC!!! LOTS

So I'm going to continue on @ task and clean head etc and check valves etc and put it back together. The few minor problems I encountered would seem to answer the issues I was having and glad it is a smaller job than initially (more the money than the challenge) though I still have to split the tractor to do the clutch.
The tractor spent its lift on a cattle farm lifting silage bales so explains the play in clutch and brake pedals. Here are some additional pictures of engine. I suspect they will be useful to someone. The injectors were very dirty and I will replace them all. The picture shows it after been soaked in degreaser for 24hr so most of the grease and dirt had come off it.

I'm going to invest in a engine hoist so I can lift the parts easier and for lifting engine and hydraulic cap off. I also have another engine to attend to on my woodchipper. It is due a overdue service and engine attention...... possible rebuild involved here as head gaskets gone but only a 3 cylinder lister petter engine so will be interesting to see how rods have performed since the last overhaul....
 
   / MF 165 Engine Break Down - Comments welcome Please #9  
You dont need new injectors.
You just need new nozzles for the injectors.
Those injectors are tricky to hold in a vise upside down to remove the nozzle cap so you may need to build a fixture to locate on the 2 holes that the studs pass through to break the caps loose with a wrench on the 2 flats. I would spray some type of lubricant on those fine pitch threads now and let them soak as sometimes they are bad about not wanting to unscrew.

What is the 2 letter code on the injectors? You may need to clean them with a wire brush to find it.

It would not surprise me if that motor did not have 8-10 thousand hours on it.
I recommend taking the head to an engine machine shop that has a chemical vat or dipping process to clean it properly, as a head in that condition will cause the engine to smoke due to the oily carbon buildup in it. That will need chemicals to clean it up.

Great pics and I would love to see the complete tractor as well. Are you going to re-work the dash and install all new gauges in it?
What are your plans for it.
 
   / MF 165 Engine Break Down - Comments welcome Please #10  
I recommend taking the head to an engine machine shop that has a chemical vat or dipping process to clean it properly, as a head in that condition will cause the engine to smoke due to the oily carbon buildup in it. That will need chemicals to clean it up. .[/QUOTE]

I Agree!
 
   / MF 165 Engine Break Down - Comments welcome Please
  • Thread Starter
#11  
I will remember that for the injectors. The two letter code is DA82P by the looks of it. I plan on reworking the dash and try and re-use the original gauges if I can. I think the tacometer is goosed. I had a look at it this evening and everything seems to move around in it loose but I have put it to the side and will look at it closer to the time to see if I can reconnect it and if it will work and allow it to go on from there!

I originally bought the tractor to clear some scrub land for the horses so was not really worried about the condition but now I don't have the land anymore but will use it around the yard and do a bit of topping with my major 605 topper. I have all the original papers so would like to have it back in road worthy condition and may by bring it on some road runs. There is a very strong vintage community in my region. I will post some more photos soon.

I have ordered an engine hoist and stand today to work on the engine and help with the process. I have also ordered myself a sandblasting cabinet to clean down some of the parts and should be useful with other things in the future around the place for light cleaning!
 
   / MF 165 Engine Break Down - Comments welcome Please #12  
Your tach will (should) have a cable attached to it that connects to the engine. When the engine is running it spins that cable within the housing and therefore turn the gear in the tach to give it the reading. You can disconnect the end that hooks to the engine and remove the cable and see if you are able to spin the inner cable by hand. If not, you can soak it in lubricant to free it up. If one end spins freely and the other end doesnt you have a broken tach cable. If you are able to get the whole length of the cable free'd up where you can spin it, you can then attach the motor end of the cable in a power drill. Attach the tach end back into the tach and tighten it up. Apply power to the drill, starting off slowly and then see if it raises the needle on the face of the gauge. Most power drills will turn roughly 900 r.p.m.'s so you shouldnt do any damage to the tach. You will need to pay attention to the direction of the drill when you first start as you dont want to spin the tach backwards at high speed. If you notice the needle dropping below zero you will need to reverse the direction of the drill.

I see more cables go bad than I do tachs going bad, so you may be in luck with this repair.


Regarding the injectors, Normally there are just 2 letters stamped somewhere. I have never seen anything like DA82P on one before. When you take your pictures be sure to get 3 or 4 shots of an injector after its been wirebrushed clean.
 
   / MF 165 Engine Break Down - Comments welcome Please
  • Thread Starter
#13  
The tach cable was disconnected at both ends when I stripped it down. I suspect it was done to stop the hours going up!! I have put it all to the side to check at a later date and try to resurrect it to working condition. Other wise should I have to get a new one I will most likely use your idea to set the current showing on the old tack to the same hours on the new one using the drill.

I only had quick look at the injector last night with a wire brush. I can see where they screw out now with the grime and dirt gone. That was a number etched into it on the edge of the injector just where it screws onto housing, not stamped. I will have a look when a chance to clean them down. In the meantime they are soaking in solution. I have the workshop at work making me up a clamp to sit them in! Photos to follow when I get a chance
 
   / MF 165 Engine Break Down - Comments welcome Please
  • Thread Starter
#14  
The tach cable was disconnected at both ends when I stripped it down. I suspect it was done to stop the hours going up!! I have put it all to the side to check at a later date and try to resurrect it to working condition. Other wise should I have to get a new one I will most likely use your idea to set the current showing on the old tack to the same hours on the new one using the drill.

I only had quick look at the injector last night with a wire brush. I can see where they screw out now with the grime and dirt gone. That was a number etched into it on the edge of the injector just where it screws onto housing, not stamped. I will have a look when a chance to clean them down. In the meantime they are soaking in solution. I have the workshop at work making me up a clamp to sit them in! Photos to follow when I get a chance


ForumRunner_20140201_223458.png


ForumRunner_20140201_223515.png


ForumRunner_20140201_223539.png


ForumRunner_20140201_223552.png


ForumRunner_20140201_223552.png


ForumRunner_20140201_223657.png


ForumRunner_20140201_223552.png
 
   / MF 165 Engine Break Down - Comments welcome Please #15  
The CT stamped just above the injector line connection is the code I was talking about.

Make sure when you have the injectors worked over that you or someone who does the setting of the opening pressure replaces the copper sealing ring under the top cap. Once you break the cap loose they will leak the biggest majority of the time when you put them back together. Likewise you will need all the sealing washers for the return line banjo bolts. There are 2 per bolt.

To speed things up with your dealer, you can unscrew the bottom portion of the injector and write down the injector nozzle number and call them with that number to make sure they are in stock or if they will have to order them. Most of the time that nozzle number will start with DBB followed by a series of numbers.

Make sure when you take them apart - the nozzle is pointing straight up. Once the cap comes off, the nozzle is just sitting there resting on two small pins. Lift it off and be careful as the center pin in the nozzle could slide out. Most of the time you have to put a good amount of pressure on them to pull them out but I would not bother with it as you are only going to write down the number on the side of nozzle printed on the bigger diameter of it. There is a spring and a spring plug down inside the injector and that is why they need to stay pointed up so they will stay in there and not hit the floor and disappear. When you go to replace the nozzle, align the two pins and make sure that the 3rd hole (small fuel hole) aligns with the hole on the injector body. You will see what I am talking about when you take one apart. Snug it back down and take them to your dealer for testing.

Nice photos of the cleaned up injectors. Looking forward to seeing this restoration come together.
 
   / MF 165 Engine Break Down - Comments welcome Please
  • Thread Starter
#16  
IMAG0381.jpgIMAG0379.jpgIMAG0372.jpgIMAG0371.jpgIMAG0374.jpgSo reading back over the thread I've some additional info to add. I been busy cleaning the head down using chemicals and the valve ports are coming up nice and clean bit by bit. Its no wonder the tractor giving the state of the valves and the deposit build up in the head. There was no sign on the underneath of a burnt valve. I went to measure the cylinders but can't locate my callipers not that I actually need them :)

Some additional photos showing current shape of project while waiting on engine hoist and engine stand to do some clean up work on the engine and do the clutch while it is apart.

I dismantled the front axel today also and have an issue. It is not obvious where to dissemble the axel due to the nuts being corroded and broke.... should I drill?
The nut for the crankshaft has been tampered with at some point.... what's the best thing to do with this??

Cheers
 
Last edited:
   / MF 165 Engine Break Down - Comments welcome Please #17  
That is the crankshaft pulley bolt not the camshaft bolt. If you have to replace it, you will need to be correct in your wording when you talk to the dealer about the part.
You can get a die grinder (air or electric) and slowly work the outer edge of that bolt back into shape so that you can get a socket on it. I think you can do that and save it to the point that you can reuse it. If not you can order a new one for the rebuild. If you cant grind it down, I would consider using an air chisel to try and get it to spin off. It looks like someone used one to take it off and tighten it. The deep chisel mark that is still in the bolt appears to be a sign of them trying to turn it clockwise on assembly. Last thing I would try is to weld another big nut onto that nut so you can attach a socket to the outer nut to get it moving. I would try to grind it smooth first.

Post up some pictures of the axle where you are having the issue and I will see what advice I can give you about it.

I really like your progress on the restoration, you have taken the tractor apart like it needs to be to properly clean and rebuild. Yes it will take longer but your results will far exceed the hard work that you are doing now. Outstanding work and pictures.

Something else I want to add. I love the look of your shop/garage. That rock wall in the background makes for some great photos when that tractor is reassembled and painted.
 
   / MF 165 Engine Break Down - Comments welcome Please
  • Thread Starter
#18  
IMG_0542.jpgIMG_0541.jpgIMG_0540.jpgIMG_0539.jpgIMG_0538.jpgIMG_0537.jpgIMG_0536.jpgIMG_0535.jpgIMG_0534.jpgIMG_0533.jpgIMAG0381.jpg

Here are pictures of the axel frame. There was a screw to the front which I screwed out but it was actually broke when I removed it. In the center of the axel there seemed to be a retainer nut. This also broke when I went to unscrew it. The axel pin itself was not sitting in the housing and was rocking loose when you move the arm. I'm thinking now that it might be possible to knock out the pin out of the housing and get a new one from my dealer to replace the old one.
 
   / MF 165 Engine Break Down - Comments welcome Please #19  
get some kroil and wet everything well before you try to tear things apart
it's the best loosen-er I have found

I also like your workshop
the keg makes it complete
 
   / MF 165 Engine Break Down - Comments welcome Please
  • Thread Starter
#20  
The keg also has a sister...... perfect for making impromptu benches :)
 

Tractor & Equipment Auctions

Cushman Hauler 1200X Golf Cart (A57148)
Cushman Hauler...
1605 (A57192)
1605 (A57192)
ExMark Vantage 48in Stand-On Commercial Mower (A59228)
ExMark Vantage...
Toro Greenspro 1260 Towable Greens Roller (A56859)
Toro Greenspro...
2022 CATERPILLAR 303.5CR EXCAVATOR (A60429)
2022 CATERPILLAR...
2006 Mercedes-Benz Unimog 405 4x4 Flatbed Truck (A56858)
2006 Mercedes-Benz...
 
Top