MODIFY BRUSH HOG SOME MORE

   / MODIFY BRUSH HOG SOME MORE #161  
Rob
The 4 for the house are stacked to get 220 and in parralle to carry the current

The ones for the shop are just stacked to get 220 at alower current
I would spring for another one or the shop and eliminate the phase convertor.

It's easy spending some one elses money.
I am putting one invertor in (I'm on a lower buget than rob)

tom
 
   / MODIFY BRUSH HOG SOME MORE
  • Thread Starter
#162  
tommu56 said:
Rob

I would spring for another one or the shop and eliminate the phase convertor.

It's easy spending some one elses money.
I am putting one invertor in (I'm on a lower buget than rob)

tom
Hahaha, sure spend all my money. Heck this thread started because I was able to do a project from scraps ... thus saving money. Now you've got me trying to spend a bundle on another converter and you are using only one?:confused: Those babies are expensive man.

I was thinking of using the phase converter first since it cost me nothing to do it. Then if I find out it uses too much power, I can re-evaluate. Maybe cut out some of Loretta's electrical use?:D

Guess what,
I've actually got an update for the quick attach wheels and a few photos coming.
 
   / MODIFY BRUSH HOG SOME MORE
  • Thread Starter
#163  
You know how I was slicing those large tubes in half using a saw blade on the milling machine? Well that sucks. I ended up seizing the blades and eventually breaking them, so I quit doing it that way.
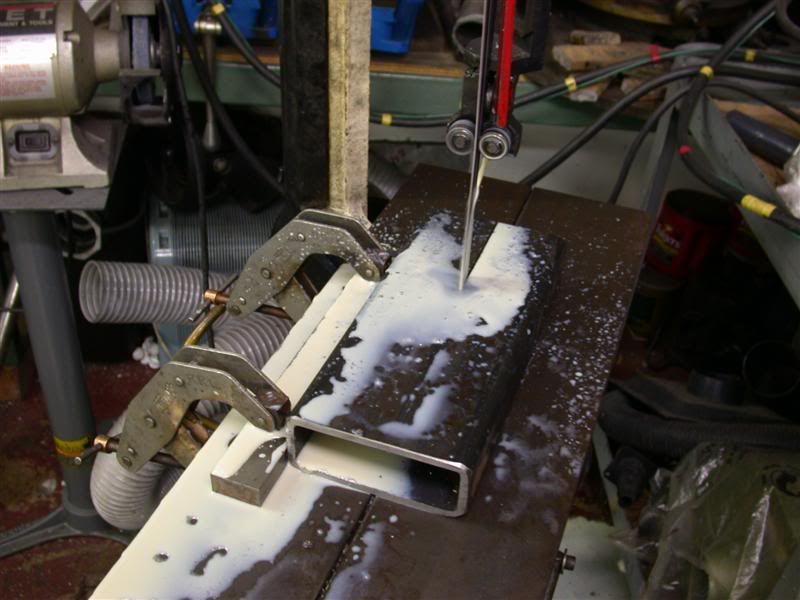
I made a vertical sawing table for my shop saw. Figured I'd do it the way smart guys do it. My saw raises all the way up but did not come with the vertical table attachment. I clamped on a guide and sawed them up that way with coolant. That was way easier.:)


Those tubes when cut in half are going to be the base receivers which will be welded to the other taller implements such as the boxblade and rake. Actually, they will be welded to a 3/8" thick plate first, and the plate will be welded on. The dog leg extensions will slide into the half tubes and get pinned together.
 
   / MODIFY BRUSH HOG SOME MORE
  • Thread Starter
#164  
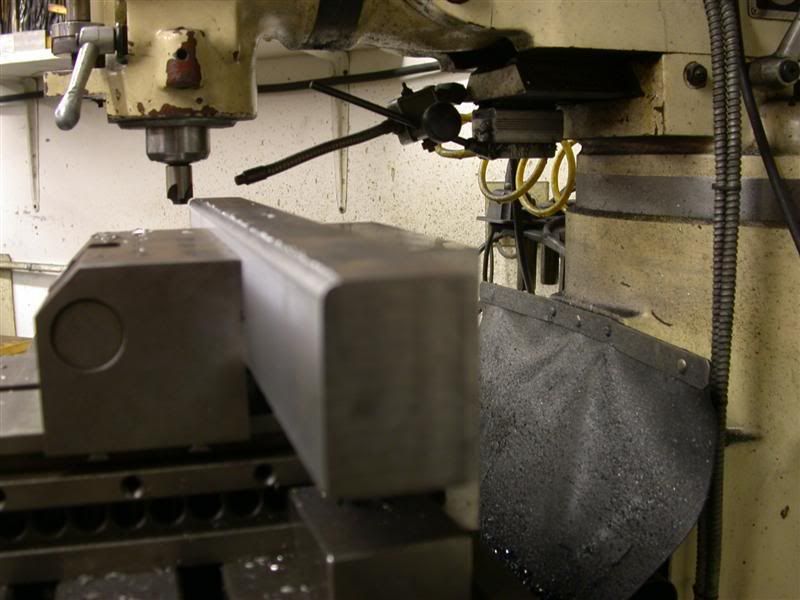
I also got the base for the rotary cutter done. It will get welded to a plate which will be welded to the body. Again, the Quick Attach Wheels will slide onto that and pinned. So here they are all chamfered and ready to weld up. I rounded the tops of the bars where the QA Wheels slide on so it would match the inside of the tubes.


Next is to weld up the dog leg extensions. I can do that here at home. But I have to bring the implement receivers to camp and hand fit them to the boxblade, to be sure it fits and position correctly. The spacing has to be the same on all the implements the QA Wheels go on. So I'll have to do all that final welding at camp. Maybe this weekend?
 
   / MODIFY BRUSH HOG SOME MORE
  • Thread Starter
#165  
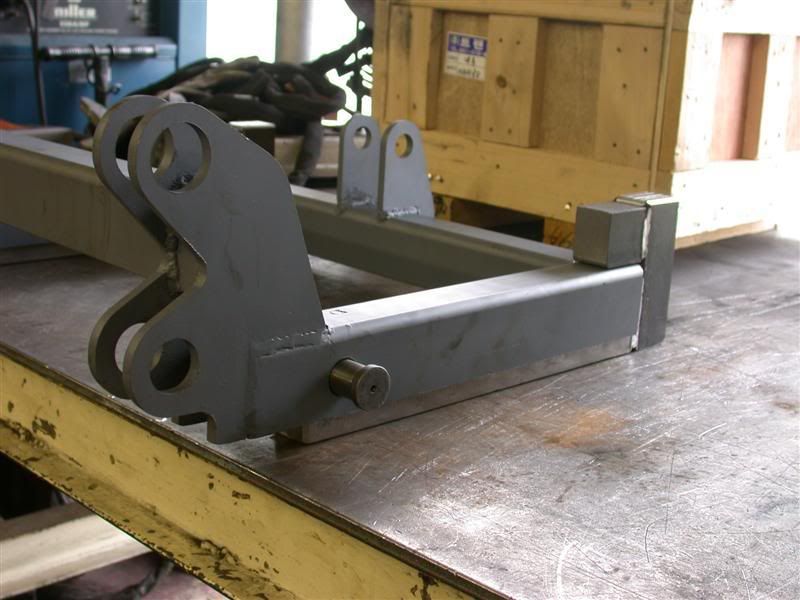
Got the welding at home done today. I used 7018AC rod with my stick welder. Seems my super old Forney doesn't like it as much as my new Lincoln arc welder does? Some welds came out great and others so so. The ones I didn't like I just cut off.


What you see there is the "hook" welded on the frame bar. The hook will capture the end of the QA wheel frame and along with a 1" diameter pin, will hold the assembly in place so it can't move.
 
   / MODIFY BRUSH HOG SOME MORE
  • Thread Starter
#166  
I took these pictures to give you an idea what the receivers look like and how they will work with the wheel frame. The first one shows the receivers for the rotary cutter. the next ones show how the wheel frame will slide onto the receiver. You can see here the rear of the wheel frame is captured and the big pins hold it all together.


Those receivers will be welded to the body of the rotary cutter. You pull out those 2 pins and slide the QA wheels off. I'll need to disconnect the QA hydraulic fittings first of course then they can be parked or put on another implement in a similar fashion.
 
   / MODIFY BRUSH HOG SOME MORE #167  
Nice pictures, but there is one thing I don't understand. How do you get the rust off all of your steel? I just leave mine on it, as most of my steel is older than dirt anyway. I collect it, stash it, and use it when I need some. Yours looks like you buy a new piece for every job.
David from jax
 
   / MODIFY BRUSH HOG SOME MORE
  • Thread Starter
#168  
Now these are the "dog leg" parts that you saw in the drawings. They are shaped like this to allow the QA wheels to touch the ground when used on the boxblade or rake. Otherwise there would be little adjustment since the boxblade and rake are taller than the brush hog. In the next photos you can see the tubing I cut in half. Those will be welded onto plates and then welded onto the boxblade and rake. I made a couple spare sets of tubes for other implements.


Anyway, you take the dog leg bars and slide them into those tubes and pin them so they are fully captured. Then you slide the QA wheels onto the front of the dog leg just like on the rotary cutter. That part of the dog leg bar has the rear "hook" and front pin just like the rotary cutter. Last picture is after I primered them all to get ready to go to camp tomorrow.

 
   / MODIFY BRUSH HOG SOME MORE #169  
Wow Rob, it's coming together nicely, man what a load of steel and work. I see quite a few solid bars there. Are you taking them up with the Jeep or the Blazer? Did you already take the wheel assembly up to camp? Those plasma cut parts do look cool, thanks for letting me help you out on that part of the project.

Great job pulling this off. I'm in anticipation of seeing the end result and the big ole smile on your face when you see it working perfectly to your satisfaction.

Larry
 
   / MODIFY BRUSH HOG SOME MORE
  • Thread Starter
#170  
Thanks David.
My steel just looks like I got the rust off, but there is still some on it. I try to get it off by using an India stone and oil, but if you look closely at some of those pictures, you will see it's still there. The parts that look new might be where I machined some off or oily?

Thanks too Larry,
The Blazer is up at camp with that stick through the window.
Got to get that fixed too. :mad:


Lucky the rest of the wheel assembly is already up there. I posted some pictures of what I did up there (see post #125) and also of the assembly already painted black and greased. It is waiting for this part now.

Then I have to deal with the hydraulic part of it. You know I'm on a tight budget and wanted to make this project out of as much scrap and spare parts as I could. So I will be scrounging for hoses since the ones I have will be used for my hydraulic winch. I'll need to scrounge up a bunch of fittings and quick disconnects to make this happen this weekend. I know I have some spares but not sure how many? I really hope to have this done this weekend.

I forgot to tell you that during one of the visits, one of the kids was racing my Ranch ATV and it busted a rear axle, brake caliper, disc, hoses and cables. So I'm bringing all those replacement parts too. I spent all week online trying to order them. I hope I got the right parts because I don't have a shop manual for it. Crap.

I've also been trying to figure out a QA hydraulic winch mount. Which may end up not being QA since it's so big. Oh, plus I've got to put new tarps over the tents themselves, since the old ones are leaking. I already changed the main tarp over the big decks. Not to mention taking pictures of the log home progress. So I've got a billion things to do.
But believe me, if I get this thing finished, you will see photos and a couple videos for sure. THEN you get to see that big smile on my face. :D
 

Tractor & Equipment Auctions

1999-2010 Ford Pickup Truck Bed (A49461)
1999-2010 Ford...
(INOPERABLE) CAT D4D (A50854)
(INOPERABLE) CAT...
12-Wheel Pneumatic Pull-Behind Asphalt Compactor (A49461)
12-Wheel Pneumatic...
2015 KENWORTH T800 MID-ROOF SLEEPER (A50854)
2015 KENWORTH T800...
2007 FORD F-750XL SUPER DUTY DUMP TRUCK (A51243)
2007 FORD F-750XL...
2012 Chevrolet Traverse SUV (A50324)
2012 Chevrolet...
 
Top