Multi-Purpose Rear Ballast Project

   / Multi-Purpose Rear Ballast Project #1  

Spencer

Veteran Member
Joined
Jan 2, 2002
Messages
1,267
Location
Western Michigan
Tractor
NH TC33D w/R4 Tires, Rear Remote, Hydraulic Toplink, 2 Auxiliary Work Lights, 7308 Loader w/Kasco Uni-Hitch (Quick Tach)
Hi everyone, unfortunately I have not had the time to read or contribute to TBN in the last few months. I still don't really have the time, but I wanted to share my latest project with you.

I don't have loaded tires on my TC33D and the rear end often gets light while I am doing loader work. I did put on two sets of NH rear wheel weights shortly after I got my tractor, but I still need more weight back there. I often have my 6 foot rear blade on the back of the tractor to help add some weight, but that makes maneuvering a little tricky at times and it isn't really as heavy of a counterweight as I would like. My 60" rotary cutter does the best job as a counterweight, but that really makes maneuvering a challenge through my woods.

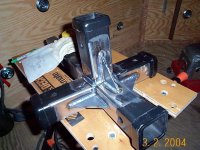
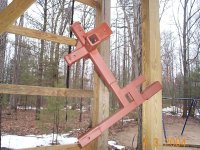
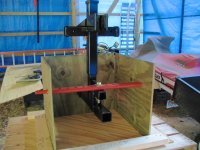
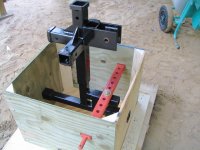
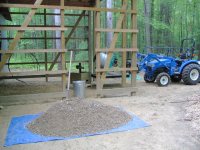
I went shopping for a ballast box last year and quickly decided against them. They are pricey for what you get and I knew if I had the time I could weld one up for a fraction of the cost. I have seen many concrete ballast projects here on TBN and that really seems to be the best way to go. Many of you have added a standard trailer hitch or 2" receiver to your concrete ballast projects and I decided to borrow that idea. Wroughtn_Harv uses those 2" receivers all over the place to mount vises and benders, etc. and I decided to borrow that idea as well.

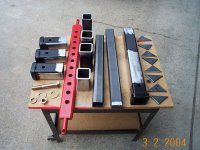
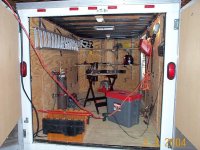
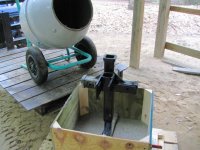
This first picture shows most of the metal that I used in this project. By the way, that is the correct date in the photo. I started welding up this project back in March when I had a little time to spare.
 

Attachments

  • 434681-Metal_Parts.jpg
    434681-Metal_Parts.jpg
    82.1 KB · Views: 1,825
   / Multi-Purpose Rear Ballast Project
  • Thread Starter
#2  
This picture shows four 2" receivers that I have welded together for the top of the ballast. I needed to have a sturdy metal skeleton for the concrete ballast anyway so I figured I would try and make it as useful as possible. I will be able to drop the concrete rear ballast just about anywhere and it will give me a very stable place to mount a vise, etc.
 

Attachments

  • 434688-Four_Receivers.jpg
    434688-Four_Receivers.jpg
    90.1 KB · Views: 1,523
   / Multi-Purpose Rear Ballast Project
  • Thread Starter
#3  
This picture shows the metal brackets that I welded up for my toplink to attach to.
 

Attachments

  • 434689-Toplink_Brackets.jpg
    434689-Toplink_Brackets.jpg
    81.7 KB · Views: 1,407
   / Multi-Purpose Rear Ballast Project
  • Thread Starter
#4  
Here is the metal skeleton after most of the welding has been done.
 

Attachments

  • 434690-Final_Welds.jpg
    434690-Final_Welds.jpg
    79.2 KB · Views: 1,400
   / Multi-Purpose Rear Ballast Project
  • Thread Starter
#5  
My enclosed utility trailer worked great as a temporary welding shop.
 

Attachments

  • 434696-Welding_Shop.jpg
    434696-Welding_Shop.jpg
    83.5 KB · Views: 1,184
   / Multi-Purpose Rear Ballast Project
  • Thread Starter
#6  
Here is the skeleton after it was primed. This is as far as I got back in March. Work picked up and I didn't get a chance to get back on the project until yesterday.
 

Attachments

  • 434697-Freshly_Primed.jpg
    434697-Freshly_Primed.jpg
    95.1 KB · Views: 1,396
   / Multi-Purpose Rear Ballast Project #7  
Spencer,
Can't quite figure out by looking, how the metal skeleton will attach to your tractor, but your welds sure look good. /forums/images/graemlins/grin.gif I rely on a grinder and paint to "pretty up" my welds. By the way, do I see wooden walls and floor for your "welding shop"? /forums/images/graemlins/shocked.gif Not only are your welds nice, but you must not throw any sparks. /forums/images/graemlins/cool.gif

I weld just outside an open garage door. I've only caught the kids' toys on fire twice.

OkieG
 
   / Multi-Purpose Rear Ballast Project
  • Thread Starter
#8  
OkieG, thanks for the compliment. This picture should clear up how the skeleton is going to attach to my 3-point hitch. This is part of the box I made to hold the concrete.
 

Attachments

  • 434702-Box_Started.jpg
    434702-Box_Started.jpg
    71.8 KB · Views: 1,454
   / Multi-Purpose Rear Ballast Project
  • Thread Starter
#9  
Here is a picture of the box completed and ready to have concrete poured into it. I wanted to ease the corners of the concrete so I cut some 4x4's on an angle and put those in the corners.
 

Attachments

  • 434709-Box_Completed.jpg
    434709-Box_Completed.jpg
    70.3 KB · Views: 1,548
   / Multi-Purpose Rear Ballast Project #10  
Spencer,
That is real purty. I can tell you're a fabricatin' kinda guy. This is possibly a non-point, but is there some reason why you don't want the horizontal drawbar sitting under the square tubing. Would support be better...or maybe it doesn't matter?

Isn't it nice to come back to TBN after a few months away, and get hammered with hard questions right off the bat? /forums/images/graemlins/grin.gif That really is a nice looking unit. Post some action shots when you get a chance.

OkieG
 
   / Multi-Purpose Rear Ballast Project
  • Thread Starter
#11  
I mixed and poured the concrete in small batches. I wanted to try and eliminate as many air pockets as I could. It was nice to have my tractor help to get the concrete mixer up to the right height.
 

Attachments

  • 434713-Pouring_Concrete.jpg
    434713-Pouring_Concrete.jpg
    82.4 KB · Views: 1,169
   / Multi-Purpose Rear Ballast Project #12  
Heyyyy....I guess it doesn't matter if you're going to pour concrete all around it. I think that qualifies as a non-point/doesn't matter. Duh.

OkieG
 
   / Multi-Purpose Rear Ballast Project
  • Thread Starter
#13  
</font><font color="blue" class="small">( This is possibly a non-point, but is there some reason why you don't want the horizontal drawbar sitting under the square tubing. Would support be better...or maybe it doesn't matter?

OkieG )</font>

It was just a matter of making everything at the right height. I wanted the lower 2" receiver tube and the bar for my lower lift arms to both be at a certain height (centered at 8" and 14" respectively) when the ballast was sitting on the ground.
 
   / Multi-Purpose Rear Ballast Project
  • Thread Starter
#14  
Here is a better picture of my tractor helping out on the project. That pile is premixed gravel/sand from a local concrete supplier. I used 65 shovel fulls of the gravel/sand mix and 13 shovel fulls of portland cement.
 

Attachments

  • 434724-Mixing_Concrete.jpg
    434724-Mixing_Concrete.jpg
    92.7 KB · Views: 1,071
   / Multi-Purpose Rear Ballast Project
  • Thread Starter
#15  
The box held together with all the concrete in it but one side had a bow at the top. I should have reinforced the outside of the box with 2x4's.
 

Attachments

  • 434728-Box_Full.jpg
    434728-Box_Full.jpg
    62.5 KB · Views: 1,051
   / Multi-Purpose Rear Ballast Project
  • Thread Starter
#16  
I took the box apart about 3 hours after I finished pouring the concrete. I have read where it is good to leave the concrete forms on as long as possible to slow down the curing process, but I thought that the concrete would cure more evenly with the box off.

I think the angled corners turned out nice. They should also help so that my lower 3-point lift arms don't hit the sides of the concrete. Some of you have been brave enough to admit your design flaws to us. I remember one guy bent his toplink when he lifted his concrete ballast up all the way. I remember another guy had to chip away some of his concrete ballast until it was light enough for his tractor to pick up. I tired to keep all of those things in mind when I designed this but who knows, I may have some problems of my own. I'm not sure how long I should let this cure before I try to pick it up with my 3-point. I am real curious if it will fit right.
 

Attachments

  • 434736-Box_Off.jpg
    434736-Box_Off.jpg
    69.1 KB · Views: 1,247
   / Multi-Purpose Rear Ballast Project #17  
</font><font color="blue" class="small">( </font><font color="blueclass=small">( This is possibly a non-point, but is there some reason why you don't want the horizontal drawbar sitting under the square tubing. Would support be better...or maybe it doesn't matter?

OkieG )</font>

It was just a matter of making everything at the right height. I wanted the lower 2" receiver tube and the bar for my lower lift arms to both be at a certain height (centered at 8" and 14" respectively) when the ballast was sitting on the ground. )</font>


Just out of curiosity, how far off the ground will the bottom of the ballast be when you 3pt is all the way UP?

Or rephrased, did you make sure there is enough clearance between the bottom of hte ballast and the ground so that when you are working on rough ground the bottom of the ballast won't be rubbing on the ground or coming into contact with things on the ground?
 
   / Multi-Purpose Rear Ballast Project #18  
By golly that should keep your tractor's rear tires on terra firma. It llooks like about a 2' cube. If that's the case, it should tip the scales at around 1200 pounds. Nice welding............chim
 
   / Multi-Purpose Rear Ballast Project #19  
Looks Great.

If it were mine, I'd all the time be catching my shins on the drawbar pins!
 
   / Multi-Purpose Rear Ballast Project
  • Thread Starter
#20  
</font><font color="blue" class="small">( Just out of curiosity, how far off the ground will the bottom of the ballast be when you 3pt is all the way UP?

Or rephrased, did you make sure there is enough clearance between the bottom of hte ballast and the ground so that when you are working on rough ground the bottom of the ballast won't be rubbing on the ground or coming into contact with things on the ground? )</font>

Bob, ground clearance was the first thing that I took into consideration when I was designing this. I'm not saying that I won't have any problems, but I did try to address it from the start. I don't have all of my paperwork anymore because I started this back in March, but I did calculate exactly how much clearance I should have.
 

Tractor & Equipment Auctions

2013 CATERPILLAR 299D SKID STEER (A60429)
2013 CATERPILLAR...
iDrive TDS-2010H ProJack M2 Electric Trailer Dolly (A59228)
iDrive TDS-2010H...
Crown RM6025-45 4,500 LB Stand-On Electric Forklift (A59228)
Crown RM6025-45...
Husqvarna Riding Mower (A56857)
Husqvarna Riding...
1992 Talbert 70 Ton Lowboy Trailer with Removable Gooseneck (A56438)
1992 Talbert 70...
2024 CASE TV450B SKID STEER (A60429)
2024 CASE TV450B...
 
Top