My Container Barn

   / My Container Barn
  • Thread Starter
#41  
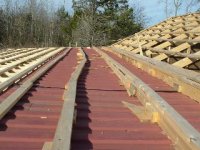
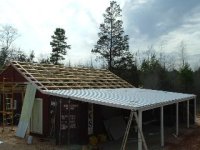
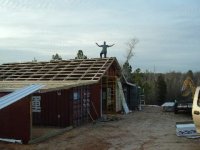
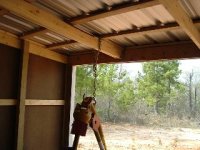
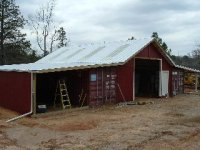
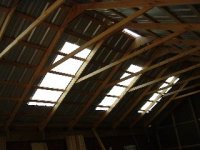
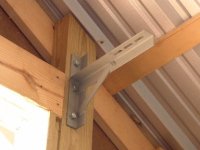
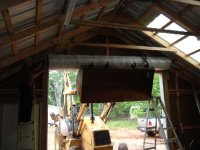
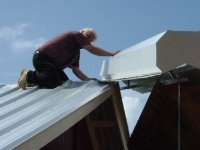
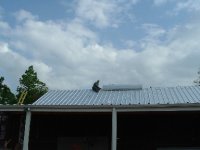
The only real ugly spot was lining up the roof line along the top of the containers. They are a long way from being flat. I placed a straight edge across the span and built up supports the length of the containers to hold up the roof and act as purlins. I figure with enough liquid nails and the weight of the roof, it wouldn't go anywhere.
 

Attachments

  • 381085-Barn, Build-up on top of container, Feb 04.jpg
    381085-Barn, Build-up on top of container, Feb 04.jpg
    32.1 KB · Views: 3,140
   / My Container Barn
  • Thread Starter
#42  
The panels go on really quick with nice results. I only put in about half the screws I need to get as much done before the weather changed. This section is a 1/12 pitch 11 feet, 9 inches wide by 41 feet long.

A buddy with years of experience helped me installing the roof panels. A good tip is to clamp two 100 foot tapes to the beginning panels and measure each one you install to keep them lined up.

I was really amazed how the panels want to work apart. An eighth on an inch isn't much, but over a distance it really adds up.

Both roof lines lined up purfect using this technique with no fudging needed at the end.
 

Attachments

  • 381087-Barn, Flat section on, Feb 04.jpg
    381087-Barn, Flat section on, Feb 04.jpg
    29 KB · Views: 3,058
   / My Container Barn
  • Thread Starter
#43  
Half the roof is on and the weather is changing quickly! That's me on top after I put in the last of the screws for the day.

I really hate heights, but with the first panel in, I was able to funtion without too much trouble. I wore my sneakers, which allowed me to walk up and down the panels easily.

The pitch on the high side is 6/12 and just about the maximum for walking up and down. Length of these panels are 13'6" for a 41' run.
 

Attachments

  • 381090-Barn, Half the roof is on, Feb 04.jpg
    381090-Barn, Half the roof is on, Feb 04.jpg
    25 KB · Views: 2,854
   / My Container Barn
  • Thread Starter
#44  
This is another view of my post hole digger that I hung from the rafters. I doubled up a pair of 2x6's with half inch plywood glued in between.

Now it's under a roof and should stay nice a dry.
 

Attachments

  • 381093-Barn, inside with roof on and post hole digger, Feb 04.jpg
    381093-Barn, inside with roof on and post hole digger, Feb 04.jpg
    30 KB · Views: 2,300
   / My Container Barn
  • Thread Starter
#45  
Between the rain, I managed to get the other side of the roof on.

My free help didn't show up, so I did this side by myself. It took a full day and about three hours yesterday.

The toughest part was climbing up and down the ladders getting the panels. A real suprise came when I tried to climb up the steep part after getting some panels pre-positioned. My shoes had dirt on them and my traction was non-existant. One step up and a quick slide down! No injuries, just surprised how quickly my footing was lost.
 

Attachments

  • 383762-Barn, roof on left side, Feb 04.jpg
    383762-Barn, roof on left side, Feb 04.jpg
    29.5 KB · Views: 2,341
   / My Container Barn
  • Thread Starter
#46  
This is a view of the skylights from the inside.

The gap in the middle is where the roof vent is going to go. I'll need a hand with it due to its weight.
 

Attachments

  • 383763-Barn, inside view of skylights, Feb 04.jpg
    383763-Barn, inside view of skylights, Feb 04.jpg
    26.8 KB · Views: 2,574
   / My Container Barn
  • Thread Starter
#47  
The roof vent is in the crate in front.

This side faces North and doesn't have any skylights.

I still need to install the metal trim and finish painting the wood trim.

I'm pricing doors and will order a roll up door this week. Prices are all over the place.

Main door size is 12 feet wide and 10 feet tall after a concrete floor is poured. I'll build up the base rock to eliminate the gap under the door in the mean time.
 

Attachments

  • 383768-Barn, front angle with roof, Feb 04.jpg
    383768-Barn, front angle with roof, Feb 04.jpg
    32.2 KB · Views: 2,438
   / My Container Barn #48  
Eddie,

I don't understand why you need a roof vent... With the size of the gap between panels on each side of the roof you can cover it with "ridge-row" and have plenty of ventilation. The ridge I've used was ordered from the metal vendor in 10' lengths and I think 12" on each side of the V. It would certainly be easier to install, and probably a lot cheaper.
 
   / My Container Barn
  • Thread Starter
#49  
You're right about the ridge vent. I was thinking the vent would be better for long term and allow me the option of closing and opening it if I ever wanted to. It might just be a waste of $200. One day I'd like to have a concrete floor, insulation and heating for working on projects when the weather is real bad. I figured I could close this vent and keep it warm inside.
 
   / My Container Barn
  • Thread Starter
#51  
It was pretty muddy today, so I finished running some wire and went to Mueller Inc, a metal building company about half an hour East of me.

I ordered my roll up door. $588 for what they say is everything I need. I've done plenty of garage doors, but this will be my first roll-up.

I'm going to finish up painting my trim in the morning and maybe put the new blades on my brush hog. Hopefully it's not too muddy to shred some jungle.
 
   / My Container Barn #52  
Are u sure you're not from up above the mason dixon line!!!!! /forums/images/graemlins/grin.gif /forums/images/graemlins/grin.gif AN AWESOME PIECE OF WORK!!!!
uP HERE WE CALL THAT YANKEE INGENUITY!!!!!
Any pics of the finished project!!! with the whole thing in it!!! TODD
 
   / My Container Barn #53  
EddieWalker

I am thinking about getting a roll-up door when I get my next project going. Let me know how you made out when all is said and done. Thanks. /forums/images/graemlins/smile.gif
 
   / My Container Barn
  • Thread Starter
#54  
I've had some time to work on my barn. I've had the roll up door for about a month. No rush to get it in, but it had to happen one of these days.
 

Attachments

  • 419123-Barn, door ready to install, Apr 04.jpg
    419123-Barn, door ready to install, Apr 04.jpg
    57.6 KB · Views: 2,806
   / My Container Barn
  • Thread Starter
#55  
Getting it into position was a little tricky.

Of course the starter went out first thing in the morning. Turns out I had some Romanian piece of junk in it. I ended up buying a brand new Lucas starter for $175.
 

Attachments

  • 419125-Barn, door lifted into position, Apr 04.jpg
    419125-Barn, door lifted into position, Apr 04.jpg
    37.1 KB · Views: 2,274
   / My Container Barn
  • Thread Starter
#56  
The door came with everything you need to install it exept lag bolts for wood mounting.

I used 1/2 inch by 3 inch bolts. They should be strong enough.
 

Attachments

  • 419127-Barn, door bracket installed, Apr 04.jpg
    419127-Barn, door bracket installed, Apr 04.jpg
    27.9 KB · Views: 1,930
   / My Container Barn
  • Thread Starter
#57  
View of the inside positioning the door.

Once it was on the brackets, it just kind of fell into place.
 

Attachments

  • 419129-Barn, door in position, Apr 04.jpg
    419129-Barn, door in position, Apr 04.jpg
    37.6 KB · Views: 2,026
   / My Container Barn
  • Thread Starter
#58  
This is what it looks like all done.

I need to do some finish up paint and repair some trim that got in the way of the loader bucket.

I really want to thank the Henro post and discussion about his barn and the section on barn doors. I decided to use the roll up after reading all the great feedback there.
 

Attachments

  • 419131-Barn, door installed, Apr 04.jpg
    419131-Barn, door installed, Apr 04.jpg
    36.5 KB · Views: 2,461
   / My Container Barn
  • Thread Starter
#59  
My dad helped me get the vent onto the roof yesterday.

It was way too heavy to do on my own. We lifted it up with the loader and kind of dragged it along the peak into position.
 

Attachments

  • 419134-Barn, vent going up, Apr 04.jpg
    419134-Barn, vent going up, Apr 04.jpg
    25.2 KB · Views: 2,029
   / My Container Barn
  • Thread Starter
#60  
This is me sealing around the edges with the vent in position.

This vent opens from the inside, is fully ajustable and can be connected to multiple vents in line.

It's cost $200 and is probably the biggest mistake I've made so far in this project. I would never use it again, don't recomend it and kind of wish I didn't have it.

It works fine, but I could have gotten the same results with a different type of vent for much less money and easier instalation.
 

Attachments

  • 419136-Barn, vent installed, Apr 04.jpg
    419136-Barn, vent installed, Apr 04.jpg
    23.3 KB · Views: 2,321

Tractor & Equipment Auctions

2023 JOHN DEERE 85G EXCAVATOR (A59823)
2023 JOHN DEERE...
2014 AMERITRAIL LAY FLAT HOSE TUGGER TRAILER (A58214)
2014 AMERITRAIL...
SKID STEER ATTACHMENT SIFT BUCKET (A58214)
SKID STEER...
Year: 2012 Make: GMC Model: Acadia Vehicle Type: Multipurpose Vehicle (MPV) Mileage: 188,471 Plate: (A59231)
Year: 2012 Make...
2015 Freightliner M2 106 AWD Altec AT37G Bucket Truck (A60460)
2015 Freightliner...
2009 JACK COUNTY KILL TRAILER (A58214)
2009 JACK COUNTY...
 
Top