My homebuilt Loader 3B

   / My homebuilt Loader 3B #1  

Graydin

Member
Joined
Dec 23, 2024
Messages
35
Tractor
3B
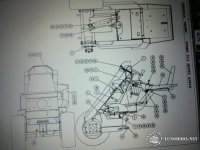
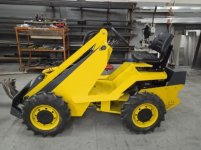
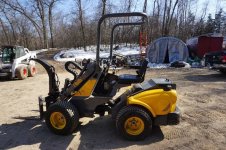
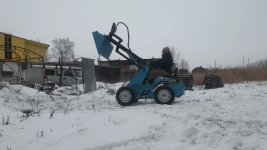
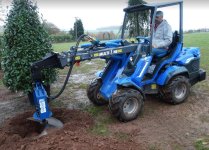
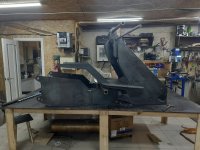
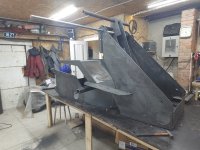
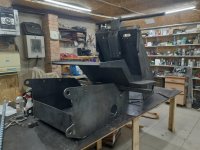
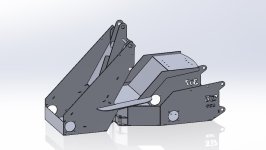
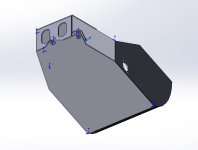
Greetings everyone! I want to show you how I build my front loader. I'll start with a bit of history: The design does not belong to me. My loader will be a combination of a general design idea that has been working for a long time and has proven to be reliable and well thought out, along with my personal modifications that I hope will make my loader even more convenient and reliable. The main goal is simplicity, affordability, easy and cheap repairs, and convenience when working with it.
 

Attachments

  • 3785613a169bb5fd20967901e1937109.jpg
    3785613a169bb5fd20967901e1937109.jpg
    157 KB · Views: 118
  • be969583af884a2a7d33c85fcfa99a74.jpg
    be969583af884a2a7d33c85fcfa99a74.jpg
    188.8 KB · Views: 112
   / My homebuilt Loader 3B
  • Thread Starter
#2  
"Here you can see how the idea originated and what it has turned into today. There is such a machine in the family. This is where my loader was born."
 

Attachments

  • 2.jpg
    2.jpg
    227.7 KB · Views: 91
  • 6298410.jpg
    6298410.jpg
    336.6 KB · Views: 98
  • c45d359f7abe551ec1e40cb2e1ed243a.jpg
    c45d359f7abe551ec1e40cb2e1ed243a.jpg
    303.9 KB · Views: 92
  • maxresdefault.jpg
    maxresdefault.jpg
    434.9 KB · Views: 88
  • T11_5_digital.jpg
    T11_5_digital.jpg
    292.4 KB · Views: 95
  • xdix16b8q1mdisqgs3nbmpsxlnzr6bu7.jpg
    xdix16b8q1mdisqgs3nbmpsxlnzr6bu7.jpg
    658.6 KB · Views: 99
Last edited:
   / My homebuilt Loader 3B
  • Thread Starter
#3  
As a result, one of my compatriots assembled an intermediate version that greatly interested me. It is this version that you will see in the photographs below. I bought a DIY KIT set from him. The seller did not limit my responsibility for copyright and still sells kits for free use, without restrictions. I am grateful to him for this, as it provides a basis on which I can realize my personally designed machine. And this is very valuable to me as a designer.
 

Attachments

  • 20250222_182529.jpg
    20250222_182529.jpg
    5.8 MB · Views: 111
  • 20250222_182534.jpg
    20250222_182534.jpg
    6 MB · Views: 115
  • 20250222_182541.jpg
    20250222_182541.jpg
    5.4 MB · Views: 103
   / My homebuilt Loader 3B
  • Thread Starter
#4  
Now that I have the basic data, I can start developing my...

So far, it looks very similar. But I am just learning to work not on paper, as I was taught in the Soviet Union, but on a computer, in SolidWorks. It is a great program that allows you to change the sizes and shapes of parts "on the fly." It's really cool, and I enjoy learning, even though I am almost 50 years old...
 

Attachments

  • 11.jpg
    11.jpg
    101.5 KB · Views: 43
  • 12.jpg
    12.jpg
    105.5 KB · Views: 42
   / My homebuilt Loader 3B
  • Thread Starter
#5  
Initially, I will assemble the loader, which I purchased as a kit. Following this, I will conduct testing to identify any shortcomings and develop my own version, aiming to achieve the optimal balance of price, quality, and simplicity. Subsequently, attention will turn to the caterpillar model, which I will discuss in a future thread at a later time.
 

Attachments

  • Общий вид.JPG
    Общий вид.JPG
    288.4 KB · Views: 53
   / My homebuilt Loader 3B #6  
Very cool; I look forward to seeing your progress- folks like you, who are smart enough to design and build machines themselves, are inspiring!
 
   / My homebuilt Loader 3B #7  
It is fun to watch your ingenuity in action. Keep sending some pics as you go along.
 
   / My homebuilt Loader 3B #8  
Definitely following
 
   / My homebuilt Loader 3B
  • Thread Starter
#9  
Thank you very much. You have no idea how important your support is to me! I spent 12 hours at the computer)))) And here is what I can show you. I could have limited myself to photos, but I thought you would be more interested to see how the boom and bucket work... There are still few of my developments here. Just the bucket. But, during the drafting process, I saw several important changes that are necessary for this design to improve its quality and simplicity. God, how interesting it is to work on this!
 
   / My homebuilt Loader 3B
  • Thread Starter
#10  
So, while there is an opportunity, I am starting to make changes to the design. I do not like the weak joint node between the rear and front parts of the loader. In the old version, all the load is on the bushing, which is welded with only one weld. This is unacceptable. In the case of diagonal wheel suspension, the node works on a break and deformation is possible. I removed the oil tank inside the rear part, added metal and strength. Now the lower mounting of the loader frame hinge is a solid part and not a weld, as it was before.
 

Attachments

  • 2.jpg
    2.jpg
    80.4 KB · Views: 28
  • З.jpg
    З.jpg
    106.4 KB · Views: 27

Tractor & Equipment Auctions

2013 Ford Taurus Sedan (A42744)
2013 Ford Taurus...
2013 Nissan Pathfinder 4x4 SUV (A42744)
2013 Nissan...
1988 Miller 40' Citrus Trailer (A44500)
1988 Miller 40'...
22’X23’ DOUBLE GARAGE (A45046)
22’X23’ DOUBLE...
Set of 4 ST225/75R15 Radial Trailer Tires (A42021)
Set of 4...
19.5L-24 Tires (pair) (A45788)
19.5L-24 Tires...
 
Top