Naked 430

   / Naked 430
  • Thread Starter
#31  
You know that a cell phone is NOT a camara, right.

You wouldn't' use a soldering iron to weld with, why would you use a cell phone to take a picture?

Other that that, your work is excellent !


Richard

Thanks for the comment.

Ah, but it has two cameras in it. Besides, I only took my good camera to the shop to take pictures once years ago, it didn't turn out well. The camera in the phone does just fine most of the time. Like I said, it's over 5 years old, might be time to replace it.
 
   / Naked 430
  • Thread Starter
#32  
Nice work on the 430 and congratulations for having an orderly looking shop!

I'm dropping a pic of my wife's naked 430.
It's missing fenders, lights, and battery covers.

Orderly?? Well maybe to a point, but certainly full of to much stuff. Since retiring, I have done a lot of tossing stuff I'll never use or need again. I have so many parts, pieces and collections that I have organized into plastic organizers, I'm running out of wall space to hang them. Hopefully, in the spring I can get to work on my 1970 Nova, and get all those related parts back on/in the car. I large set of shelves in the rear are going to go away too, since I no longer need them to store spare truck tires under and filters and other parts in it.

That looks like a beauty! It kind of reminds me of the MT that my granddad then my father had. When dad decided to sell it, I would have bought it, but I didn't a place to put it since I was living in a mobile home park at the time.
 
   / Naked 430
  • Thread Starter
#33  
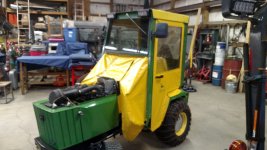
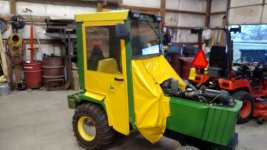
Worked in the 430 this afternoon. Was so nice outside, in the 60's, I opened the overhead door and let the sun and breeze in. Not going to have any more days like this for a while.
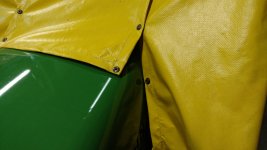
I modified the front cover by removing two of the brass grommets and replaced them with stainless steel marine twist fasteners, like the clasps on some women's purses, Now I can put the twist locks on the side panels and hood to seal out a lot of the cold that would come in around them. Once I get the hood back, that will be about the last thing to do to finish this project up.

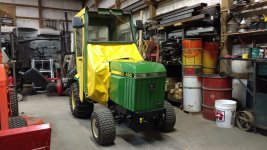
After I got those installed, I slid the metal anchoring bars into the pockets and fastened them the the front posts on the cab and did the same with the one that attaches below the front window. I connected the wire for the cab lights and when I turned them on, nothing, no lights. AHA! Then it dawned on me, that I had mounted the cab on rubber pads and they insulated the cab from the chassis. The seat pan is mounted on rubber mounts too, now that I think about it, so I wonder how they ever got a ground before. Hmmmm.
Oh well, after I ran a ground wire to the chassis, the lights work fine.

I got the doors mounted too, so it's starting to look like a real snow fighting machine again.

One other thing that needed attention, as the GF pointed out, were the six 20kg suitcase weights. They really are pretty bad looking. I pulled a couple off, scuffed them up with some 80 grit sandpaper, wiped them down with paint thinner, let them dry and gave them a couple coats of JD green. Tomorrow or Sunday I'll get the rest of them spruced up.

Oh yeah, one other thing that's bugging me is the cooling system surge tank on the engine. The antifreeze has taken the paint/powder coating off and it has a lot of bare metal showing. I'll drain the cooling system so I can remove it, and clean it up, prime and paint it while I'm in the mood.

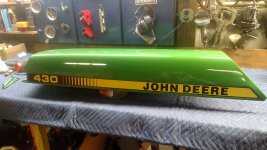
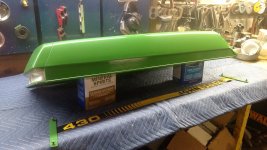
Gotta check with Brian in the morning to see how the paint on the hood is coming.
 

Attachments

  • IMG_20201120_170959075 (Custom).jpg
    IMG_20201120_170959075 (Custom).jpg
    352.7 KB · Views: 122
  • IMG_20201120_171014127 (Custom).jpg
    IMG_20201120_171014127 (Custom).jpg
    334.6 KB · Views: 122
  • IMG_20201120_173047785 (Custom).jpg
    IMG_20201120_173047785 (Custom).jpg
    328.2 KB · Views: 119
   / Naked 430
  • Thread Starter
#34  
Well, I got the hood back from my painter friend, he did a great job on it. Had another friend come over today and give me a hand putting the 3 foot long decals on the sides of the hood. He has done a lot of work with decals and paint masks in the past, so he was the man to call. Went pretty smoothly, the only problem is that the decals were probably 20 years old and had a ridge where the split in the backing paper was at. It may flatten out when it warms up some or the hood gets good and warm from engine heat.
Tomorrow I'll get it installed on the tractor, and then I need to get some protective film to install where the front fabric drapes over the hood. Previously it had rubbed completely through the paint and down to the plastic/fiberglass, and I don't want it to that again.

Looks like I'm going to need it soon, they're predicting 6-8 inches of snow this week. Time to give the blower overhaul and new mount a workout.
 

Attachments

  • IMG_20201129_170259949.jpg
    IMG_20201129_170259949.jpg
    4.8 MB · Views: 115
  • IMG_20201129_161306579.jpg
    IMG_20201129_161306579.jpg
    4.6 MB · Views: 118
   / Naked 430 #35  
A heat gun or hair blower might help on the fold problem.
 
   / Naked 430
  • Thread Starter
#36  
We tried to flatten it out with a heat gun, helped a little.

Got the hood installed this afternoon. looks pretty good with all the pieces back on it. I still have to put the protective film on the hood where the fabric drapes across it, and put a couple of snaps on the side panels to secure the sides of the fairing. The film will be here tomorrow and I'll get it applied and the snaps installed.
I'm also making a light bar for the rear of the cab. It will have four flashing LED lights on it. I got the bar they mount on drilled, tapped and painted Sunday, and I'll try to get the lights installed and wired up in a day or two.
 

Attachments

  • IMG_20201201_172330205.jpg
    IMG_20201201_172330205.jpg
    5.3 MB · Views: 142
   / Naked 430 #37  
She's a beauty... very nice work and restoration.
 
   / Naked 430
  • Thread Starter
#38  
Thanks. I'm the kind of guy that hates to let a piece of equipment just rust away. Besides, it was a lot cheaper than buying a new one, or putting a blower and cab on my Kubota. Of course, if we don't get any more snow than we've had for the last couple of years, it will barely get used. Good insurance I guess.
 
   / Naked 430
  • Thread Starter
#39  
I installed a box with three switched in it above the left cab door this afternoon. I got the gang switch off Amazon for $20, and its all wired up right out of the box, Just connect 12 volts, ground and the leads to the three lights, pretty slick. I printed up a box to mount it in on my 3D printer, with a couple of holes to run wires in and out. I had a cigarette lighter socket I don't use any more mounted where I wanted put the switch box, so I removed it and used that hole to mount the plastic box. So now I have separate switches for the strobe on top of the cab, the four light bar I just installed on the back of the cab, and the flood lights on the front.

Link to the switch: Amazon.com : FXC Rocker Switch Aluminum Panel 3 Gang Toggle Switches Dash 5 Pin ON/Off 2 LED Backlit for Boat Car Marine Blue : Sports & Outdoors

The light bar has four 12 led lights that can be set to different flash patterns, by grounding one of the wires, and are synchronized by connecting all the sync wires together. I mounted them in a 1 1/2" square tube and 3D printed caps for both ends, one with a hole where I mounted a weatherproof push button switch so I can change the flash pattern if I want. It only draws about 1.5 amps maximum as my power supply showed.

I got the 3M adhesive stone guard material today, laid out where I want it on the hood, and have it taped down in place. Saturday I'll turn the heat on in the shop so it will get warm enough to apply it properly.

Now I have to talk to a local tarp shop about modifying the center piece of the front fabric cover so I can get all the snaps fastened. Since I modified the formers that frame the area where the pedals and your feet go, they won't pull together enough to get them snapped. I need the piece remade about 2-3 inches wider so they can snap together. We'll see what they say.
 

Attachments

  • IMG_20201202_191557862.jpg
    IMG_20201202_191557862.jpg
    4.2 MB · Views: 106
  • IMG_20201203_165413538.jpg
    IMG_20201203_165413538.jpg
    4.2 MB · Views: 115
  • IMG_20201203_170756372.jpg
    IMG_20201203_170756372.jpg
    4.4 MB · Views: 134
   / Naked 430 #40  
Great work BX, and rather clever using a 3D printer to create a box for the switches.

BUT, isn't there always a but.

I'm not to excited about your use of crimps to connect your wires. Moisture, time and a little salt mist will cause the connections to fail. The copper wire strands will corrord away, starting with intermittent and then total failure.

A much better way is to solder them and then use shrink tubing that has sealant in it. The tubing protects the connection from any unintentional contact with other wires or frame and the sealant seals out any moisture.

Richard
 

Tractor & Equipment Auctions

New/Unused Fuel Pump with 50ft of Hose (A51573)
New/Unused Fuel...
JOHN DEERE 5125R (A53084)
JOHN DEERE 5125R...
2013 Chevrolet Impala Sedan (A51694)
2013 Chevrolet...
2012 Nissan Rogue (A50324)
2012 Nissan Rogue...
NEW Wolverine Skid Steer Trencher (A53002)
NEW Wolverine Skid...
2015 KENWORTH T800 (A52472)
2015 KENWORTH T800...
 
Top