need to rewire the KAMA TS254C

   / need to rewire the KAMA TS254C
  • Thread Starter
#41  
For reasons that escape me, the charging voltage goes through a low capacity fuse. I don't have my wiring chart handy, so you'll have to isolate which fuse yourself. All else can be working as normal as Chinese wiring can work - including the ammeter - but a blown fuse will stop the charging voltage from ever getting to the battery.

Tomorrow I'll dig out my info for the charging bypass wire. But first I need to warn you that - once installed - it bypasses the ammeter. You'll get max recharge voltage delivered to the battery, but you won't be able to detect it on the ammeter. All other ammeter functions will be normal. I haven't found it to be a problem on mine. But if you have a personal need to "see" charging voltage, say so now and we'll forget the bypass wire.

//greg//

Please give me the bypass info. Thanks.
 
   / need to rewire the KAMA TS254C #42  
Take this parts list to any auto parts store, and go to the electrical section:
(a) ~20" of 10ga primary wire (stranded and insulated)
(b) one 1/4" crimp-on ring terminal for 10-12 wire
(c) one 5/16" crimp-on ring terminal for 10-12 wire
(d) 3/8" and 3/16" heat shrink OR fusible electrical tape
note1: don't be tempted to use smaller than 10ga wire. It will only strangle the voltage delivery.
note2: starter and glow plug relays take 10ga wire too, at least 5 more feet. Buying a 7' roll might be cheaper in the long run
note2: Heat shrink may be more grease resistant. But if you use fusible tape, skip steps 2-3-5a

1. strip 1/4" of insulation from each end of the primary wire
2. if you're using heat shrink, cut two 1" pieces of each size.
3. slip one piece of 3/8" onto the wire, followed by two pieces of 3/16", followed by the last piece of 3/8"
4. crimp the 1/4" ring terminal on one end of the wire, crimp the 5/16" ring terminal on the other end
5a. slip a 3/8" heat shrink over the crimp you just completed. Apply heat and shrink. Slip the 3/16" over what you just shrank. Apply heat and shrink. Repeat at the other end of the wire
5b. if you use fusible electrical tape, wrap tightly - sealing crimps to wire
6. disconnect positive battery cable from the battery
7a. remove hex nut/washer from starter end of the same battery cable (no need to remove cable)
7b. put 5/16" ring terminal on the post, Reinstall nut/washer
8a. Locate alternator output (B+) post. If in doubt, it's usually the largest diameter post. Remove nut and washer
8b. without removing wires already there, put the 1/4" ring terminal on the post - reinstall nut/washer
9. reconnect positive battery cable to the battery

You've now bypassed all tractor wiring, including the potentially troublesome fuse. By routing charging voltage via the battery cable, all previous wiring system voltage losses have been bypassed. But understand that this includes the ammeter. You'll no longer be able to rely on it for accurate charge/discharge depictions.

I haven't looked up which fuse is in the charging circuit yet, or have you already found it yourself?

//greg//
 
   / need to rewire the KAMA TS254C #43  
Huh? You're talking to a very "un-electrical" guy, Brad. Can you explain how I'd do this meter/isolation thing? Thanks.

If you don't have one, get a multimeter like this or better:
- Harbor Freight Tools - Quality Tools at the Lowest Prices
Thay are also sold at Wal-mart or any auto parts store. The analog needle display type is fine too but digital is a little easier to read.

Set the meter to measure resistance in ohms. The lowest range like 0-200 ohms is good.
Touch the leads firmly together or poke them both into a piece of copper or aluminum and you will see a resistance measurement. Wait for the display to stabilize. My cheap meter is not perfectly zeroed so note the "zero" value.

When you disconnect the bus from the glow plugs, you can check the resistance from the connector to ground on each plug. I don't know the specification for your glow plugs but I am guessing about 2 ohms each (change from the "zero" value). I just looked it up - For a Ford PS, the acceptable range is 0.1 to 6.0 ohms - Wow!

You can also measure the resistance between the disconnected bus bar and ground. The display should be the same as when the leads are not touching anything, an open circuit. You may see a brief reading because of some small capacitance in the system meaning a slight charge builds up but it doesn't go anywhere. If there is some measurable resistance that means you have a short to ground in the bus supply circuit.

Hope that makes sense.

Brad
 
   / need to rewire the KAMA TS254C #44  
Please give me the bypass info. Thanks.

After reading all the post on this problem I must admit you sher have gone though a lot of work for a bad battery connection. You need to stop now, and stop second guessing your problems , do not complicate the problem by putting in the wiring by pass. You your self said, I quote ( You're talking to a very "un-electrical" guy,) you do nothing more than put your self in a deeper hole.
so what to do? work on one problem at a time, and one circuit at a time.
First get tools you will need, 12 volt test light, volt /ohm meeter that has a continuity buzzer on it, and a wiring diagram for your system.
put your wiring back together, make sure you have a good ground connection to the engine block from the frame and frame to the battery ground.
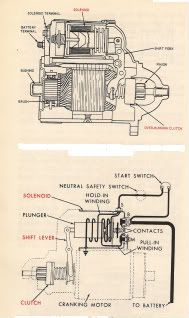
the positive side of the battery goes to the starter then up to the fuse block though a 30 amp fuse to the amp meeter to the key and back to the fuse block buss bar, a buss bar is where all individual fuses come off of to start there own circuit protection like the glow plugs. Now the fun begins ,, take the test light hook to the engine (ground) and touch the positive side of the battery (+), light should work, this tests that your ground is good. now put the light to the fuse block with all the fuses removed and fine the power side of the block it will be the 30 ammeter fuse. , and no other fuse slot will have power. install the 30 amp fuse and turn the key to on , now the rest of the fuse buss bar will come to life.
now I would put the 10 amp regulator fuss in, hook up the volt meeter to the battery it should read 12 volts, and start the engine the meeter should read 13-14 volts. if not take it off and to a auto store and have it tested. remember all wiring coming off the fuse block comes from the + side of the battery and when fuse blows it's because gone to ground be it from chafing, part burning out and going to ground or the wire was hook up by mistake to ground.
now its a matter of going though each fused circuit and seeing if it works if not you will have to find the short and fix it..

I hope this helps

keep it simple stupid! for the more complicated you make it the stupider you become
 
   / need to rewire the KAMA TS254C #45  
I am guessing about 2 ohms each (change from the "zero" value).
Two ohms seems reasonable. At that value, 3 glow plugs in series (0.66667 total) will pull ~18 amps at 70 degrees. That should ensure that glow plugs plus solenoid draw doesn't exceed the 30 amp system fuse rating. But this assumes good glow plugs, 12v at the buss bar, and a 70 degree day. Glow plug condition, voltage loss, and ambient temperature can significantly cause measured numbers look different than calculated numbers.

Using test values to determine glow plug extremes (solenoid draw not considered), anything less than a total of 0.4 ohms total (3x1.2 ohms for example) risks blowing the 30a system fuse. At the other end, anything above 1.0 ohms total (3x3.0 ohms for example), and the resultant 12 amps will probably underheat the swirl chamber.

Testing them on the tractor however, is really only a gross test. Resistance between the buss bar and the negative post on the battery will give you an idea of the total resistance presented. You're hoping that's well within the (calculated) 0.4 to 1.0 ohm window. But doesn't tell you how many glow plugs are contributing to that total. Next, you remove the buss bar and measure each glow plug individually; center conductor to negative battery post. It's another gross test, just to make sure individual plug resistance isn't wildly outside the individual (calculated) 1.2 to 3.0 ohm window.

All this is nice brainstorming, but I think it's kinda putting the cart way out in front of the horse. LakeSpirit needs to get his starter problem conclusively resolved before moving on to individual circuit issues.

//greg//
 
   / need to rewire the KAMA TS254C #46  
Lakesprite
start all over! that means put your wiring back the way it was.

Graig is right get it started before moving on to other problem.

here a diagram of a stater system its not yours but it will give you an idea of whats happening..

starterjpg.jpg


It would be helpfull if you give a list of what works and what doesn't
 
   / need to rewire the KAMA TS254C #47  
It would be helpfull if you give a list of what works and what doesn't
He has, and that's what I'm working from
1. starter solenoid won't engage consistently
2. 30A system fuse blows when he energizes glow plug circuit
3. rear lamp(s) and horn issues

They're pretty much listed (from my perspective) in the order of importance, and so far we haven't crossed off #1. Money is an issue here too, the less the better. That's why he's asking for instructions on the charging circuit bypass. It's comparatively cheap. Battery load testing is free, as should be a starter/solenoid diagnosis from an auto-electric shop. That's what we're waiting on at the moment.

//greg//
 
   / need to rewire the KAMA TS254C
  • Thread Starter
#48  
OK Fellas: Here's where I am presently;

1. The battery in the tractor will easily start the engine.
2. The solenoid and starter are both working fine.
3. I did do the bypass as Greg detailed.
4. I ran the tractor for about 3 hours today with the bypass and either the battery is a monster, or charging is working because it still starts.
5. Isolated the glow plug causing me the popped 30A fuse. I put the bus bar back on the two glow plugs that are OK, and now the fuse DOES NOT pop when using the remaining plugs.
6. Backup light works.
7. The headlights I rigged up using an auxiliary toggle switch works.
8. Horn works.

Additional issues, which were of course created by me.

1. When I depress the brake pedal the gauges go nuts. The oil pressure goes to zero, the ammeter becomes spastic.

If I can't get everything working properly, and nothing deteriorates from here, I can live with it.
 
   / need to rewire the KAMA TS254C #49  
OK Fellas: Here's where I am presently;

1. The battery in the tractor will easily start the engine.
2. The solenoid and starter are both working fine.
3. I did do the bypass as Greg detailed.
4. I ran the tractor for about 3 hours today with the bypass and either the battery is a monster, or charging is working because it still starts.
5. Isolated the glow plug causing me the popped 30A fuse. I put the bus bar back on the two glow plugs that are OK, and now the fuse DOES NOT pop when using the remaining plugs.
6. Backup light works.
7. The headlights I rigged up using an auxiliary toggle switch works.
8. Horn works.

Additional issues, which were of course created by me.

1. When I depress the brake pedal the gauges go nuts. The oil pressure goes to zero, the ammeter becomes spastic.

If I can't get everything working properly, and nothing deteriorates from here, I can live with it.

WOW now that's some progress, great going, before you know it you'll be an electrical engineer ;)

OK break lights causing the gauges to go nuts - bad ground. Somewhere there has got to be a ground for the lights and gauges. Find and fix that and you might be on the home stretch. The grounds for all the lights and gauges on my Jinma 354 is a wire that runs down the steering column then attach's to a bracket. Not sure where the KAMA ground is, but find that and then clean up it's connection.

Larry
 
   / need to rewire the KAMA TS254C #50  
Just to add to what Larry said make sure you are not pinching a wire somewhere when you press the brake pedal. I can remember another user having a issue similar when pushing the clutch pedal. Ended up it was smashing a wire and going to ground.

Chris
 
 
Top