Newby welder with questions

   / Newby welder with questions #1  

LS Tractor Owner

Super Member
Joined
May 1, 2017
Messages
7,665
Location
Edgewood, NM
Tractor
LS XG3025 TLB, Previously MT125 TLB, Craftsman GTS6500
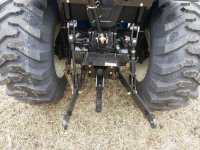
Well, not quite a newby, but not very knowledgeable about welding..... My question is about altering / changing the ends of a hydraulic cylinder for a side link setup. I can find the correct size cylinder as far as bore and stroke, but I cannot find them with the correct ends. I would need to cut off the ends then weld a narrow (7/8"w x 5" long)clevis on the rod end and a cross tube on the cylinder end.

The cost of buying a pre-made or custom made side link is unaffordable for me. I can get the cylinder for around $60. The rest of the parts would come from cutting the factory parts from my tractor's stationary link. The prices I have been getting are from $450-$600, the only local hydraulic shop would charge $350 if I supplied all the parts, still out of my budget.....

I have a 200A stick welder, a 170A mig welder, and an acetylene torch. I can weld using all of them, but have only done little repair type welding and a little fabrication of small items. I can do "clean" beads.

Am I out of my league to attempt to do this? I have never welded on a cylinder. I have never taken one apart if that has to be done.

So, does the cylinder need to be disassembled? Can the end be welded on by doing a bunch of small spot welds / tack welds letting it cool in between welds?

The cylinder is a 2" bore, 4" stroke, 8" cylinder length.

Any and all comments, suggestions, tips, or instructions would be greatly appreciated!
 
   / Newby welder with questions #2  
The cylinder does need to be disassembled. Bevel all the joints so you can get good penetration.
 
   / Newby welder with questions #3  
Does it have to be welded,
can bolt or pin on adapters be used in the existing cylinder ends.
If your cylinder has clevis ends an eye welded to the tube for the top,
for the lower end a pair of flat bars with a spacer for width through the clevis end.
 
   / Newby welder with questions #4  
I have made several hydraulic side links without taking the cylinder apart...it is NOT necessary...

Open the port on the sealed end and extend the rod out to the max...wrap the end of the cylinder with a wet rag...just take your time and once the new end is tacked in place take it even slower...start the finish bead and then stop and let it cool down...refresh the wet rag and repeat the process until it fully welded...I have never had a problem with this technique...
...blowing air into the open port will help cool it down more quickly between welds...just take your time..
 
   / Newby welder with questions
  • Thread Starter
#5  
I have made several hydraulic side links without taking the cylinder apart...it is NOT necessary...

Open the port on the sealed end and extend the rod out to the max...wrap the end of the cylinder with a wet rag...just take your time and once the new end is tacked in place take it even slower...start the finish bead and then stop and let it cool down...refresh the wet rag and repeat the process until it fully welded...I have never had a problem with this technique...
...blowing air into the open port will help cool it down more quickly between welds...just take your time..

Cool! This is exactly the response I was hoping for! I can definitely muster up the patience to do it slowly. Which process would you use? Mig or Stick?
 
   / Newby welder with questions #6  
Cool! This is exactly the response I was hoping for! I can definitely muster up the patience to do it slowly. Which process would you use? Mig or Stick?

The ones I have made I used MIG...BTW...There are several other (old) threads where the process is discussed and where I learned it from...
 
   / Newby welder with questions
  • Thread Starter
#7  
Does it have to be welded,
can bolt or pin on adapters be used in the existing cylinder ends.
If your cylinder has clevis ends an eye welded to the tube for the top,
for the lower end a pair of flat bars with a spacer for width through the clevis end.


Here is a pic of the 3 point, if you look at the top of the side link, there is a weird swivel type link that the link fits around. The clevis of the link is
1 3/8" Wide, with a 5/8" pin. The cylinder I was looking at has a clevis that is 1 1/4" wide... no big deal, I could grind down the Link swivel, but the pin Hole on the cylinder is 1", so Reducer bushings would be needed on both sides of the cylinder clevis.

It would be difficult to re-make the swivel with a 5/8" pin at the top and a 1" ID tube for the pin on the bottom.

That's why I was just going to cut the top off of the left lift link and reweld it onto the cylinder. If you have any ideas after looking at the pic, please let me know... thanks
 

Attachments

  • 8E248ED4-0F88-4BEB-9954-6DE55D7A1A0D.jpeg
    8E248ED4-0F88-4BEB-9954-6DE55D7A1A0D.jpeg
    127.2 KB · Views: 237
   / Newby welder with questions
  • Thread Starter
#8  
The ones I have made I used MIG...BTW...There are several other (old) threads where the process is discussed and where I learned it from...

I never have any success using the search bar on the main page.... always gives me a hundred threads that barely talk about what I'm looking for.... any specific wording for the search?

I'll give it a try under "welding hydraulic cylinder ".... thanks
 
   / Newby welder with questions
  • Thread Starter
#9  
I thought about using just a pin through the lift arm, using a cylinder with a ball swivel, but that would put all the stresses on just one side of the arm. Also not knowing if I could even get enough swivel from a ball end on the cylinder. Thoughts?
 

Attachments

  • B08FB6E0-B93E-4E7E-A934-3AB9FE57E77F.jpeg
    B08FB6E0-B93E-4E7E-A934-3AB9FE57E77F.jpeg
    127.2 KB · Views: 171
   / Newby welder with questions #10  
I never have any success using the search bar on the main page.... always gives me a hundred threads that barely talk about what I'm looking for.... any specific wording for the search?

I'll give it a try under "welding hydraulic cylinder ".... thanks

"site" tractorbynet.com welding side link - Google Search


I just took a quick look and found this on the second page.:

https://www.tractorbynet.com/forums/hydraulics/351604-weldable-hydraulic-cylinder-ends.html


this was the google search term "site" tractorbynet.com welding side link
 
   / Newby welder with questions
  • Thread Starter
#11  
I was able to find and was reading your second link when you posted it.... :):thumbsup:

Just like what I am up against.... can't find bare end cylinders.... oh well. Looks like I will be taking your advice on welding them up! Seems like that's how everyone else has succeeded in doing so! Thanks again.
 
   / Newby welder with questions #12  
Question, most adjustable links are on the right, are you putting the hydraulic link on the left so that both have adjustment?
Only situation where I could see it matter is with a plow. Maybe move the adjustable link to the left side and install the hydraulic link on the right side??
 
   / Newby welder with questions #13  
Looks like you could take a piece of flat stock bend it to a U shape,
with the bottom of the U 1" for the cylinder pin,
drill for the top pin.
 
   / Newby welder with questions
  • Thread Starter
#14  
Question, most adjustable links are on the right, are you putting the hydraulic link on the left so that both have adjustment?
Only situation where I could see it matter is with a plow. Maybe move the adjustable link to the left side and install the hydraulic link on the right side??

As you can see in the picture, the adjustable link is on the right, where the hydraulic will go. The stock left side (non-adjustable) will be sacrificed for the parts.....
 
   / Newby welder with questions #15  
As you can see in the picture, the adjustable link is on the right, where the hydraulic will go. The stock left side (non-adjustable) will be sacrificed for the parts.....
Yes, sacrifice the left side for parts. Remove the right side and put it on the left side. That way you have plenty of adjustment to both sides if it is ever needed. My only suggestion to the process is that you could maybe set the cylinder in a tub of water to keep it cool rather than using wet rags, assuming you have an adequate tub depth.
 
   / Newby welder with questions
  • Thread Starter
#16  
Yes, sacrifice the left side for parts. Remove the right side and put it on the left side. That way you have plenty of adjustment to both sides if it is ever needed. My only suggestion to the process is that you could maybe set the cylinder in a tub of water to keep it cool rather than using wet rags, assuming you have an adequate tub depth.

That's a good idea, I have plenty of small tubs it will fit into. Probably a better way to keep it cool.
 
   / Newby welder with questions #17  
Open the port on the sealed end and extend the rod out to the max...wrap the end of the gas cylinder with a wet rag...just take your time and once the new end is tacked in place take it even slower...start the finish bead and then stop and let it cool down...refresh the wet rag and repeat the process until it fully welded
 
   / Newby welder with questions
  • Thread Starter
#18  
Cool, (no pun intended).... I still haven't got around to welding it. Too many other things to do first. I appreciate the info / suggestions.
 
   / Newby welder with questions #19  
It's not a real surprise that it runs a little 7014. A decent test would be a box of 5/32 lo hy.
 
   / Newby welder with questions #20  
The benefit of the new 200 inverters is just that. The small Stickmate class is pretty much limited to 1/8. For those with equipment running the bigger rod would be a plus and they run it from a standard 50A welder circuit
 

Tractor & Equipment Auctions

2017 FORD F350 XL 35' NON-INSULATED BUCKET TRK (A59823)
2017 FORD F350 XL...
2016 MACK CXU613 MID-ROOF SLEEPER (A58214)
2016 MACK CXU613...
2015 Ram 1500 Crew Cab Pickup Truck (A59230)
2015 Ram 1500 Crew...
2021 Allmand Bros Maxi-Lite II 20kW Towable Light Tower (A55973)
2021 Allmand Bros...
MARATHON 20KW GENERATOR (A58214)
MARATHON 20KW...
2014 Ag Spray Schaben Sidedresser (A56438)
2014 Ag Spray...
 
Top