No-Weld Trick Work Light Brackets

   / No-Weld Trick Work Light Brackets #1  

JoeL4330

Platinum Member
Joined
May 28, 2004
Messages
888
Location
Harpers Ferry WV
Tractor
Kubota L4330, 6 rear remotes
After years of use and intimate encounters of the worst kind with branches, my work lights needed rehab. I note, as do all of you with FELs, that the tractor's OEM lights must be there for some purpose other than nighttime visibility.

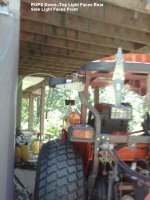
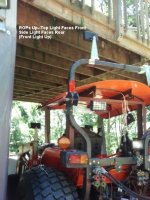
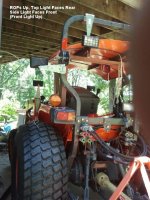
My requirements, this time around, are to have fore and aft lighting that can duck out of the way, do the job whether the ROPs is up or down, and install using readily available (e.g., Home Depot/Lowes, etc) hardware. Also, front illumination has to shoot over my canopy.

As the pictures show, the lights are mounted on gate strap hinges, which are attached to the ROPs with Gate-Latch "Closed Bar Holders". I drilled and tapped the Bar-Holders (but you could use washers and nuts) and drilled matching (slightly over-sized) holes in the hinges. The fasteners are all 1/4 - 20 hex-heads and 1/4 "fender washers" (because the holes in the hinges are over-sized to give some adjustment ...and make up for the fact that I'm notoriously bad at measuring).

The lights are mounted as shown in the farthest (existing) hole of each strap hinge ...I used a taper reamer to get the required fit (if you're not familiar with this shade-tree mechanic's best friend, I recommend one for your toolbox).

The pics show the variety of configurations possible for the lights (which are symmetric, side to side). There are 3 pairs of lights, then, controllable from 3 switches (which, in fact, are double-throw, so I could get fancier, if/when). I can't imagine using all 6 lights at one time (although I have upgraded to the larger "cab" alternator). Note that, if I want to be in electro-conserve mode, I can run just one pair of ROPs lights, one facing front, the other facing rear.

And, did I mention that each light is designed to fold away when brushed by a branch. The last pic shows all the lights tucked away for safe travel.

The discerning among you may have noted that wires are not yet hooked up and there's some excess strap hinge to be cut off ...but that's for tomorrow
 

Attachments

  • FrontFacingFronLight.jpg
    FrontFacingFronLight.jpg
    99.6 KB · Views: 1,263
  • ROPsDownTopLightFacesRear.jpg
    ROPsDownTopLightFacesRear.jpg
    94.9 KB · Views: 1,026
  • ROPsUpTopLightFacesFrontSideLightFacesRear.jpg
    ROPsUpTopLightFacesFrontSideLightFacesRear.jpg
    115.6 KB · Views: 874
  • ROPsUpTopLightFacesRearSideLightFacesFront.jpg
    ROPsUpTopLightFacesRearSideLightFacesFront.jpg
    127.8 KB · Views: 934
  • ROPsUpAllLightsTuckedInforDaytimeTravel.jpg
    ROPsUpAllLightsTuckedInforDaytimeTravel.jpg
    112.5 KB · Views: 871
   / No-Weld Trick Work Light Brackets #2  
What holds the light in position, as in photo 1 and 3?

Bruce
 
   / No-Weld Trick Work Light Brackets #3  
bcp said:
What holds the light in position, as in photo 1 and 3?

Bruce

Could you also post some details photos of how you attached the strap hinges w/o drilling into your ROPS?

I didn't understand your explanation- my fault not yours- I process better by images than text...
 
   / No-Weld Trick Work Light Brackets #4  
PhysAssist said:
Could you also post some details photos of how you attached the strap hinges w/o drilling into your ROPS?

I didn't understand your explanation- my fault not yours- I process better by images than text...

Oh and I forgot to say- it looks great, nice adaptive use of materials....
 
   / No-Weld Trick Work Light Brackets #5  
Could you also post some details photos of how you attached the strap hinges w/o drilling into your ROPS? I didn't understand your explanation- my fault not yours- I process better by images than text...

As the pictures show, the lights are mounted on gate strap hinges, which are attached to the ROPs with Gate-Latch "Closed Bar Holders". I drilled and tapped the Bar-Holders (but you could use washers and nuts) and drilled matching (slightly over-sized) holes in the hinges.

See " Gate-Latch 'Closed Bar Holders' " example here:
[ame=http://www.amazon.com/National-N235-291-Closed-Bar-Holder/dp/B000BO9NFI]Amazon.com: National #N235-291 ZN Closed Bar Holder: Home Improvement[/ame]
 
   / No-Weld Trick Work Light Brackets
  • Thread Starter
#6  
WRooster's link shows the piece that slips over the ROPs...the rest of my explanation may now make sense, no?

As for what holds the lights in position ...in the ROPs case, side or top, note that the hinges will only fold 270 degrees and I made that work for me.

In the case of the front lights, they are set down just a tad below the "barrel" of the hinge and the upright member, to which they are attached, stops any forward movement.

So far, so good, but I am sure others can improve on the design(s).
 
   / No-Weld Trick Work Light Brackets #7  
Clever idea; but without a torsion spring on the hinge pin, I don't see what keeps the lights in place during use, as any vibration is going to move the lights anywhere but where aimed.
 
   / No-Weld Trick Work Light Brackets
  • Thread Starter
#8  
hinges are quite stiff, and arranged so each light operating position is slightly "over-center" on hinges that only turn through 270 degrees and are used at the limit of their travel. what else can I say, they seem quite stable.
 
   / No-Weld Trick Work Light Brackets #9  
Thanks for sharing your light pics.

I see you also have a Tuff Top, I just installed one on my L4200.
Wondered how you mounted it though, as it doesn't appear you used the ROPS bracket mine came with.
 
   / No-Weld Trick Work Light Brackets
  • Thread Starter
#10  
you're right about the tuftop ...first of all, it is the over-size one, but fits just right as far as I am concerned ...it is mounted on a home-made frame because, I wanted it low enough to fit in my garage (with the ROPs folded down, of course). I had a thread sometime back that shows how I did it and how it just (barely) fits ...I've gotten better at welding, since, but not much better.

For a poor man's cab I throw on a golf cart cover...the only neat trick, there, is I used super-duper little magnets mounted grommet-like at the key places on the bottom "curtains" to hold them down against the fenders and floor, yet allow me to open it up. (sorry, just took it off, no pics)

And, since you noted that the tuftop is lower than usual, note that my light scheme on the top of the ROPs might not work for traditional mounting (but the side lights would) ...and, I should add that I am vertically challenged so the loss in headroom is of no concern to me.
 
   / No-Weld Trick Work Light Brackets #11  
   / No-Weld Trick Work Light Brackets #12  
Joe, I am curious now that 6 months has gone by, how do you like your mounts? Do they still stay in place? Would you do anything different? Have you had to make any adjustments?
 
   / No-Weld Trick Work Light Brackets
  • Thread Starter
#13  
They do exactly what I want, in all cases and I don't think I would change anything. The three toggle switches I installed for them are double-pole, double-throw and I am still working on which combinations should work together. The only thing I might do differently is spring for the new super-bright LED's to cut down on the current draw, but one of the things I did when I first got my Kubota L4330 open-station was to swap in a bigger alternator ...I believe the one from the 4330 cab model, so I have ample current, and I have installed a second fuse panel. I thought about welding up all the mounts, but using just parts from home-depot/lowes, etc. was cheaper and faster. I think some enterprising board member might decide to fab and offer for sale an upgraded set of such mounts...maybe spring-hinged so they return to station after being brushed back/over ...

Oh, and note that they are designed to brush back only (only) when going forward, which is usually when I encounter brush or branches ...in reverse, take care, you're on your own.
 
   / No-Weld Trick Work Light Brackets #14  
I bet a good strong rare earth magnet would lock the hinge in place as needed, while maintaining the right angle within the hinge assembly to use in the front and rearward positions. You also would be very unlikely to loose the magnet in the event you catch a limb, and limit any damage to the assembly.

product_thumb.php

This one has 55 LBS of pulling force, yet is only .50" X .50" X 2.0"...price $3.89
 
   / No-Weld Trick Work Light Brackets
  • Thread Starter
#15  
Good thought ...incidentally, as I may have posted elsewhere, I use little rare-earth magnets on my golf-cart-cover-poor-man's-cab at the bottoms and along the fenders: pulls away when I want to enter, but holds fast to keep out the weather.
 

Tractor & Equipment Auctions

1660 (A59213)
1660 (A59213)
2013 Godwin Dri-Prime CD103M Towable Trash Pump (A59228)
2013 Godwin...
2021 VERMEER S925TX STAND ON SKIDSTEER (A52709)
2021 VERMEER...
2022 FREIGHTLINER M2 26FT BOX TRUCK (A59905)
2022 FREIGHTLINER...
2016 Ford Explorer AWD SUV (A59231)
2016 Ford Explorer...
207279 (A52708)
207279 (A52708)
 
Top