Tow ways to build your truss's. In place, which is the hardest way, or on a flat surface and then put them into place. If I can, I like to build them first, then install them as one unit.
I agree with you on stick building.
But this is bracket building.
One of the reasons I've pursued this system and tried to work out all the bugs and then applied for a patent on the system is bracket building makes trusses a snap.
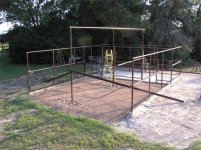
If you look at the above posted picture you will notice the pipe runs length of the peak. The pipe holds the brackets which accept purlins as rafters to the top plate. No figuring pitch except for ridge cap. The pitch is decided by the location of the pipe. That pipe or combination of pipes, or ridges if you will, determine the pitch.
Again, no cuts beyone ninety degrees because the brackets remove all the figuring.
When I was designing this system one of the things I had to deal with is trusses and roof pitches are probably the most intimidating aspects of building a structure for the amateur. I was able to take away all the calculations about run, rise, and degrees of cut for the seat and peak with a simple bracket.
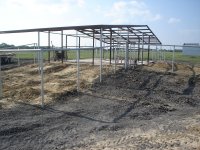
All the builder has to do is what Don has done. He's decided where he wants his peak and that's all there is to it, truss is designed.
I recommend Don put a purlin eight to ten inches down from the peak on each side. This gives more metal and framing for attaching the roofing sheet and the ridge cap.
His rafter length will be something about eleven or so feet, I don't want to do the math right now. The rafter will end at the edge the top plate. That cut can be figured out with a plumb (level) on one rafter and that one used for a pattern or they can all be placed wild and cut afterwards.
One of the features of the bracket is the rafter length doesn't have to be dead on. There's about two inches maximum of fudge built in to the bracket-purlin attachment.
Again, no more than four feet between purlins (purlins run between rafters, rafters run between the top plate and the peak or ridge).
The purlin above the top plate will be perpendicular to the rafter and will not protrude beyond the top plate. That purlin will be attached to the top plate via self tapping screws coming in from underneath the top plate into the purlin.
I recommend two inches of overhang beyond the siding sheets. So allow one and a quarter inches for siding if Don is using R panels. I also recommend about six inches of gap between the peak and end of roofing sheet if using ridge caps. Four inches if ridge roll is used.
I see ridge roll as a false economy for my installations. When I add the cost of the foam blocks that's required with ridge roll versus the cost of ridge cap it's almost a wash. Plus ridge cap will attach to the purlin through the roof sheets and the ridge roll is attached to just the ribs on the roofing sheet.
Let's say Don's rafters are eleven feet from the outer edge of the top plate to a good overlap on the bracket. It works out that measurement is a good one for the roofing sheet when we consider three and a half inches overhang beyond the top plate and eight inches or so down from the peak.
Now if Don isn't going to use gutters then I recommend six inches of overhang to insure getting the water away from the siding. When I refer to gutters I'm not referring to box store or seamless gutters. I'm talking about the gutters that are provided from the steel sheeting supplier. It's a good system works with the steel panels. Other gutter systems require additonal modifications and work that offer potential problems down the road.
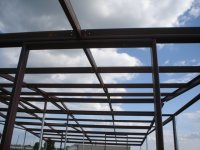
If you look at this picture you will see I use a piece of purlin as a brace between the rafters. This reinforces the truss principles of the rafter system using the brackets.