Only in Texas, Don and Harv doing

   / Only in Texas, Don and Harv doing
  • Thread Starter
#82  
Don and myself talked about this yesterday. I suggested pouring a concrete beam along the sides of the carport. That would enable the placing of the doorway without adding an additional post.

I also pointed out the beam would keep the gravel inside the carport keeping it from becoming potential missles for the mower.

Also if the ever decide to concrete the floor for the carport they'd only have to drill the beam for their rebar and go for it.

Even though it's going to be an open walkway now I suggested framing it for a door. That way if at a later date a door is required the installation will be a snap.

We can get you some additional brackets so that isn't a problem.
 
   / Only in Texas, Don and Harv doing
  • Thread Starter
#83  
That's an interesting concept. All of the manufacturers, DeWalt, Makita, Bosch, etc have quick connect systems that are almost as simple to use. I have one in each cordless kit.

For the siding installation I've found the corded screw guns are unbeatable. I carry four cordless kits on the truck, two Hitachi, two Bosch.

However, if the ship comes in and the port survives the crash I'll probably donate all of those to charity and go with this. The power of 18 volt at the weight of fourteen and tons of run time.
 
   / Only in Texas, Don and Harv doing #84  
The following worked pretty well for me when building my barn: First I hired someone to level my pad w/a scraper & box blade to w/in about 3". Then we set & squared up my batter boards, laid out the hole locations & drilled them in using a 24" auger on a skid steer loader (my posts were 6x6 treated so this gave me some room for any final squaring tweeking), then we used a survey level to set a grade pin in the bottom of the holes & poured a concrete plug to the top of the pin, I cut all my posts to the finished length & then stood them up & re-squared everything up using stringlines off the batter boards. Setting the precut posts on these concrete plugs left the tops of all the poles even & no final trimming was required, I used the survey level to set a chest high reference mark on all the posts & stuck a nail in every post @ this mark. I could use the nail to hang my tape on when measuring up & down for the purlins & beams. I'm using dense grade to bring the floor to finished elevation & provide drainage. This is what worked for me, no criticism for doing it differently is implied.
 
   / Only in Texas, Don and Harv doing #85  
Tomdully, that is an interesting drill. My biggest concern would be the weight of the drill.

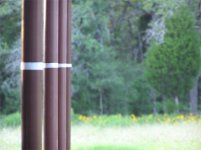
Twinwillows, a pin in the bottom of the hole and then using that as the starting point would eliminate the cutting off of the poles. These holes are 4' deep and I cannot touch the bottom. Some of the holes with the plug it would have required about another 4"-6" in depth. I think that cutting the tops off will be easier for me in this particular project. Thanks for sharing your method. It is always interesting to see how many different ways the building steps can be done.

I got another pallet of cement and I am celebrating my 50th bag of cement! /forums/images/graemlins/grin.gif

Only six more holes to fill. (I'm on better than banker's hours /forums/images/graemlins/grin.gif /forums/images/graemlins/grin.gif)

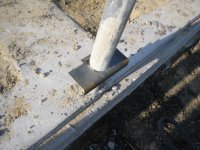
Harvey tell me more about the beams, width, depth, how much steel and how far past the end post (the entrance to the carport) should it extend. Also explain the lip and how to build the frame.

I am also toying with the idea of having a rock exterior facing on the beams and slab by setting rocks next to the framing board. below the lip. Have you ever done this?

I'm trying to determine if I want to pour the beam myself, and then use the framing for the slab, or if I will pour it on the same day as the slab. I don't want to have too much going on on slab pouring day that I + 1 can't handle.

Thanks!
 
   / Only in Texas, Don and Harv doing #86  
The poles are set!!!!!!!!!!!

It took till sunset, see attachment, but I was determined to finish tonight. Now I don't have to wake up in the morning and get critters out of the holes.

The got the purlin/pole/connector screws in the mail yesterday.

I guess next on the agenda is to frame the foundation and level the slab area and install the re-barb. /forums/images/graemlins/smile.gif
 

Attachments

  • 881662-polelast.jpg
    881662-polelast.jpg
    44.9 KB · Views: 441
   / Only in Texas, Don and Harv doing #87  
Congratulations on that milestone, Don. /forums/images/graemlins/cool.gif

I looked at your picture and thought, "That doesn't look like that much work to get to this point." /forums/images/graemlins/wink.gif Deceptive, isn't it? All that hard work is in those holes and out of sight. /forums/images/graemlins/smirk.gif
 
   / Only in Texas, Don and Harv doing #88  
Thanks Jim. There are eighty bags of sacrete hidden under those poles.

With the poles up I can think of no reason to keep the batter boards up so I have taken them down. Everything gets lined up on the poles now.

The reference line has been marked on the poles with a laser level. I put masking tape on the lines so they would show up in the picture.

The concrete level has been marked on the poles and the foundation and beam framing wood and re-barb has been delivered.

Mikem has delivered a cattlegaurd which will be used about 40 feet in front of the carport (no more gap to open).

Harvey, any tips on framing the beams and slab? /forums/images/graemlins/smile.gif
 

Attachments

  • 886949-centerlaser.jpg
    886949-centerlaser.jpg
    30.5 KB · Views: 358
   / Only in Texas, Don and Harv doing #89  
Thanks Jim. There are eighty bags of sacrete hidden under those poles.

With the poles up I can think of no reason to keep the batter boards up so I have taken them down. Everything gets lined up on the poles now.

The reference line has been marked on the poles with a laser level. I put masking tape on the lines so they would show up in the picture.

The concrete level has been marked on the poles and the foundation and beam framing wood and re-barb has been delivered.

Mikem has delivered a cattlegaurd which will be used about 40 feet in front of the carport (no more gap to open).

Harvey, any tips on framing the beams and slab? /forums/images/graemlins/smile.gif
 
   / Only in Texas, Don and Harv doing
  • Thread Starter
#90  
Morning Don,

I was up until ten thirty last night repairing the factory class three receiver hitch on my son in laws K3500. And I'm running late this morning.

Maybe this picture will help you until tonight when I can find the pictures of the framing etc.
 

Attachments

  • 887088-DSC02663.JPG
    887088-DSC02663.JPG
    77.6 KB · Views: 385

Tractor & Equipment Auctions

1996 Lincoln Town Car Sedan (A50324)
1996 Lincoln Town...
2 Vintage Metal Signs (A48081)
2 Vintage Metal...
1968 CHEVROLET C10 1/2 TON PICKUP TRUCK (A51222)
1968 CHEVROLET C10...
2018 John Deere R4038 Self Propelled Sprayer, (A50657)
2018 John Deere...
2013 CATERPILLAR 420F BACKHOE (A51242)
2013 CATERPILLAR...
John Deere Quick Attach Bale Spear (A50514)
John Deere Quick...
 
Top