Started construction this weekend. 36x36 monitor style, derived from this plan from the Univ. of Tennesse extension: http://web.utk.edu/~ggrandle/Programs/Plans/T4161.pdf
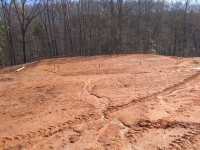
My neighbor is a semi-retired grader/earth mover. He dug the foundation for our house, and has done some other land clearing for us. Had him clear some space at the edge of our woods and form a pad. Last weekend I laid out the dimensions of the building with masonry line. We've had some heavy rain in the meantime, and the water went exactly where intended. An experienced, semi-retired grader makes an excellent neighbor!

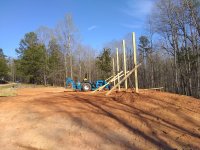
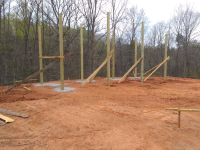
This weekend, beautiful weather with the exception of some heavy wind. The wife and I were able to get the first row of posts (back of barn) stood up. We had some family obligations and were also doing garden prep work, and the first post was definitely a "let's go slow and figure out our methods" process. Feel pretty comfortable we can do about 4 posts in a day, including digging, placement, bracing, removing the spoils, mixing and pouring concrete, and resting our tired, creaky bodies. Expect a couple of more weekends to stand all sixteen posts, which is fine, since we are not in a particular hurry.

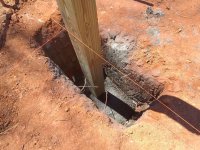
Nearly rented an auger to do the post holes, but after a lot of reading, pondering, and digging a test hole, decided to dig them with the backhoe on my LS. It's a much bigger hole than an auger makes, but I chose to use a variation of a "collar" style method that the experts over at the Hansen pole building blog describe. Their preferred method is using some sort of fixture (imagine a heavy wire basket) to stand the post 6" off the ground so wet concrete flows under it, and then 18" of depth/contact with the post itself. Didn't have a good way to do the stand off, so instead poured an 80lb. bag dry, in the hole as the base, well tamped, set the post on that, and then another four to five bags of mixed concrete to get 18" of contact with the post. Used a concrete vibrator to max consistency and adhesion to the post. I've decided not to backfill with the red clay. Waiting on our local gravel and rock guy to bring a load of crusher run for the backfill. It's a couple more bags of concrete than I planned per hole, but like the result I am getting and think it will have good resistance to both settling and uplift.

Couple of tool notes: The concrete vibrator is the $120 Harbor Freight version. It's pure chinesium, but it works great. Ran it with a Sportsman 1000w generator. The tool works well, feels solidly built, and has a long power cord so I could keep the genny well away from the hole without an extension cord. Also, on the topic of Harbor Freight, I bought the smaller (60lb) Central Machinery concrete mixer a couple of years ago. My wife likes to do masonry projects on the property. We probably mixed a half dozen bags of mason cement before the motor quit. Very poor quality motor. I replaced that motor with a more powerful American made motor, and now that thing runs great and easily mixes an 80lb sack. Mixed 20 bags this weekend, never missed a beat. Last but not least: Bought a Swanson post level for this project. Will never set another post without one.
Some supplier and material notes: We use a local building supplies store called Yoders (Fair Play, SC). Great vendor; super friendly and customer service oriented, and very good pricing. They charge a whopping $11 for delivery, any size order, and they are 20 miles from us. They special ordered the 20' and 18' posts (UC4B...ground contact/burial, structural applications), and had them to us in less than a week. The pallet of concrete turned out to be Sakrete. I'm used to buying Quickrete at Home Depot. I now like the Sakrete MUCH better. It was far more consistent than what I've gotten from Home Depot.
So, that's it. Started. Will post updates to the thread as this progresses.
My neighbor is a semi-retired grader/earth mover. He dug the foundation for our house, and has done some other land clearing for us. Had him clear some space at the edge of our woods and form a pad. Last weekend I laid out the dimensions of the building with masonry line. We've had some heavy rain in the meantime, and the water went exactly where intended. An experienced, semi-retired grader makes an excellent neighbor!

This weekend, beautiful weather with the exception of some heavy wind. The wife and I were able to get the first row of posts (back of barn) stood up. We had some family obligations and were also doing garden prep work, and the first post was definitely a "let's go slow and figure out our methods" process. Feel pretty comfortable we can do about 4 posts in a day, including digging, placement, bracing, removing the spoils, mixing and pouring concrete, and resting our tired, creaky bodies. Expect a couple of more weekends to stand all sixteen posts, which is fine, since we are not in a particular hurry.

Nearly rented an auger to do the post holes, but after a lot of reading, pondering, and digging a test hole, decided to dig them with the backhoe on my LS. It's a much bigger hole than an auger makes, but I chose to use a variation of a "collar" style method that the experts over at the Hansen pole building blog describe. Their preferred method is using some sort of fixture (imagine a heavy wire basket) to stand the post 6" off the ground so wet concrete flows under it, and then 18" of depth/contact with the post itself. Didn't have a good way to do the stand off, so instead poured an 80lb. bag dry, in the hole as the base, well tamped, set the post on that, and then another four to five bags of mixed concrete to get 18" of contact with the post. Used a concrete vibrator to max consistency and adhesion to the post. I've decided not to backfill with the red clay. Waiting on our local gravel and rock guy to bring a load of crusher run for the backfill. It's a couple more bags of concrete than I planned per hole, but like the result I am getting and think it will have good resistance to both settling and uplift.

Couple of tool notes: The concrete vibrator is the $120 Harbor Freight version. It's pure chinesium, but it works great. Ran it with a Sportsman 1000w generator. The tool works well, feels solidly built, and has a long power cord so I could keep the genny well away from the hole without an extension cord. Also, on the topic of Harbor Freight, I bought the smaller (60lb) Central Machinery concrete mixer a couple of years ago. My wife likes to do masonry projects on the property. We probably mixed a half dozen bags of mason cement before the motor quit. Very poor quality motor. I replaced that motor with a more powerful American made motor, and now that thing runs great and easily mixes an 80lb sack. Mixed 20 bags this weekend, never missed a beat. Last but not least: Bought a Swanson post level for this project. Will never set another post without one.
Some supplier and material notes: We use a local building supplies store called Yoders (Fair Play, SC). Great vendor; super friendly and customer service oriented, and very good pricing. They charge a whopping $11 for delivery, any size order, and they are 20 miles from us. They special ordered the 20' and 18' posts (UC4B...ground contact/burial, structural applications), and had them to us in less than a week. The pallet of concrete turned out to be Sakrete. I'm used to buying Quickrete at Home Depot. I now like the Sakrete MUCH better. It was far more consistent than what I've gotten from Home Depot.
So, that's it. Started. Will post updates to the thread as this progresses.
Last edited:
