Our New Barn , In Picture Series. Enjoy!

   / Our New Barn , In Picture Series. Enjoy! #22  
Beautiful Job and Congrats. You can be real proud of your efforts!:thumbsup:
 
   / Our New Barn , In Picture Series. Enjoy! #23  
WOW! That is one nice building!
 
   / Our New Barn , In Picture Series. Enjoy!
  • Thread Starter
#24  
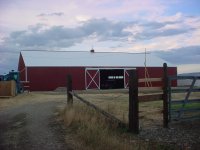
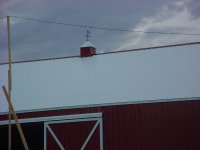
The skies really are bluer in MT. Barn is great, like the classic red color. Surprised you used hinged stall doors there, I'd think the snow would make them non-functional in the winter. We don't get as much as you do and we can never get the doors open until I plow.

We positioned the barn in an area where we get no drifting snow. The dutch doors at the back of the barn on the stalls are all hinged but are opposite of the normal wind pattern we get so we shouldn't get them drifted at all. The man door at the side along with the sliding door next to it is protected as well. The two big sliders at the front may get some small drifting but the angle that the wind blows should never create to big of a problem there either. The true test will be during the coming winter but I don't think we will have much problem. We chose the position of the barn carefully as to minimize drifting in the doors. Hope it works out but won't know for sure until winter.
 
   / Our New Barn , In Picture Series. Enjoy!
  • Thread Starter
#25  
Part 5 , Got the weather vane installed today and we are working on the interior. We are almost finished with it. I will post the final pics when we are done with the stalls and the tack room.

Here's the pics of the weather vane mounted onto the cupola. enjoy! :)
 

Attachments

  • DSC06669.JPG
    DSC06669.JPG
    502 KB · Views: 379
  • DSC06670.JPG
    DSC06670.JPG
    469.5 KB · Views: 230
  • DSC06672.JPG
    DSC06672.JPG
    484.5 KB · Views: 201
  • DSC06673.JPG
    DSC06673.JPG
    490.7 KB · Views: 260
  • DSC06674.JPG
    DSC06674.JPG
    487.6 KB · Views: 205
Last edited:
   / Our New Barn , In Picture Series. Enjoy! #26  
US, man that's a great looking barn! I can't wait to finish mine, it will be 60x80 & it won't be red so I guess it ain't a "barn".


Actually, with barn metal it is wider on one end than the other. So it will go crooked if you don't cheat it. We usually put the first sheet up and from then on we will measure where each and every sheet will go to ensure it is straight. It is not easy though.

Horse Apples...

I have never seen tin bigger on one end than the other. The way it's made that is just not possible. If it's crooked it's operator error. Tin is a pain in the arse to keep straight but it can and is done every day. We always use a string line the length of the building and every sheet has to be adjusted so it is perfect. There is quite a bit of wiggle room which is why they get "out" of square rapidly. If you are working by yourself it is almost impossible to keep it straight...I know this based on experience. Oh, and if the building frame ain't straight.....the worm can is open.
 
   / Our New Barn , In Picture Series. Enjoy!
  • Thread Starter
#27  
Horse Apples...

I have never seen tin bigger on one end than the other. The way it's made that is just not possible. If it's crooked it's operator error. Tin is a pain in the arse to keep straight but it can and is done every day. We always use a string line the length of the building and every sheet has to be adjusted so it is perfect. There is quite a bit of wiggle room which is why they get "out" of square rapidly. If you are working by yourself it is almost impossible to keep it straight...I know this based on experience. Oh, and if the building frame ain't straight.....the worm can is open.

All of the above is right , It is not easy to get it right but if you pay close attention to detail (especially with the tin) you can get it near perfect. Having the framework set properly to begin with is the most important part to getting a near perfect result. You can't get much better than this one, it really did come close to perfect. :thumbsup:

Thanks to all for looking and your kind complements. We are currently working on the stalls, then the electrical and lighting will be done and then last will be the insulating and installing the inner walls of the tack room. Then we will paint the inside stall walls and the tack room. As soon as the rest of the work is done I will post up the final pics of our beautiful new barn. We are very happy with it and looking forward to getting her finished up. :D
 
Last edited:
   / Our New Barn , In Picture Series. Enjoy! #28  
Thanks for the pics
 
   / Our New Barn , In Picture Series. Enjoy!
  • Thread Starter
#29  
Last edited:
   / Our New Barn , In Picture Series. Enjoy!
  • Thread Starter
#30  
Update! We have just finished all the barn wiring for lights, sockets, switches, exterior lights with day/night sensors. The tack room is wired up as well with all lights, switches, sockets and a 220volt heater with 3000 watts. That job was just finished yesterday. Took us about 4 days total. My friend and I wired it up and it is all wired to code.

We put in a 100amp Square-D breaker box in the barn and ran a 190ft 100amp underground service line using 2-2-2-4 aluminum service feed line 2ft deep in conduit and an underground phone line from our office to the barn. It was the only existing feed we had to use for the barn. We wanted a 200 amp service line but in order to do that we would have to put in a new transformer on a separate service and it would have cost over $3500.00. So we decided to go with the 100amp service line spliced to our office since it was the only other option. The 100amp service will do all we need at this time but we may upgrade to a 200 amp service in the future. All the electrical to the barn is done and the service and phone lines are buried. All wiring in the barn itself is copper wire.

I am going to be running a underground service in conduit from our barn to the outbuilding next to it
with a Square-D 70amp breaker box to power the new lights and automatic horse waterer. I have the line in the conduit and at the other building now so it is about half way finished. I am burying the line tomorrow. We have now eliminated the overhead line going to that building and everything is underground and looks a lot better now. :) I have built and painted both fences on each side of the barn and finished painting the small shed on the east end of the barn.

I am currently finishing that job and we are painting the horse stalls and outer walls and face of the tack room. One stall is completely finished so far. We are getting ready to start working on the insulation and inner walls of the tack room pretty soon. I will be posting up more pictures of our progress in the near future.
 
Last edited:

Tractor & Equipment Auctions

2022 Caterpillar 906M Compact Wheel Loader (A50322)
2022 Caterpillar...
Chipper (A50774)
Chipper (A50774)
2016 Ford Explorer AWD SUV (A51694)
2016 Ford Explorer...
2017 Ford Explorer AWD SUV (A50324)
2017 Ford Explorer...
Agro Trend 7' 3PT Snow Blower (A52349)
Agro Trend 7' 3PT...
2018 Ford Transit 250 (A50120)
2018 Ford Transit...
 
Top