PA160 STH unboxing!

/ PA160 STH unboxing!
  • Thread Starter
#81  
I saw that idea, and tried it, but it seemed like chucking the tungsten in the drill was kind of more trouble than it was worth. How critical is the bevel on the tip? I'm sure I would get a more consistent bevel with a drill than turning by hand, but right now I'm just turning by hand.
 
/ PA160 STH unboxing! #82  
I use to sharpen by hand until I seen how Zap does it. I really like it! I live in a county that has three huge Navy yards. One is a nuclear submarine base, (one of my son-n-laws is a rigger there). Some of the best weldors in the world live here. Years ago the company I was working for wanted me to learn how to Tig weld stainless steel pipe. They sent me to welding school to learn. The teacher was a high pressure pipe weldor out of the local Navy shipyard. He took a liken to me at first sight:confused3:! He would bring me tungsten from the shipyard. They don't grind their tungstens, they are turned on a lathe! Mirror finish on them.:cool:
 
/ PA160 STH unboxing! #83  
Here is a chart someone posted, on WW I think. This is opposite of what I was taught, or maybe I mixed things up in my head over the years:confused3:! But I thought you'd get more penetration with a really sharp point.
 

Attachments

  • Tungsten pen.jpg
    Tungsten pen.jpg
    105.3 KB · Views: 269
/ PA160 STH unboxing! #84  
You can buy chemical that sharpens the tungsten and special tungsten grinders but they're expensive. What's most important is to grind lengthwise with the grain. I know a good TIG welder that uses a fibre sanding disc in a 4 1/2" grinder to grind his tungstens. You have to have a dedicated grinding wheel or sanding disc for tungstens.
 
/ PA160 STH unboxing! #85  
joshuabardwell said:
The Miller calculator only calls for a 1/16" electrode for this joint. What's the effect of using a larger electrode than is called for? I know larger electrodes have more current-carrying capacity, so the down-side of using too small an electrode is obvious, but what's the tradeoff for using a larger-than-necessary electrode?
Poor stability at lower amps.
The tip won't get as hot, so it won't emit current as well. Just sharpen to a point to help.
 
/ PA160 STH unboxing!
  • Thread Starter
#86  
I use to sharpen by hand until I seen how Zap does it. I really like it!

Just wanted to say, I gave the sharpening with the drill another try and I think you're right that it's better than doing it by hand. It's even faster, since the tip grinds down faster when spun in the drill vs. by hand. You can apply more pressure when turning with the drill because you're only doing one thing at a time with your hand.
 
/ PA160 STH unboxing!
  • Thread Starter
#87  
OMG you guys TIG welding is so awesome!

I'm building a cart for my welder so I can move it around with the cylinder attached. I'm using some 1" x 1/8" thick square tubing that I have left over from another project. I have stick welded this stuff before, but I kind of hate it. I feel like I have to move fast to keep from burning through, but at the same time, the joints are only ever 1" at a time, so there's this tiny little target zone that I have to hit. And even with 3/32" electrodes, the resulting joints look like big ugly scars on that little tubing.

To top it all off, the sun was going down, and I had to get out a work light. I just cannot stick weld by work lights. Something about the shadows and depth perception and the halogen constantly setting off my auto-dark hood just adds up to I fall apart. I managed to tack everything up with 6011, and then I switched to 7018 to do the finish, and I just kept sticking the rod again and again. I got one terrible bead done and then hit a standstill. I checked the ground. I checked the tip of the rod for slag. I don't know what was wrong, because it was so dark I couldn't see what I was doing.

So I cussed a lot and then I went to the barn and said twenty Hail Mary's (actually, I was swearing) while grinding the mess I had made back to clean. While I was there, I got to thinking. I had decided to stick weld this project because I barely have an hour under the hood with the TIG torch, while I consider myself to be minimally competent with a stick welder, and I figured I would just make a mess of the thing with TIG. But as bad as things were going, I figured they could hardly get any worse, and if it came down to it, I'd just cut the thing up and use it for practice stock.

What a difference! The small stock was no problem for the TIG torch, of course. And instead of being 14" away from the joint, I was right in there so I could see what I was doing. Instead of having an arc and smoke plume obscuring everything, I could see the puddle forming, and every little thing it was doing. It was just beautiful. If I put in filler too soon, I could see it ball up and sit, and then I could see the puddle form and watch the filler wash in. I could really see the effect of different heat settings on the base metal. Once, I even saw the puddle starting to sag as I nearly burned through. It was just amazing being able to see every little thing that the arc and puddle were doing in the joint.

Wow. TIG is amazing.

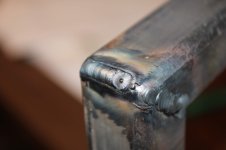
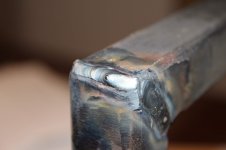
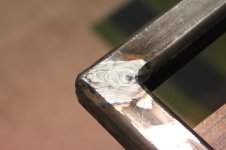
A couple of pics are attached, 'cause I'm sure some people will like to see them. As flawed as they are, these are the best of the bunch. The outside corners are a little bit cheating, because I skipped the filler entirely and just used the torch to melt the edge together. On the flat joint, I had a small groove that I ground in with a cutoff wheel and then I basically just laid a 1/16" filler rod in the groove and washed over it with the torch. I still just make a total mess if I try to actually feed wire.

One of the most obvious problems I am having is breaking the arc without leaving a "bubble". I try doing what I've seen Jody do in his videos, where you wash back over the bead slightly while backing off the pedal, but it doesn't fix it.
 

Attachments

  • IMG_7449.jpg
    IMG_7449.jpg
    155.2 KB · Views: 160
  • IMG_7450.jpg
    IMG_7450.jpg
    171.1 KB · Views: 163
  • IMG_7451.jpg
    IMG_7451.jpg
    238.2 KB · Views: 150
Last edited:
/ PA160 STH unboxing!
  • Thread Starter
#88  
... oh, and Shield Arc: I know. ROUND THE CORNER! As soon as I looked at the corner, I realized I hadn't done it. I'm going to go back and fix it tomorrow. See? I never would have thought to just go back and dab in another dollop of weld with stick!
 
/ PA160 STH unboxing! #89  
TIG is fun isn't it.? I knew you would like it. Keep working on it.

James K0UA
 
/ PA160 STH unboxing! #90  
I would rather use my wave balance to adjust penetration as opposed to tungsten grind angle. That chart is something i have never seen and it makes perfect sense.. / You can get by with a larger than needed tungsten by sharpening a long ( 5/8" ) taper. Beats switching collets all the time. The only time I worry about tungsten contamination from a bench grinder is when welding aluminum. / If you want to try a cool tig welding process put in an .040 tungsten and weld up some 28ga. I personally need a Mag lens for this but it's neat to see how light you can go with a good tig unit.
 
/ PA160 STH unboxing! #91  
WOW! I think you're a natural at Tig welding!:thumbsup:
Personally I try very hard to stop my welds in the center of a joint, not on the edge. This can't be done all the time, but I try. I like to use 36-grit 5-inch dia sanding discs on a 4-inch grinder for cleaning steel before welding. Maybe try, just as your backing off the pedal to stop your weld make one last dip of the filler rod to eliminate that little "bubble".
 
/ PA160 STH unboxing!
  • Thread Starter
#92  
Personally I try very hard to stop my welds in the center of a joint, not on the edge.

Right. As I understand it, the corners/edges are where most of the stress is going to be, and the start/stops are going to be the weakest part of the weld, so it's better not to put those two together in the same place. I really have to start pushing myself to round the corners. It's so difficult with stick, where you may be 12" out from the joint, so swinging around a ninety-degree corner requires a rapid movement of more than a foot. I'm not sure how you really do that while still staying steady and carrying the puddle properly. With TIG, and its small torch, I will have to come up with a different excuse. :laughing:
 
/ PA160 STH unboxing! #93  
It's so difficult with stick, where you may be 12" out from the joint, so swinging around a ninety-degree corner requires a rapid movement of more than a foot. I'm not sure how you really do that while still staying steady and carrying the puddle properly.
Welcome to the world of welding:laughing:, wait until you get into pipe welding! It is all about maintaining the proper rod angle at all times. I think you're doing great, I' am impressed!:thumbsup:
 
/ PA160 STH unboxing!
  • Thread Starter
#94  
I would rather use my wave balance to adjust penetration as opposed to tungsten grind angle.

Only an option on AC machines, though. The PA160-STH is DC only. Maybe some day, I will get an AC TIG machine, but for now, the machines and the materials are way out of my price range.

At the end of the day, you can always adjust penetration by turning up the heat, although that has side-effects.
 
/ PA160 STH unboxing! #95  
At the end of the day, you can always adjust penetration by turning up the heat, although that has side-effects.
Joint prep, joint prep, joint prep! There is more to welding than burning rod / wire. Proper joint prep is key!;)
 
/ PA160 STH unboxing!
  • Thread Starter
#96  
Joint prep, joint prep, joint prep! There is more to welding than burning rod / wire. Proper joint prep is key!;)

It's really everything. Fitup is the number one reason why I can weld coupons and kind of look like I might not be a total hack, but when I start trying to actually build something, all my "skills" seem to go out the window. It's so frustrating too, because I know I can run a decent bead, but my projects often look like it's my first day under the hood and I have no business there. For all the practice I do with a welder, making sure my bandsaw fence was square to the blade did more for my projects than most anything else.

The real insight into the importance of fitup came to me on a forum thread showing pictures of bicycle builds. Coped tubing, complex joints, and nary a gap to be found. Now that is skill, man. You can't just cross your fingers and try to bridge a gap on a bicycle! If those guys can do it with coped tubing, surely I can do it with a couple of pieces of square tube making a right-angle joint.

The other thing I have had to learn is, as I put it: "Don't double down on your mistakes." If I cut a joint and it has a huge gap, or if I accidentally cut the piece an inch short or something, I have a tendency to want to just forge ahead and try to work around the mistake, rather than scrap the piece and do it again. This creates a cascade of failure. I've been watching the show Kitchen Nightmares, and say what you will about Gordon Ramsay, he will send an order back to the kitchen five times rather than send it out to the table with one thing wrong with it. My fabrication could use a little more of that attitude.
 
/ PA160 STH unboxing! #97  
It all comes with experience, the more projects you build, you'll learn from everyone of them. My buddy Jack who was a crane operator for me for years, says he loves to build projects with me in my shop, because he learns a new trick every time we build something together. If you can get around someone who has a lot of experience fabricating, you would be amazed at some of the tricks we use. Most times we don't even think about them, it's just second nature!;)
 
/ PA160 STH unboxing! #98  
Josh, prep is EVERYTHING! I just finished up a very small project for a friend, sorry no pics, I gave it back to him today, but a half a day saturday and a few hrs sunday all prep and fit work. Couple tacks monday just to check fit up, and a half hour tig welding today and its better then new now. But patience and time is a key factor before you light up. Makes a world of differance. And I aggree with your food guy when it comes to my products. I will literally smash it and chuck it in the pile with the others if it isnt perfect, right in front of the person and build new before I put my name on it. And believe it or not it builds good business. When people want quality from someone who cares about there work they come see me. But anyway your coming along real fast bud, keep at it!
 
/ PA160 STH unboxing! #99  
Josh:
For small gaps, try re-positioning so you can angle the weld downhill. Not all the way verticle, but some what going down. That way the dreaded drip is just moving ahead.
 
/ PA160 STH unboxing! #100  
In my line of work we didn't always have the luxury of working to close tolerances. It was more blow and go! On this project we placed a million tons of falsework. We set these beams in place, and used two 100-ton jacks to jack against the vertical beams at the walls, then hard shimmed the beams before welding them. Right where this guy is setting, I seen a guy take a very heated a $ $ chewing for re-picking the beam because he missed the mark by 1/32 of an inch.
 

Attachments

  • Harv.jpg
    Harv.jpg
    46 KB · Views: 181

Marketplace Items

2001 BOBCAT 773 SKID STEER (A60429)
2001 BOBCAT 773...
LOT LOCATIONS (A59905)
2021 CATERPILLAR 730 OFF ROAD DUMP TRUCK (A60429)
2021 CATERPILLAR...
2014 American Signal Solar Towable Message Board (A59228)
2014 American...
2023 FABRIQUE CARRY-ON -TILT 60"X8' TRAILER (A60430)
2023 FABRIQUE...
UNUSED FUTURE FT-ZDQ160 110V CONCRETE VIBRATOR (A60432)
UNUSED FUTURE...
 
Top