Post-Frame Shed Build

   / Post-Frame Shed Build #21  
Holeey crap, I think I could park my tractor on that roof......wow:thumbsup: Nice Job!

I'm the "anti-engineer", most of my builds exist floating around in my pea brain. I rarely even draw or write anything down but just start building. Sometimes I wish I could plan ahead a bit more, but it just never seems to happen:laughing:
 
   / Post-Frame Shed Build
  • Thread Starter
#22  
Outriggers, Facia, etc.:

So, after several weeks without a chance to work on the shed, we headed up for a long weekend prior to and including the 4th of July. The first task was to finish the roof framing.

The outriggers came first. Since I had ordered the roof panels cut to length and didn't want to cut any off, we had to measure the exact distance from the center post peak to the outer post, then add the proper overhang to get each outrigger's length. This worked okay, but in hindsight I think we should have just done it for the front and back posts, then stretched a string in between so the facia would end up straighter. Oh, well, it wasn't too bad. The outriggers got nailed to the post tops and then blocks added in between so there was more to nail the facia boards to.

The facia boards went on pretty easily on the eaves, but the gable facias were a little tougher to install at the top of the ladder. We got them done pretty quickly, though.

Lastly, we added blocking in between all of the purlins and several other strategic spots on the enclosed side to close-up any gaps between the framing and roof.

After a day's work, here's what we had:

Shed Construction 4 001.jpgShed Construction 4 003.jpgShed Construction 4 004.jpgShed Construction 4 005.jpg
 
   / Post-Frame Shed Build
  • Thread Starter
#23  
Gable and Window Framing:

The last bit of framing necessary was the gable and window framing. The gable girts required mitering at 63.5 degrees, which was beyond the capacity of our miter saw. So, we marked them and I cut them off with the hand-held circular saw. We had to block behind them to get them nailed flush with the rafters, which was a little challenging due to the small space between rafters. But, a little creativity with temporary blocks got the job done.

I had purchased two used windows that were nominally 18" square. We decided to put them high in the gables to provide a little light without giving anyone visibility to the goodies inside. They turned out to be actually about 17.75" square, so we adjusted the upper girt a little to fit and added some blocking to completely wrap the window with framing. Then we simply nailed the vinyl flange to the outside. It won't seal perfectly this way, but it's pretty close to the roof overhang, we don't get much wind when it rains/snows up there (the valley is rather protected), and heck, it's a shed, so if it leaks a tiny bit around the windows, I'm not going to cry.

This only took until lunchtime on the second day. Here's a few pics.:
Shed Construction 4 006.jpgShed Construction 4 007.jpgShed Construction 4 008.jpg
 
   / Post-Frame Shed Build
  • Thread Starter
#24  
Steel Siding:

Finishing the framing was quite an accomplishment, so we took a break just long enough to eat some lunch. Then it was time to start siding.

The way the siding was stacked, the short pieces for the gable ends were on top. So rather than re-stacking all of the steel, we decided to just start with the gables. Each piece had to be cut off at an angle to match the roof pitch. I had brought several tools capable of cutting the steel siding, but wasn't sure which would work best. We started with a diamond-dust coated blade (borrowed from my Dad) on the hand-held circular saw. This worked great, but threw sparks all over us and sort-of melted the paint along the cut line. Then we tried a set of electric sheet metal shears (also borrowed from my Dad). They gave a cleaner edge and didn't burn anyone, but they were a real pain to maneuver across the ribs, since their jaws only opened about 1/4". In the end, we used each tool for about 1/2 of the cuts. I'm not sure one was better than the other, but at least it gave a little variety during the process.

We quickly discovered that installing the steel panels in the gables while on ladders was DIFFICULT. The main problem was that our cordless drivers do not have the hammering feature. Thus, we needed to put significant pressure on the screws to get them to drill through the steel and bite into the wood. It is very tough to get any leverage to push on those screws when you're 15 feet up a ladder. When you push, the ladder simply moves. Thus this part took longer than it should have because lots of the screws required simply holding the driver and "drilling" for as much as a whole minute or two before they would punch through.

Here's where I get to make my plug for safety: Just a short while into the process, Mrs. MtnMan had to go inside to put dinner in the crock pot. So, I stayed outside intending to put more screws into the panels we had already placed but not completely screwed-in. So, I climbed the step-ladder to the top rung, and started putting screws in. Wanting to get as many as I could without moving the ladder, I reached over to my left and grabbed the rafter with one hand and started driving a screw with the other. Apparently I over-reached, because the ladder tipped and I didn't have a good enough grip on the rafter to hold on. Man and ladder went down hard, and niether got up for several minutes. I ended up with some HEAVY bruising on my left thigh where it hit the ladder on the way down, and also on my left hip bone in the back where it hit the dirt. It left me limping for several days and moving pretty slowly, but I was lucky not to break any bones or worse. From that point on, Mrs. MtnMan wouldn't let me on the ladder without her holding it.

The three gables with short panels took the rest of that day, and the sidwall panels for the enclosed side took the entire next day. Cutting was minimized by ordering the panels the correct length, but we still had to notch-out several places, and also rip the last panel lengthwise on each wall since 36" coverage panels are actually 38 7/8" wide due to the overlap. I hadn't thought of that when I designed the building. Oh, well, better to cut some off than be wishing for more . . .

Also, we used foam closure-strips between the metal and the window flange at the bottom of both windows to try to minimize leakage.

Here are some pictures. It's not perfect, but I'm happy because we didn't mess-up any of the panels and have to re-do (which is good since I didn't order ANY extra).
Shed Construction 4 009.jpgShed Construction 4 010.jpgShed Construction 4 011.jpgShed Construction 4 012.jpg
 
   / Post-Frame Shed Build
  • Thread Starter
#25  
Roofing:

For our last full day of this trip, we decided to tackle the roof. It seemed like a good idea to make sure we completed at least one entire roof slope before we left, in case any freak winds came up while we were gone. A partially covered roof slope seems intuitively more vulnerable than a completed one to me.

So, we started first thing in the morning on the slope covering the enclosed side of the shed. We had purchased 4'X8'X1/2" styrofoam sheets to sandwich between the purlins and the roof steel. These were to prevent condensation on the bottom of the steel when there was warm, slightly moist air inside and cold air outside. One side was shiny foil coated, so we pointed that down to reflect energy back into the shed and also hopefully prevent the birds and bugs from tearing it up.

I thought it made sense to install all of the foam and then come back across installing steel on top of it. The only trouble was that you can't walk on the foam alone when it's sitting on the purlins. So, I was only able to reach part of the sheets to staple them onto the purlins. I think I've mentioned before that the wind rarely blows at our location up there, and so far, this trip had been no exception. It had been hot with scarcely a breeze. Well, Mr. Murphy paid us a visit that morning because as soon as we had all of the foam on the roof, a 10 - 15 mph wind came up and promptly ripped it all off. I know that 10 - 15 mph isn't really much wind at all, but it was plenty to grab those foam sheets and toss them off onto the ground. Amazingly, the staples ripped out without really tearing up the foam, and the worst damage to any of them were a couple of broken corners.

So, Mrs. MtnMan stepped in with a better plan, and we installed each row of foam followed immediately with steel. The steel was heavy enough to hold it down, and also provided a surface to walk on so we could reach more areas to staple the foam down. We only installed the top row of screws (at the peak) on each sheet of metal so that we could get it all on quickly. This turned out to be a smart move, since about halfway across we realized that the panels were not all lining up square and we had to pull screws and adjust several of them. The roof panels were installed with so that a gap of about 6" would be left at the peak for ventilation (the roof cap will cover this). I had been reading a lot trying to figure out how much to allow the panels to overhang the eaves without support, and couldn't find any consensus. So, we settled on a guess of 2" and went with that.

Once all of the panels were in place (with screws only in the top purlin), we installed the eave fascia trim. It had to be tucked-under the steel but above the foam, then screwed in from the front. We also had to stuff the closure foam strips between the trim and the roofing. These strips are very stretchy and have glue on one side, so they are kind of hard to get stuffed in there and match the rib profile of the roofing. We did our best . . .

Then it was time to put all of the screws through the roof panels into the purlins. This presented another challenge because we couldn't see or feel the locations of the purlins underneath the roof. So, we used a chalk line and snapped lines where the nails in the gable fascias attached to the purlins. This, however, was imperfect because the nails might not be exactly in the middle, and unfortunately, the purlins were not all perfectly straight and lined-up. The result was a few sections were our screws missed the purlins entirely. After a while, I got to where I could feel the difference in the torque on the driver when I missed a purlin, and could adjust on the next screw. We may go back later and try to add wood underneath so the missed screws have something to bite into, but for now, there is simply a small section of roof that isn't held down as well as the rest. With purlins on 16" centers, I think we have some leeway, though.

Another safety note: Our roof is on a 6:12 pitch, which is just about as much as I would ever want to try to walk on using steel. We kept a moist towel on our ladder and wiped our feet every time we went up to make sure we had good grip (like a basketball player). Even so, the chalk line dust started to make things a little sketchy toward the end, and we were getting a little nervous about sliding off.

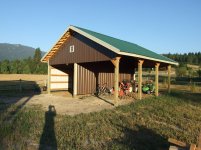
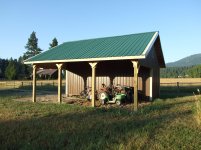
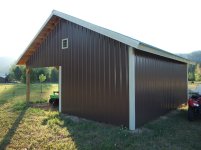
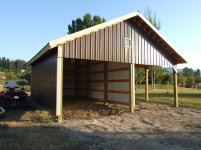
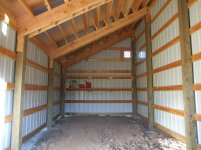
We finished the screws at about suppertime, so it took basically an entire day to install one full roof slope. Here is a picture showing the installed roofing:
Shed Construction 4 016.jpg
 
   / Post-Frame Shed Build
  • Thread Starter
#26  
Corner Trim:

The next morning was the 4th of July. We'd been working on the shed for 4 solid days, and we were ready to take our daughters to town and have a little fun. So, all we did that morning was install the corner trim on the sidewalls. This was relatively easy, (measure, cut, and screw on) and we lucked-out that all of the corner gaps were covered by the trim.

We worked hard, sweated a lot, and I came away with a couple of bruises to show for it. But, now the end of the project is in sight - all we have left to do is install the other half of the roof, a little roof trim, backfill the interior with road mix, and build/install doors.

The neatest part was when we got ready to leave, we were able to park our ATV, wheelbarrow, etc. inside the COVERED shed! We still had to lock some stuff up to the posts since the doors aren't on, but it was sure nice to put it in there vs. our porches.

Stay tuned for more . . .
Shed Construction 4 013.jpgShed Construction 4 014.jpgShed Construction 4 015.jpgShed Construction 4 017.jpg
 
   / Post-Frame Shed Build
  • Thread Starter
#27  
Roof Trim:

The girls went with Nana and Papa last weekend, so Mrs. MtnMan and I were able to put in a few more hours on the shed. We started Friday evening by putting the second half of the foam and metal on the roof. This went pretty quickly since we already had our "system" figured out, and we had it secured top and bottom by the time we ran out of light. The next morning, we had to wait for the dew to dry off of the roof before we could go up and put all the screws into each row of purlins. So, we did some general clean-up and also added two small shelves in the back of the enclosed side using a couple of leftover 2X6's.

We used the same chalk-line approach to placing the screws into the purlins, but this time, we sent one person down below to be the "spotter" for several screws on each line before we did them all. That way, if any missed, we could adjust properly before lots more missed their mark. This slowed us down slightly, but made it so that we won't need any "repair" blocking like we still need to do on the other side.

With all of the screws in, we turned to the rake trims along the gable edges. We had the metal outfit cut them long enough so they were each only one piece (no seams), but we still had to trim them to fit. They were easy to set in place, but then the tough part began. Their edges that laid on the roof were "hemmed" (folded under), so that we had to drive screws through two layers of trim metal plus the roof metal. This was extra-difficult to get the screws to drill through, especially working on the edge of the roof where we couldn't crouch right over them and bear down with our weight. Also, our 1" trim screws turned out to be too short to go through all of the layers of metal and foam and actually bite into the wood. So, we ended up using some longer green screws that were extra. They all stick out like sore thumbs on the ivory trim. Oh, well . . .

We also discovered that when trying to drive screws though several layers of metal and/or in an awkward position that won't allow much leverage, a hammer and a small nail are a lifesaver. Simply use them to punch a small hole to start the screw in and you don't need nearly as much pressure on the driver.

The last pieces of metal we installed were the roof caps. We had just over 27' of roof peak, and three sections of cap at 10' each, so we didn't even cut them - just overlapped generously. These screws were also difficult to install because they had to go through the cap and into the tops of the roof panel ribs, then find wood somewhere beneath. Several missed, but we put one in EVERY rib, so hopefully it won't blow off.

At that point, it was past dinnertime, and we were tired, so we quit for the night. Good thing, too, because within an hour it was pouring rain from the first summer thunderstorm we'd had in weeks. I checked later, and couldn't find any leaks - hooray!

Sunday morning we put a few more screws in the rake trim (ones we could reach from the ladder, so the wet roof wasn't an issue), then took a deep breath. This point marks the completion of the basic parts (wood and steel) to make a sound structure. We still need to go back and block under the closed side of the roof to secure the screws that missed, and we still have road-mix backfill and doors to complete, but it somehow seems like the hardest parts are all past us.

We were pretty proud of ourselves until we realized that we had forgotten our camera. So, sorry, but no pictures this time. We'll be back up there in two weeks to meet the gravel truck and do some backfilling (with my Dad's little Yanmar), so we'll get some pics then.
 
   / Post-Frame Shed Build
  • Thread Starter
#29  
Gravel Backfill:

With the shed construction essentially complete (minus the doors), we were ready to get the interior leveled-up so we could start storing things inside more permanently. We debated on whether to hire someone with a skid-steer to do this work, or borrow my Dad's little grey-market Yanmar and do it ourselves. The decision wasn't too hard - I kind-of enjoy running that little tractor.

We still had a few yards of topsoil leftover from a previous project up there, so we used that first to add a little elevation to the floor. I wasn't able to do much spreading with the tractor loader inside the shed, but Mrs. MtnMan stepped-in and did the hard work, spreading by hand. We were able to accomplish this portion of the job on Friday evening after arriving.

Saturday morning, we had 4 loads of 3/4" and under road mix sand/gravel delivered by dump truck. I think we got something close to 50 yards. We used almost the entire first load adding height to the inside of the shed. We brought the encolsed side up to completely level, and the open side has about 4" - 6" of gravel.

This material was pretty easy to scoop up with the little loader, but I was initially concerned about exceeding the tip capacity of the little Yanmar (I'd had trouble with that in the past). However, in addition to the tiller that always rides around on the back of it, I hung a home-made weight (12" steel pipe filled with concrete) from the back that added around 150 lbs. That made a big difference, and as long as I took it slow, it could handle nearly as much as the bucket could scoop. I think if the rear tires were filled, it would do even better, but then it would be heavier to trailer around.

The rest of the gravel was used to build about 75' of driveway connecting the existing drive with the new shed, and also raising the elevation of the existing driveway. We added a couple of drain pipes underneath as well because we had some runoff coming across the top of the drive this Spring.

Without a back-blade, I found that the best method for spreading the gravel with the tractor was to point the loader bucked straight down, apply some down pressure and "back-drag" in reverse. Luckily, most of the work area was pretty open, so I had room to back up beyond where I wanted the gravel. We still had to do a fair amount of shovel and rake work, which (in 95 deg. heat) had us pretty worn out by the end of the day.

And, of course, we were so tired that we forgot to take pictures of the results. I'll take some next time and add them to this post. I think we'll fix the small issue with the roof screws next time, then try to get the doors built and installed over Labor Day weekend.
 
   / Post-Frame Shed Build
  • Thread Starter
#30  
Well, I thought I could add pics to a previous post, but I can't figure out how, so here are the ones that belong with the "Roof Trim" post.
 

Attachments

  • Shed Before Gravel 001.jpg
    Shed Before Gravel 001.jpg
    663.4 KB · Views: 417
  • Shed Before Gravel 002.jpg
    Shed Before Gravel 002.jpg
    698.1 KB · Views: 278
  • Shed Before Gravel 003.jpg
    Shed Before Gravel 003.jpg
    516.9 KB · Views: 195
  • Shed Before Gravel 004.jpg
    Shed Before Gravel 004.jpg
    618.3 KB · Views: 229
  • Shed Before Gravel 005.jpg
    Shed Before Gravel 005.jpg
    497.7 KB · Views: 407

Tractor & Equipment Auctions

2018 Kinze 3500 Planter (A52349)
2018 Kinze 3500...
2023 John Deere 8R410 MFWD Tractor (A52748)
2023 John Deere...
3 POINT  7FT RAKE (A52472)
3 POINT 7FT RAKE...
SHOP MADE MANIFOLD TRAILER (A52472)
SHOP MADE MANIFOLD...
2015 FREIGHTLINER CASCADIA DAY CAB (A52577)
2015 FREIGHTLINER...
2010 Ford Edge SE SUV (A51694)
2010 Ford Edge SE...
 
Top