You are using an out of date browser. It may not display this or other websites correctly.
You should upgrade or use an alternative browser.
You should upgrade or use an alternative browser.
Post-Frame Shed Build
- Thread starter MtnManSK
- Start date
- Views: 17850
More options
Who Replied?
/ Post-Frame Shed Build
#31
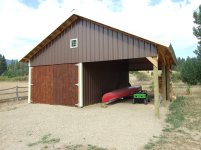
FINISHED!!
We didn't work much in August, opting to play a little more (like canoeing the river through the valley with the in-laws). We did get the spot in the roof fixed where the roof screws had missed the purlins. We simply backed the screws out, added another purlin right beside the existing one, then drove the screws back in. Now they're either biting the new 2X6 or at least sandwiched in between the two so the threads have something other than steel and foam to hang on to.
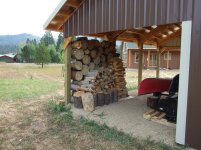
Labor Day weekend marked the start of the archery deer season up there, so my early mornings and late evenings were spent prowling the woods over the holiday weekend. We had to cut and stack a half-cord of firewood that weekend as well, so, needless to say, there wasn't tons of time for working on the doors, which were the last piece of the project. However, we did spend one afternoon on them, and they actually went together really quickly.
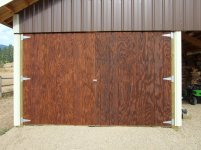
If you remember way back, we had ordered three sheets of T-111 plywood for the doors. We simply measured the opening where they were to go, undersized them by about 1/2", and cut the plywood out so that each door was 1/2 of the opening. Since the T-111 was only 4' wide, but each door was nearly 6' wide, we had one seam on each door. Luckily, the plywood we bought had tongue and groove edges, so it fit together very nicely. For structural integrity, we screwed 2X6s onto the back of the doors, creating a perimeter frame, mid-height crossmember, and diagonals top and bottom. This added a lot of weight to each door, but also took out most of the "wobble". Driving the screws through the front of the doors was a little challenging, as we had to lay them out on the ground face up, slip the 2X6s underneath them, and then drive the screws from the front. This way, the threads were into the 2X6s and the heads were holding the plywood (instead of the opposite).
The assembled doors got propped-up inside the shed for a week, and when we got back the following Friday, Mrs. MtnMan applied a coat of fairly dark-colored stain to the outside surface of each door. It turned out pretty nice, leaving the wood grain visible, but darkening it to a shade pretty close to that of the steel siding. Then, Saturday afternoon (after my morning hunt and Mrs. MtnMan's monthly quilting class), we tackled the job of hanging the doors.
We decided to install the hinges on the doors first. We had bought six heavy-duty hinges so that one could be installed where each 2X6 crossmember was located. In order to get all three hinges on each door mounted with their pins parallel, we temporarily installed a couple of nails and a string along the edge of the door. Then we visually lined-up the hinge pins with the string and screwed them on. This wasn't perfect, but got them pretty close.
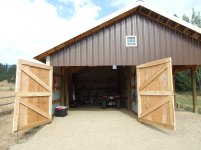
Hanging the doors turned out easier than I expected. We pulled another string across the bottom of the door opening at the height where the bottom of the doors was to sit. Then, we set wood blocks in the gravel so that they were level with the string. The doors were then simply stood up on the wood blocks, bumped and scooted into place against the posts, and the hinges attached to the posts. It was a really crude method of hanging doors, but, believe it or not, they meet almost perfectly in the middle and swing very smoothly without wanting to self-swing either direction (unless a breeze comes up!).
We decided that the left-hand door would be the normally-stationary one, while the right-hand door would be used for frequent access. Thus, we installed a sliding bolt-style latch at the top of the left-hand door on the inside to anchor it to the frame above the door. For anchoring the bottom, we purchased a 4-foot piece of 1/2" galvanized conduit, ground and hammered one end to a point, and drove it into the ground a couple of feet deep in the correct position. Then, using a couple of conduit clamps, we hung a bent piece of 3/8" rebar on the bottom of the door so that it could be inserted into the pipe for anchoring, or slid up and out for opening. The conduit was cut off just about an inch above the gravel level so that it won't impede driving mowers, ATVs or anything else inside.
Lastly, we nailed a block of 2X6" to the middle of the left-hand door sticking out for the right-hand door to strike against when closed. For security, a small, key-operated stainless hasp latches the two doors together.
And there you have it. We broke ground on Memorial Day weekend, and finished one week after Labor Day. Not bad for a couple of amateurs working a few weekends a month.
Mrs. MtnMan wants to build a deck on the cabin next year. I'm not so sure; I may need that long just to re-charge!
Here are pics of the finished-product. Thanks for reading!


deezler
Elite Member
- Joined
- Jan 30, 2012
- Messages
- 3,886
- Location
- Southeast MI
- Tractor
- Cub Cadet 7305, Kioti CK3510seh TLB
Mighty fine shed there! Nicely done, and again, many thanks for all the pictures and explanations.
I suggest you get some perforated angle, and screw it every 6 inches, to the middle of the 2x6's, on both inside vertical edges of those doors.
Plywood is not known for staying straight, and since you used pieces instead of solid wood for the verticals, there will not be anything to stop them from warping.
Plywood is not known for staying straight, and since you used pieces instead of solid wood for the verticals, there will not be anything to stop them from warping.
