Restarting My '70 Nova Project

   / Restarting My '70 Nova Project #81  
A friend of mine had an old Ford Ranger. He painted it with a brush. We called it "an industrial finish" 🤣

Old Blue is what he called it. Great little truck for hauling stuff around when he needed it.
 
   / Restarting My '70 Nova Project #82  
Sailboaters use fast drying deck paints/finishes where it's tough to keep a wet edge. What I learned and tried was to roll enamel(?) on quickly, then brush out with a quality bristle brush.

btw, people also paint shower stalls and cars with this stuff.


Thinking I might use that on the big Ford's boom & bucket (which sits outside) or on the old Corvette in the barn. They're both already white and one coat should cover. :sneaky:
 
   / Restarting My '70 Nova Project #83  
In high school I painted our 70 Nova with a cheap compressor and paint gun. It spit lots of dust. The hood, roof and trunk lid ended up with a no-slip finish. :rolleyes:


🤣
 
   / Restarting My '70 Nova Project #84  
My second job at GM was in the Fact 11 spray booth. I painted left 1/2 hood, left frt fender, and left headlight bucket on '77 model year LeSabre, Park Avenue, and Riviera, 3rd coat (one 'sealer'/primer, two paint) before they went into the bake ovens.

Each car's bits came thru' the booth on a conveyor dolly with a 'color tag' hung on it, and over a grating at floor level with a 'waterfall' a foot below it. Walls were white and from shoulder-high arching up were ~50/50 banks of fluorescent lights & filters for the air drawn thro' the floor grate as part of the paint recovery system. We never really smelled paint but the ovens were on our floor and it really stunk when you stepped out of the booth, or were anywhere near the plant, actually.

We had no clear-coat then and sprayed two coats of whichever color lacquer. (say vs acrylic enamel) Paired hoses on the wall for each color would tee into a push & turn fitting on the gun and you'd clear the last color with a shot towards the floor grate after each change. (changing colors per car was normal) The hoses continuously circulated paint to each gun and were of clear tubing. You could watch the metallic bits of some colors moving in opposite directions.
 
   / Restarting My '70 Nova Project #86  
Here's a pic you classic guys might like. Taken in Ely MN over the weekend.
P1010689.jpg
 
   / Restarting My '70 Nova Project
  • Thread Starter
#88  
Looks like a survivor to me.
Original paint?

I haven't posted any progress here lately because I've been working over the right front fender to get it to fit. Had to make a few cuts through the internal bracing where the door and trailing edge of the fender meet so I could flatten the profile. The fender had way too much curve near the top and protruded about 1/2" out beyond the door. I'm not a sheet metal man, but have been taking my time and getting it massaged into the proper profile has been a slow process. To add to that, welding it back together has been a pain, the metal is around 18 ga. and melts when you look at it with the MIG torch. I'm using .024" wire and have have been playing with the voltage and wire feed speeds, and finally have it doing pretty well. I just have another foot or so of welds to do, and then the finish grinding and it should be ready to hang and check the final fit.
The left fender looks to fit a lot better so far.
 
   / Restarting My '70 Nova Project #89  
Back in the day a 4 door like that would look like an odd duck. Looks much better today. Very nice, lots of potential.
 
   / Restarting My '70 Nova Project
  • Thread Starter
#90  
Been doing a little bit on the Nova every day, but every little bit is progress.
As I have been complaining, the right fender doesn't. fit properly up at the lower windshield clip. The left one fits fine. When all else fails, get out a ruler. Measuring down from the top of the windshield channel, I discovered the right side clip is about 3/8" lower than the left one. Aha! That's just the amount of room I need.
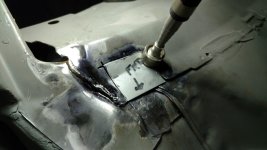
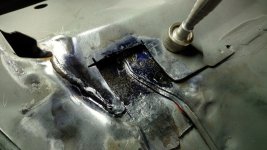
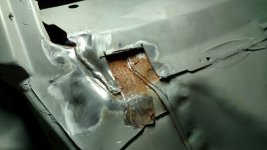
So, I remove the clip, only to discover a hole rusted in the metal under it. Doesn't surprise me, with all the other rust on the car. After all the metal we've replaced, there can't be much rust left. So, I cut out the area, wire brush, scrape and sand off all the rust I can get to, then make a patch to weld in. I give the area a couple of coats of rust treatment and let it dry.
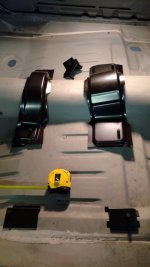
While it's drying, I dug out the bucket seats I bought to replace the bench seat. I also find the OEM style bucket seat mounts and lay them out to see how well they fit. Looks like the ones that go over the driveshaft tunnel will need a little massaging, the outside mounts I should pretty much be able to weld into place.
Yes I know, the inner mounts are switched, the wide one goes in the rear.
 

Attachments

  • IMG_20210916_142259033_HDR (Medium).jpg
    IMG_20210916_142259033_HDR (Medium).jpg
    522.4 KB · Views: 85
  • IMG_20210916_150658967 (Medium).jpg
    IMG_20210916_150658967 (Medium).jpg
    479.5 KB · Views: 79
  • IMG_20210916_150722859_HDR (Medium).jpg
    IMG_20210916_150722859_HDR (Medium).jpg
    669.5 KB · Views: 81
  • IMG_20210916_155712474 (Medium).jpg
    IMG_20210916_155712474 (Medium).jpg
    453.1 KB · Views: 81
 
Top