Backhoe Ripper tooth design - need your advice

   / Ripper tooth design - need your advice #91  
bluehog said:
I understand that there was an exchange of comments that was removed by the moderator. Seem my "so called" friends ( with friends like these... enemies seem more like allies ) decided to have some fun... as they called it :irked:. Thanks for sticking up for me :rolleyes:

Once again "consider the source of that statement" NO I DO NOT LIVE IN MY MOTHER'S BASEMENT :hissyfit: OMG... you have no idea what it like to be with these guys for 8 hours a day! I call it "purgatory" and my sentence is minimum of 8 more years... with good behavior!

Here are the two head :jester: (left to right)
John R. (aka J-Rod) Jimmy G. (aka "Dennis the Menace" )
<img src="http://www.tractorbynet.com/forums/attachment.php?attachmentid=341122"/>

Now that's funny!

:thumbsup:
 
   / Ripper tooth design - need your advice
  • Thread Starter
#92  
Back to biz... During the completion of the sandblast I bumped the cutting edge against the cart and noticed how soft the cutting edge was. This will certainly mushroom the edge as it enters the ground and I hit a few rocks. The ripper from MIE has a quench hardened edge... something I am not able to provide. I consulted my friends as to what my options were. It was determined that "hardfacing" would be an excellent choice.

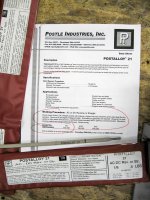
My friend Ron S. (welder) said he had done some "hardfacing" many years ago and sent me looking for materials. Not being a welder I found myself asking questions about something I knew nothing about. I contacted several local welding supply companies and found that the stuff is not only expensive ( up to $38 lb.) but came in 10 lb. packs! We only needed about a 1.5 lbs. I contacted Ramsey Welding Supply, Glendale, AZ., Mark the sales guy contacted the Northern AZ sales rep for Postle Industries and determined that Postalloy 214 would be my best bet, and it came in 1 lb. packs @ $15. Only problem was it was not in stock and would arrive as I was leaving for the first use of the ripper.

I decided to go and order the products from Ramsey so we could rebuild the edges when I returned. Derek assisted me at Ramsey asked a few more questions about my application. I told him I was a bit bummed that we couldn't get the "hardfacing" done prior to first use. He said he had just received a package from Postle Ind. a few minutes ago and opened it up. After reviewing contents he found Postalloy 21 which is similar to 214 but without the carbide mixture, it still would be 58-60Hrc. He donated 2 lbs. to my cause and only asked for feedback.

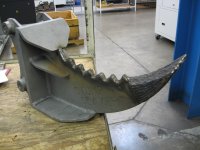
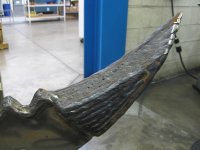
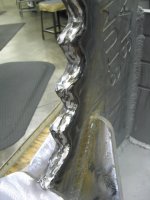
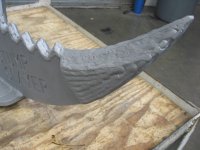
Below are the pics after application of the "hardface". First ones are after initial application. then after I kissed the high spots with a grinding disc (this stuff is hard), then after final sandblast. Not a pretty as the machining... but it should last a lot longer!

Ripper_9D-8.jpg Ripper_9D-9.jpg Ripper_9D-10.jpg Ripper_9D-11.jpg Ripper_9D-12.jpg Ripper_9D-15.jpgRipper_9D-16.jpg Ripper_9D-13.jpg Ripper_9D-14.jpg
 
   / Ripper tooth design - need your advice #93  
Back to biz... During the completion of the sandblast I bumped the cutting edge against the cart and noticed how soft the cutting edge was. This will certainly mushroom the edge as it enters the ground and I hit a few rocks. The ripper from MIE has a quench hardened edge... something I am not able to provide. I consulted my friends as to what my options were. It was determined that "hardfacing" would be an excellent choice.

My friend Ron S. (welder) said he had done some "hardfacing" many years ago and sent me looking for materials. Not being a welder I found myself asking questions about something I knew nothing about. I contacted several local welding supply companies and found that the stuff is not only expensive ( up to $38 lb.) but came in 10 lb. packs! We only needed about a 1.5 lbs. I contacted Ramsey Welding Supply, Glendale, AZ., Mark the sales guy contacted the Northern AZ sales rep for Postle Industries and determined that Postalloy 214 would be my best bet, and it came in 1 lb. packs @ $15. Only problem was it was not in stock and would arrive as I was leaving for the first use of the ripper.

I decided to go and order the products from Ramsey so we could rebuild the edges when I returned. Derek assisted me at Ramsey asked a few more questions about my application. I told him I was a bit bummed that we couldn't get the "hardfacing" done prior to first use. He said he had just received a package from Postle Ind. a few minutes ago and opened it up. After reviewing contents he found Postalloy 21 which is similar to 214 but without the carbide mixture, it still would be 58-60Hrc. He donated 2 lbs. to my cause and only asked for feedback.

Below are the pics after application of the "hardface". First ones are after initial application. then after I kissed the high spots with a grinding disc (this stuff is hard), then after final sandblast. Not a pretty as the machining... but it should last a lot longer!

<img src="http://www.tractorbynet.com/forums/attachment.php?attachmentid=341134"/> <img src="http://www.tractorbynet.com/forums/attachment.php?attachmentid=341135"/> <img src="http://www.tractorbynet.com/forums/attachment.php?attachmentid=341132"/> <img src="http://www.tractorbynet.com/forums/attachment.php?attachmentid=341133"/> <img src="http://www.tractorbynet.com/forums/attachment.php?attachmentid=341129"/> <img src="http://www.tractorbynet.com/forums/attachment.php?attachmentid=341127"/><img src="http://www.tractorbynet.com/forums/attachment.php?attachmentid=341128"/> <img src="http://www.tractorbynet.com/forums/attachment.php?attachmentid=341130"/> <img src="http://www.tractorbynet.com/forums/attachment.php?attachmentid=341131"/>

Looks fine. No reason to grind it though. This ain't no beauty contest. The high spots are protecting the rest.
 
   / Ripper tooth design - need your advice #94  
Wow that is one UGLY, (cool) looking ripper.:eek: Looks like a dinosaur tooth or something prehistoric. Just like the guys from your shop!:laughing:
Now for the flame paint job and you should be ready to do the vid or this thing in action. How many hours logged so far from beginning to date?:confused2:
 
   / Ripper tooth design - need your advice
  • Thread Starter
#95  
Looks fine. No reason to grind it though. This ain't no beauty contest. The high spots are protecting the rest.

I did not get much off... I made sparks but saw very little change, besides there are several coats on the teeth. The beauty will be seeing all those stumps on my trailer rather than in the ground.
 
Last edited:
   / Ripper tooth design - need your advice
  • Thread Starter
#96  
Wow that is one UGLY, (cool) looking ripper.:eek: Looks like a dinosaur tooth or something prehistoric. Just like the guys from your shop!:laughing:
Now for the flame paint job and you should be ready to do the vid or this thing in action. How many hours logged so far from beginning to date?:confused2:

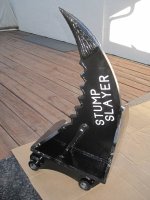
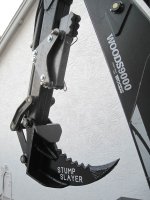
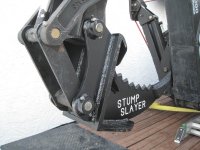
I was impressed with how it turned out... good call guys on dropping the removable tooth! No fancy paint job... basic black with white letters. Got it installed and all looks good.

Haven't heard from the shop clowns yet... but I'm sure I'll get my share of returns on Monday .

As for the hours... I have at least 25 hours after work and loss of several lunch and breaks over the last 2 weeks... so gotta be in the mid 30's for hours. As fore the welder I'd guess that he's got 6+ hours into this. As for design... who knows... sleepless nights have to be at least 10... at least :confused2:
 
   / Ripper tooth design - need your advice #97  
I was impressed with how it turned out... good call guys on dropping the removable tooth! No fancy paint job... basic black with white letters. Got it installed and all looks good.

Haven't heard from the shop clowns yet... but I'm sure I'll get my share of returns on Monday .

As for the hours... I have at least 25 hours after work and loss of several lunch and breaks over the last 2 weeks... so gotta be in the mid 30's for hours. As fore the welder I'd guess that he's got 6+ hours into this. As for design... who knows... sleepless nights have to be at least 10... at least :confused2:

I have to applaud your dedication to detail, and perseverance, :applause:
Your efforts will be rewarded. I used my ripper today and felt like I was getting the hang of it again. I made some real progress by just focusing on doing ripping and moving stumps to the burn pile. Wear safety glasses while using; sometimes when roots break free pieces go flying. I got whacked in the side of my head by a really long root the other day, and have been hit by dirtballs, mud, you name it, from all directions at various times. :confused3::eek:
 
   / Ripper tooth design - need your advice
  • Thread Starter
#98  
I have to applaud your dedication to detail, and perseverance, :applause:
Your efforts will be rewarded. I used my ripper today and felt like I was getting the hang of it again. I made some real progress by just focusing on doing ripping and moving stumps to the burn pile. Wear safety glasses while using; sometimes when roots break free pieces go flying. I got whacked in the side of my head by a really long root the other day, and have been hit by dirtballs, mud, you name it, from all directions at various times. :confused3::eek:

More good advice... my wife and I both have our forestry helmets with face shields & ear protection. I am fortunate that I am nearsighted and always wear some form of eyeglasses and carry safety glasses in my truck, but I still have to put them on! The wife however doesn't wear eyewear so she has to get reminded on a regular basis. Safety has been our key issue as we are 60 miles from the closest hospital... and the wifey cannot stand the sight of blood :knockout: (that's not good for me!) :eek:uch:

Experience = applying what you learned from screwing up ;)
 
   / Ripper tooth design - need your advice #99  
Great build! Thanks for sharing. I'm looking forward to seeing it in action.
 
   / Ripper tooth design - need your advice
  • Thread Starter
#100  
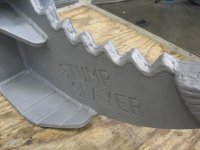
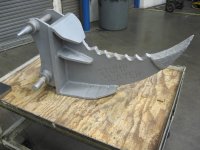
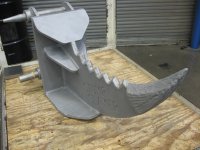
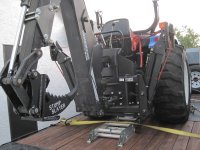
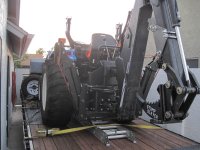
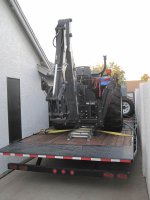
Well got it loaded on the backhoe. Here are a few pics with it's shinny coat of paint. I however forgot to take pics when I had it out in the front and only remembered after I backed the trailer behind the gate. It's a tight fit for me as I am not a talented trailer operator... so full tractor shots will have to wait until next week. The neighbors got a real kick out the "Stump Slayer" and all had stories about how they could have used it in past projects. The welds also got a lot of attention... good job Ron S.!

ripperE.jpg ripperE-2.jpg ripperE-4.jpg ripperE-3.jpg ripperE-5.jpg ripperE-6.jpg ripperE-7.jpg


Tractor & Equipment Auctions

2016 FREIGHTLINER CASCADIA TANDEM AXLE 6X4 MID ROOF SLEEPER TRUCK (A51219)
2016 FREIGHTLINER...
Gas Air Compressor (A50860)
Gas Air Compressor...
2017 Caterpillar 259D Two Speed Compact Track Loader Skid Steer (A50322)
2017 Caterpillar...
2011 TRAIL KING LOWBOY TRAILER (A50459)
2011 TRAIL KING...
Adams Conveyor (A51039)
Adams Conveyor...
2018 Bobcat T590 Compact Track Loader Skid Steer (A50322)
2018 Bobcat T590...
 
Top