Rons Grader

   / Rons Grader #1  

RonMar

Elite Member
Joined
May 25, 2005
Messages
3,002
Location
Port Angeles WA
Tractor
Jinma 284 delivered 06/28/05
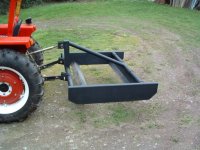
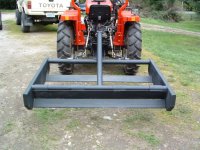
I got ambitious this week and put together the steel I had been collecting for a 60" grader box. I modeled it after a "Bad-Boy" grader.

The sides are 2" X 10" X 3/16" box tube with 3" heavy wall pipe for the forward cross where the 3PH attaches to. Blades are 4" X 4" X 1/4" angle with a 1/4" flat plate welded across the bottom forming a triangular tube. I followed Letsroll's lead and the forward cutting edge protrudes 3/4" below the sidewalls and is weld hardened with many repeated MIG passes(about 50' worth:) that are ground down into a cutting edge. The botom of the rear blade is flush with the sides.

It has a swing down rear gate that rests against the rear blade and allows me to fill the box and drag material cut by the front blade.

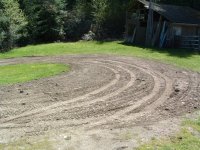
Used it for the first time today for about 3 hours and started carving a new turnaround and smoothing the drive for gravel. I didn't realize there were so many large rocks in my drive. This thing sure ripped them out, some as big as bowling balls. Only drawback so far is with the lower profile sidewall material I used(box tube was free), the rear blade with the cross tube over it can clog with clumps of sod. Loose soil and rocks up to softball size pass over it just fine.

Only thing I have left to do is put the slider on the angle tube that will hold the rear gate in the open position. I figure if I attach a line to this slider, I can drop the gate from the drivers seat with a pull on the line.
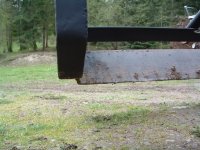
 

Attachments

  • 869417-graderside.jpg
    869417-graderside.jpg
    77.4 KB · Views: 8,967
   / Rons Grader
  • Thread Starter
#2  
Rear view.
 

Attachments

  • 869420-graderback.jpg
    869420-graderback.jpg
    83.1 KB · Views: 5,815
   / Rons Grader
  • Thread Starter
#3  
Cutting edge.
 

Attachments

  • 869422-blade.jpg
    869422-blade.jpg
    78.6 KB · Views: 4,893
   / Rons Grader #4  
I've never used anything quite like that; only a box blade, but that sure looks good.
 
   / Rons Grader #5  
RonMar,
That is a clean and simple design. Great looking fabrication. How much does it weigh? And...would heavier help with the quality of the grade do you think?
 
   / Rons Grader #6  
Ron
That front 4in. angle iron is going to take a beaten. Just wondering why you didn't use a hardened cutting edge on the front? The only other thing I would have changed was the front cutting edge location. I put mine in the centered cause the more aggressive cutting it does, the more material will collect in front of the front cutting edge. It does that when I have the top link adjusted so that the front cutting edge will cut real hard. Shorting the top link will change the angle of the front cutting edge. Just 1in. adjustment to the top link will pull my back cutting edge off the ground. My cutting edges are set at 65 degree's (used a pinion angle finding gauge). 1in. adjustment will raise that angle to about 80 degrees. That angle cutts real aggresive and that is why I put mine in the center of the grader. Another thing came to mind. When you shorten the top link so that the front cutting edge cut aggresive, you will need allot of weight on the unit to keep it from balancing around on the ground. Mine does this and I'm going to add some weight that I can move from front to rear. The weight will be a I beam that will have some brackets welded to it so that I can move it from the center to the back. The back is the litest point on mine. Anyways, your unit does look good. Got any pictures of the after grading results?
 
   / Rons Grader
  • Thread Starter
#7  
I calculated the weight at around 400 pounds. After my first runs yesterday, it works pretty well and is just great for working gravel and soil that is already broken up. I was thinking a little more weight might be better for cutting into soil with grass growing in it. It would probably reduce the "hop" when it rolls out the larger rocks.

The sides and blades are hollow and have a total volume of about 1 CU/FT so I can always add some weight internally.
If I fill the voids with sand I could add another hundred pounds fairly easilly.
 
   / Rons Grader
  • Thread Starter
#8  
</font><font color="blue" class="small">( Ron
That front 4in. angle iron is going to take a beaten. Just wondering why you didn't use a hardened cutting edge on the front?)</font>

Because I am a cheap SOB:) It is a hardened edge, it is just a home made one. Weld rod/wire is much harder than the mild steel it is fused to. Ever try running a hacksaw or sawzall through a weld? Better bring a bunch of blades... I have had good luck with weld hardened edges in the past and I can rebuild/buildup a worn edge in about an hour with my welder and grinder if necessary. The angle has a flat bottom plate forming a very rigid tube. The impact/cutting force is applied on the edge of this 6 3/4" wide plate so it is very resistant to bending/impact loads. I ground the edge down to about 1/16" and it dosn't show any real sign of deformity after it's maiden voyage. The edge was sharp enough and hard enough to dig into large buried rocks and rip them out of the ground. When I looked last night when I put it away, it was still straight. Time will tell.

On the cutting blade, the rear edge is flush with the sides and the leading edge is 3/4" below so I would guess about a 50 degree cutting angle. The blade distance back from the front was based on eyball estimates of the "Bad Boy" scraper. It seems to work fine as the blade height that soil/rock has to pass over is only about 3". The only time I noticed much material built up in front of the blade is when clumps of sod started to hang up on the top of the blade. Even then, it still didn't build up enough material to spill off the sides I will probably run a grinder along the top edge to soften it a bit and allow material to pass over easier. My main plan was to use this to shape up the road bed for gravel then to dress the gravel later. It passes loose material very well.

I do have a bit more new ground to cut so I am thinking more weight would be good for that. I will post some pics of what I did to the drive last night.
 
   / Rons Grader #9  
That's beautiful fab work and a very practical and even attractive design. Thanks for posting the photos.

Cliff
 
   / Rons Grader
  • Thread Starter
#10  
I was excited about getting it out and trying it so i didn't get any before pics. You can see what this area that we are making into a turnaround sorta looked like before as it is in the background of the first pic I posted at the start of this thread.
 

Attachments

  • 869928-turnaround.jpg
    869928-turnaround.jpg
    90.6 KB · Views: 4,095

Tractor & Equipment Auctions

John Deere 755 4x4 Tractor with Loader (A44391)
John Deere 755 4x4...
2000 FREIGHTLINER FLD DAY CAB (INOPERABLE) (A45046)
2000 FREIGHTLINER...
2020 Chevrolet Surban SUV (A44572)
2020 Chevrolet...
16in Takeuchi Excavator Bucket (A44391)
16in Takeuchi...
2011 Ford F-250 Pickup Truck w/ Liftgate (A44572)
2011 Ford F-250...
2001 Dodge Ram 2500 Pickup Truck Extended Cab (A46877)
2001 Dodge Ram...
 
Top