ROPS: Epoxy light bar with front/rear lights

   / ROPS: Epoxy light bar with front/rear lights
  • Thread Starter
#21  
George, I'll have to keep working on the image resolution thing.

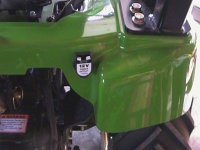
Until then, you will just have to trust me that the edges are all ground down smooth enough to drag your fingers across them, the radius of the curves match on both sides, the paint is as close to perfect as my hawthorn trees will permit me to maintain and that with the exception of the zip ties that run up the side of the ROPS, the thing looks better than the installs that I have seen come from the local dealer where they use u-bolts to clamp brackets on and they don't use matching swtiches.

I know HOW to do what I really want to do, I just have not had the time to source out a countoured wire chase that can be epoxied to the inside of the ROPS. I have seen them in offices where wires are run on the floor inside heavy rubber wire chases that are tapered to prevent people from tripping. They look like minature
rubber speed bumps on the floor. Using one would totally eliminate the zip ties on the ROPS (at least up to the top curve), would eliminate snag points completely and if painted to match the ROPS would not even be noticable from more than a few feet away.

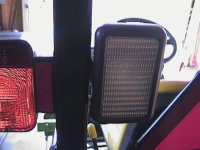
If you can't tell, I am really biased against using zip ties. I don't believe they are UV stabilized so I expect them to degrade and become brittle with exposure to the sun. I also think they look like an amature (THAT WOULD BE ME) did the install. They are great to use UNDER the dashboard, or UNDER the hood, but not where they are both visible and exposed to the sun/weather. Plus, they create snag points and points to trap moisture & dirt (which could lead to rust).

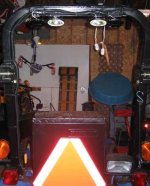
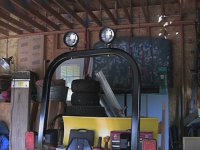
This photo shows the whole ROPS bar from the rear, you can get a view of the wiring along the back of the bracket as well. The lights are adjustable up to down and left to right, within the constraints of the light brackets. You will also see the zip ties that run up the side of the ROPS, but you can't see the zip ties used on the bracket to hold the wiring in place up there. I drilled several pairs of holes by the lights and in the center of the bracket so I could hold the wiring firmly in place to the bracket.

When mowing we brush against the hawthorn trees, and if you are not familiar with them, they have some very nasty 1" to 2" thorns sticking out of their branches that are tough enough to go through garden tractor tires or a pair of tennis shoes. Consequently having the wires protected and recessed out of the way was a MAJOR priority because if there are ANY snag points to catch, those thorns will find them and rip out whatever they catch onto.
 

Attachments

  • 355448-2rear.jpg
    355448-2rear.jpg
    51.3 KB · Views: 387
   / ROPS: Epoxy light bar with front/rear lights #22  
Hey guys, cool lights. I just finished a major wiring job on my 2210. I'll have to take some pictures and post them for you. I added 3 switches to the dash panel. The switches are OEM JD pieces. One is just left of the right had display near the top of the panel and works the front spots directly on top of the RPS. The second is directly below that one and runs the pair of JD work lights facing reward, and mounted on the inside of the RPS next to the factory tail lights. Both of these have the little head light symbols on them. I believe they are off the 445 series JD. The third switch has an I/0 symbol and come from the storage bin on the new X-series tractor. It is directly below the right hand display at the bottom of the panel and powers the sealed, 12-volt outlet on the right rear fender. I will use this to power the 12 volt, 50 gallon, 3pt sprayer.

As I feared, I cannot run all three sets of lights at one time. The little 20 amp alternator can't keep up. I've studied the X595 and 4110 tractor's wiring schematics, and since they use essentially the same engines, I believe one of these tractor's upgraded alternator kits will bolt/wire directly to the 2210. X has a 40 amp brushed with internal regulation available, the 4110 offers a 35 amp permanent magnet version, similar to the 20 amp and uses an external regulator. I am trying to get the installation instructions for one of these kits to confirm my suspicions. I'll let you know if I'm successful.

Oh yeah. I wired a 30 amp fused line directly to the battery and ran a heavy ground wire to the ground point on the left side of the frame rail. This power lead goes to a relay that is turned on with the key and is mounted next to the regulator under the kick panel on the left side. This relay supplies power to a six circuit additional fuse panel mounted next to the OEM one. (Six was the smallest, sort of sealed one I could find, I only use 3 right now) Not bad for a mechanical engineer.

I'll try some pictures this week end.

Later,

John /forums/images/graemlins/grin.gif
 
   / ROPS: Epoxy light bar with front/rear lights
  • Thread Starter
#23  
Hey John, sounds like a nice job with your wiring and switch set up. I like when all the switches match the OEM units, the switches I used on my NH also match the factory units. How did you mount the lights on the ROPS? Drill? Epoxy? Clamps? Magnets?

By the way, we make it out your way a few times a year to spend time at Pokagen -so I guess I pass you on the way there and the way back.
 
   / ROPS: Epoxy light bar with front/rear lights #24  
I'm interested in seeing your setup. Picture posts are always welcome /forums/images/graemlins/grin.gif
 
   / ROPS: Epoxy light bar with front/rear lights #25  
Bob/R^2,

I have to remember to hit the <Post Message> botton after I spell check my messages. I sent thought I sent two late Friday afternoon, but they didn't make it.

Anyhow, I used some factory holes in the top of the ROPS that passed straight though it and were spaced about 12" apart. I did drill two holes in the back face of the ROPS to pace the wires through. I'm not worried about the ROPS strength being affected as these holes are in the center of the cross section which is the neutral axis for the stress. I get so sick of the lawyers mucken everything up. /forums/images/graemlins/mad.gif A few well thought out hole placements on that ROPS will have no affect on its function. /forums/images/graemlins/crazy.gif I got sick of all the waring stickers that the lawyers put on the think, that I got the heat gun out and took them all off! /forums/images/graemlins/grin.gif

I'll try to include some of the pictures of my switch set up, the lights and the auxillary 12volt outlet.

John
 

Attachments

  • 427904-Switches-1a.JPG
    427904-Switches-1a.JPG
    37.5 KB · Views: 323
   / ROPS: Epoxy light bar with front/rear lights #26  
See last posting for picture of switches.

This one has the ROPS forward facing work lights. There not as bright as I thought they might be, but the also through some light down on either side so I can see the edges of the mmm deck when I mow.

John
 

Attachments

  • 427907-ROP Lite-1.JPG
    427907-ROP Lite-1.JPG
    77 KB · Views: 310
   / ROPS: Epoxy light bar with front/rear lights #27  
This posting has the rear work lights. Direct from JD for the 2210 model, and boy they are bright! Much brighter than the round ones on the ROPS. I may have to think about changing those out for another set of these rectangular lights. The OEM wiring for the 2210 has only one connector located just about the top link mounting. This connector is switched with the main light switch and only comes on in the last setting of the switch. I wanted more independent control of the lights, so I added all of those switches, on separate circuits and fuses.

If anyone can tell me how to add more than one picutre posting, that would be great.

John /forums/images/graemlins/confused.gif
 

Attachments

  • 427909-Rear Work Lite-5.JPG
    427909-Rear Work Lite-5.JPG
    62.3 KB · Views: 299
   / ROPS: Epoxy light bar with front/rear lights #28  
OK, last posting with a picture.

This is the switched Auxiliary 12-volt connection for the 50 gallon sprayer. Its the horizontal switch at the bottom of the dash in the first picture posting. It has the I/0 marching on it.

I got this auxiliary power supply outlet from AutoZone. It is sealed and potted on the backside so it is very weather tight. The front cover has two strong springs that hold it tightly closed against a seal material. It also has a large ring and locking collar on the backside that makes for a very tight installation. I had locked all over for some more sealed and even bought a couple of other outlets that I never used. Once I say this one, I was sold! All the connects I made throughout this wiring job use GM's Metri-pack 150 or 280 sealed connectors. Some JD dealers have some of the connectors and terminals, but they are somewhat expensive. Of course you local GM dealer would have some also. I had a hard time finding what I needed. If anyone has a good source for sealed electrical connectors, I love to know about it. The auto zones and such just don't have quality connectors.

John
 

Attachments

  • 427911-Aux 12Volt -1.JPG
    427911-Aux 12Volt -1.JPG
    68.4 KB · Views: 295
   / ROPS: Epoxy light bar with front/rear lights
  • Thread Starter
#29  
John, nice looking install. I am pretty **** about installs and try to make my stuff look like it would be something the factory would be proud of, and your install easily qualifies in that way.

One thing I would love to find is a way to place a completely weatherproof label under each swith. My switches are set up so they are logical, with the switch toward the front of the tractor powering the front lights and the switch to the rear powering the rear lights, my middle switch powers the 12-volt outlet. Mine are also lighted so it is pretty obvious if I have something turned on accidently.


420607-switches.jpg
 
   / ROPS: Epoxy light bar with front/rear lights #30  
Nice Job! Pictures look great and so does the installation. As for your question about posting the pictures, you are doing it correctly with 1 at a time and replying to your own post. Another way others have done to show mulitple is providing a link to another website with the pictures on it.
 
   / ROPS: Epoxy light bar with front/rear lights #31  
That's exactly what I'm doing but with rectangular KC lights. Very nice install you did.
 
   / ROPS: Epoxy light bar with front/rear lights #32  
Hey Bob and r^2,

Thanks for the nice words. Bob, how did you put the picture directly on the posting so that you don't have to select the "attachments"? That makes it muck easier for the reader.

r^2, I hope to someday set up a website for other 2210 owners and will have to use the link. (in my spare time I guess.)

Bob, I did some research on the supplier for JD's switches to see what they offered. Many switches use the ISO Icon standard to indicate their useage. I found Eaton Vehicle Controls at Eaton switches and I believe the supply at least the JD Ten series tractor switches. I didn't follow through trying to locate a distributor as I searched the JD Parts pages and found some to my liking. You could give them a try. They have many Icons to choose from and offer sealed versions and standard industry connector type.

Nice talking with the two of you.

John /forums/images/graemlins/wink.gif
 
   / ROPS: Epoxy light bar with front/rear lights #33  
Thanks Nick,

If you decide to add switches to the dash as I did, be careful. I thought I would take the dash off the tractor to work on it at my work bench. I spent hours trying to pull the steering wheel off per the servcie manual. I was elated that it finally came off with a gear puller and a bunch of clamps, only to find that the molded metal taper stayed on the shaft and did come off with the steering wheel. I think the new wheel was about ~$20 and apparently the dealers can't get them off in one piece either. So keep this in mind if you decide to remove your wheel.

I did use the old steering wheel as practice for drill a hole at the rim/spoke intersection for a spinner. The wheel is all plastic our there and is easily counter sunk with wood working bits. So I installed a spinner without that nasty clamp for the rim. It goes right through the wheel and looks like the factory installed it. Here's a picture.

John
 

Attachments

  • 428512-Steering Wheel-1.JPG
    428512-Steering Wheel-1.JPG
    85.3 KB · Views: 350
   / ROPS: Epoxy light bar with front/rear lights #34  
Nick,

A bottom view of the spinner on the wheel. I used a butterfly bit to create a flat spot on the bottom of the wheel and before you drill completely through the wheel, I made another flat spot on the top side, but only large enough for a spacer to raise the spinner high enough to clear the rim.

The hardest part of the install is getting the rubber cover of and then back on. After much trial and error, I found nearly boiling water soften the rubber enought to remove it from the new spinner. I cut/grind off the mounting hardware and use my own carriage bolt. I also recommend popping off one of the bearings and placing the proper length spacer between the bearings so that they are not overloaded when you torque up the assembly. Heating the rubber again allows it to be reinstalled and low seating on a heat gun helps srink the material back up tight.

John /forums/images/graemlins/grin.gif
 

Attachments

  • 428517-Steering Wheel-3.JPG
    428517-Steering Wheel-3.JPG
    88.5 KB · Views: 341
   / ROPS: Epoxy light bar with front/rear lights #35  
I am just going to tie the lights into the factory switch. Much easier and it will work well since that's how it would come from the factory. Nice job on the spinner and I can say I have never seen it installed like that before but looks pro!
 
   / ROPS: Epoxy light bar with front/rear lights
  • Thread Starter
#36  
John
To put a picture into the body of the post you can attach the image the way you normally would do it. Then post the post. Open a second browser window and then go to your post in window #2. Then open the attachement in window #2. Highlight the URL of the picture and "copy" it. Then go back to window #1 and your post and select EDIT. Then go to the place in your post where you want the image and select "Image" from the TBN Instant Markup menu and "paste" in the URL for the picture. Close window #2.

It can also be done in a similar fashion if you have the picture posted under a different thread. You simply go back to that original thread and pull up the image, copy it, and place it in the new post of the new thread.

There are probably a few other ways to do it too.
 
   / ROPS: Epoxy light bar with front/rear lights #37  
</font><font color="blue" class="small">( George, the photo files started out a 5+MB files, I opened them in Photoshop and dropped the resolution down to 72 pixels/inch and then had to shrink the size down, the combination of the two was how I got the file sizes down to the 100,000 kb limit. If you want, I can send the files to you via email.)</font>
Bob, why not go to www.webshots.com and open a free account. You can make specific albums for your pictures and then just post the URL of the pics you want people to see by copying and pasting the address into your post. Then your pics can all be MUCH larger. I've found it to be far superior. This is what I get when I post a single pic:
Backhoe
And this one can direct one to the albums:
Albums
Try it, you'll like it! /forums/images/graemlins/grin.gif
Thanks to member Dewave for suggesting it to me. John
 

Marketplace Items

Land Pride FDR1660 (A53317)
Land Pride FDR1660...
(15) WOOD PALLETS (A60432)
(15) WOOD PALLETS...
BOX BLADE (A58214)
BOX BLADE (A58214)
2020 ISUZU NQR BOX TRUCK (A58214)
2020 ISUZU NQR BOX...
DIRT DOG AGR72 GRAPPLE (A60430)
DIRT DOG AGR72...
CASE DX18E TRACTOR (A60430)
CASE DX18E TRACTOR...
 
Top