Snowblower plans?

   / Snowblower plans?
  • Thread Starter
#21  
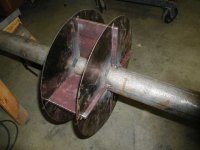
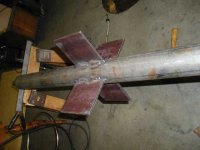
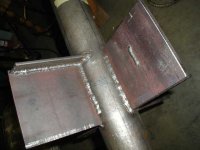
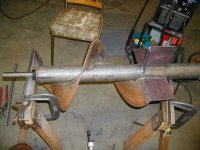
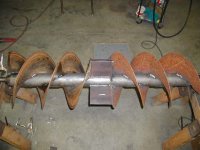
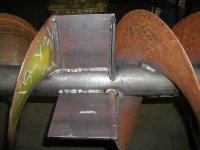
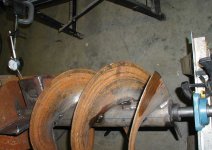
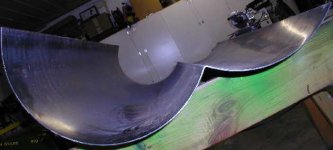
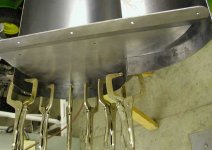
And the next step, the paddles are fixtured and tacked onto the tube. Four paddles, each is fed from one peice of flighting. The two flights from the right hand end feed paddles one and three, the flights from the left hand end feed paddles 2 and 4. Should run smoother than the two paddle versions.
 

Attachments

  • 530734-PB130093.JPG
    530734-PB130093.JPG
    26.4 KB · Views: 2,603
   / Snowblower plans?
  • Thread Starter
#22  
Here's the fixturing removed, paddles welded on lightly. Lots of parts get added yet, so no sense getting too carried away. Balance is perfected again after this step. The paddles were sawn out and then milled on every side for a size match. Then the one edge had a 12 degree bevel milled on, since the paddles actually are attached with a slightly "backwards" lean (compared to the rotation), to promote snow shedding.
 

Attachments

  • 530735-PB130095.JPG
    530735-PB130095.JPG
    25.6 KB · Views: 2,345
   / Snowblower plans?
  • Thread Starter
#23  
Here's a pic of the "cups" which are added to each paddle, opposite of the paddle ends that will have flighting connecting.
 

Attachments

  • 530736-PB140096.JPG
    530736-PB140096.JPG
    27.4 KB · Views: 2,341
   / Snowblower plans?
  • Thread Starter
#24  
And finally today, here's a pic of the first flighting pc partially installed. After this one is welded in place, another one is added by screwing it into this frts one, so there are two from that side. And later two from the opposite side. The outer end (near the bearing) still needs final trimming, and that will be done while checking balance again, after both flights from this side are final welded.
 

Attachments

  • 530739-PB140100.JPG
    530739-PB140100.JPG
    34.6 KB · Views: 2,451
   / Snowblower plans?
  • Thread Starter
#26  
Miller 110V mig, set as high as she'll go at almost all times. I then slow the wire feed rate down to get the most heat at a given location as possible. The paddles are 5/16" thick, the flighting is 1/4 tapering to about 0.120" at the outer rim. The tube is 1/4" wall. Most stuff is being welded from both sides.
 
   / Snowblower plans?
  • Thread Starter
#27  
Here is last night's progess photo. Impeller is complete, all four flights to their individual paddles. Static balance is perfect, it rolls around randomly once excited.
 

Attachments

  • 531317-PB160003.JPG
    531317-PB160003.JPG
    35.8 KB · Views: 2,636
   / Snowblower plans?
  • Thread Starter
#28  
...and here's a detail photo.
 

Attachments

  • 531319-PB160001.JPG
    531319-PB160001.JPG
    30.2 KB · Views: 2,356
   / Snowblower plans? #29  
How did you make the flighting?
 
   / Snowblower plans? #30  
Jim that's as slick as cat poop on a linoleum floor.
 
   / Snowblower plans?
  • Thread Starter
#31  
The flighting is a stock part I bought from a supply place in Kansas.
 
   / Snowblower plans? #32  
</font><font color="blue" class="small">( The flighting is a stock part I bought from a supply place in Kansas )</font>

If ya get a chance it would be nice if you post some contact info and/or part numbers for the flighting for those of us considering attempting the same thing. Do these guys have a website ?
 
   / Snowblower plans?
  • Thread Starter
#33  
Found the info:

Alfred Egbers
Hooper, NE 68031
Tel: 800 462-2588

(Sorry, I earlier said Kansas, it was Nebraska, obviously).

I found this in a few minutes using the excellent free search engine on the Farm Show News website, where I originally read about it. When I called, I talked to Mrs. Egbers, and she was very helpful, although it took me a while to convince her I wanted full auger flighting, not the webbed-out stuff that she was used to seeing on the typical two stage snowblowers. I guess she'd never seen a 15 diameter single stage blower before.
http://farmshow.com
 
   / Snowblower plans? #34  
On my 60" blower I used an electric wheelchair traction motor to drive my shute.
Simply fitted a 3" sprocket to the drive shaft and wrapped matching chain around the base of the snow shute. I anchored the chain by fitting a pin through the chain ends that was placed between 'U' shaped piece of flat stock that I welded to the shute base.
A simple DPDT spring loaded (center off) toggle switch controls the action.
Cost me $50 for the motor and is far simpler than all the hydraulics setup.
I will be on my 3rd deason without any problems.
 
   / Snowblower plans?
  • Thread Starter
#35  
Here's a pic from last night. After finishing welding on and cutting the ends square for the last two pcs of flighting, I was having trouble getting the assembly to static balance again. It occured to me that there was probably some welding distortion going on. So I set up what you see in the photo to evaluate it. Initial measurements showed one paddle was 0.149" further from centerline than the one opposite it. The other two were pretty close at 0.079 and 0.085. So I welded on the high side, rewelding existing beads to keep it from looking too messy. Three sessions of welding and letting it cool and contract did the job. It was fun to have the dial indicator on there and after welding watch the needle creep along at about 0.001" per three seconds. Final results: no more than 0.005" difference between paddle sets.
Then, I static balanced it by adding more welding in the proper areas to make the thing just laze along on the knife edges, with no particular heavy side. Impeller is finished!
 

Attachments

  • 532549-PB180010.JPG
    532549-PB180010.JPG
    62.9 KB · Views: 2,699
   / Snowblower plans?
  • Thread Starter
#36  
Piloon, where can I find one of these wheelchair motors like surplus?
 
   / Snowblower plans?
  • Thread Starter
#38  
Made some more progress this weekend. Had tried to use the cement truck chute welded together but had too much trouble getting it done since they had tapered the roll on the two pcs, it was about impossible to measure from any straight lines to know where to cut. So, I went out and bought new 12 gauge (0.100" thick) and had it rolled. After rolling, I had it bent in one place, the result is in the attached photo. This turned out really great, one pc of metal forms the entire housing, minus the end caps.
 

Attachments

  • 546068-PC120039.JPG
    546068-PC120039.JPG
    16 KB · Views: 2,267
   / Snowblower plans?
  • Thread Starter
#39  
Here's a pic of the bearing plate, drive end. It has two bends in it so, along with the end cap plate, it forms a cavity for the chain to run inside. This pc is 24 inches tall, 11 gauge (0.120" thick). This and the two end caps were cut on the NC plasma cutter I built two years ago. These are the largest parts the plasma table has cut out so far. They came out just perfect, and fit like a dream. /forums/images/graemlins/grin.gif
 

Attachments

  • 546071-PC120040.JPG
    546071-PC120040.JPG
    11.4 KB · Views: 1,971
   / Snowblower plans?
  • Thread Starter
#40  
Here is a pic of the housing and the bearing plate as they are starting to be assembled. This bearing plate gets welded in place, and the end cap plate is removable on each end, for assembly of rotor, and for chain service.
 

Attachments

  • 546073-PC120050.JPG
    546073-PC120050.JPG
    41.4 KB · Views: 2,080

Tractor & Equipment Auctions

Chevrolet 2500 Flat bed (A56438)
Chevrolet 2500...
Woods 18ft Batwing Rotary Cutter (A56438)
Woods 18ft Batwing...
Unused 2025 CFG Industrial H15R Mini Excavator (A59228)
Unused 2025 CFG...
2008 FORD F-550XL SUPER DUTY INSULATED BUCKET TRUCK (A60430)
2008 FORD F-550XL...
2015 Goose Neck Cattle Trailer (A53317)
2015 Goose Neck...
Kubota LA525 Front Loader Tractor Arm Attachment (A59228)
Kubota LA525 Front...
 
Top