Spencer's Pole Barn Project

   / Spencer's Pole Barn Project
  • Thread Starter
#281  
Re: Spencer\'s Pole Barn Project

I'm slowly making progress on the final half of my pole barn roof. This last half is going to be harder than the first half because it will have two valleys. Here is a picture showing where the two valleys have to be built.
 

Attachments

  • 311688-Valleys_Not_Framed.jpg
    311688-Valleys_Not_Framed.jpg
    88.4 KB · Views: 826
   / Spencer's Pole Barn Project
  • Thread Starter
#282  
Re: Spencer\'s Pole Barn Project

This half of the roof is going to take me a while to build. One reason is that I am still pretty busy working on the road. The other reason is that I am not a framing carpenter. I really didn't have this valley thing figured out when I drew up the plans. I thought I would figure it out when I got to it. Well it's time to figure it out. I knew I had to have some plywood down on the main trusses to build the valleys on. I didn't want to put all the plywood on yet so I just put enough sheets on to cover the area of the valleys. I used pressure treated plywood here so I didn't have to worry about it sitting up there in the rain. Yes this plywood has already seen some rain and it will probably see some snow before I get around to covering it up.

To build the valleys I started with a 2x10 ridge board. Then I put a chalk line from the top of the valley down to bottom. Then I put down a 2x12 valley board on each side. I held the 2x12 back 3.5" from the chalk line and nailed it down to the main trusses. I'm using 2x6's for the rafters, these needed a compound miter on the bottom side to accomodate for the 4-12 pitch in each direction. Unfortunately my compound miter saw won't come close to cutting a 18 degree compound miter so these had to be done by hand. I only got one valley finished last night but at least now I have it figured out, or so I think. I would have gotten further yesterday but it rained for a few hours and that slowed me down a bit. This picture was taken in the dark but I tried to lighten it up a little.

Thats all I have for now. It's not much but it's a step in the right direction.

Spence
 

Attachments

  • 311706-Valley_Half_Framed.jpg
    311706-Valley_Half_Framed.jpg
    56.5 KB · Views: 752
   / Spencer's Pole Barn Project #283  
Re: Spencer\'s Pole Barn Project

I don't want to rain on your parade but what the second picture shows doesn't look like any valley I've ever seen. I'm assuming you have a tee into the main building at the spot where you are building your valley. The tee's ridge needs to run to the ridge from the main roof. Then a valley ridge runs from that point down to the corners of the two walls. The jack rafters then go from the normal rafter to the valley ridge on both sides. I'll try and get some pictures before you get any further.
 
   / Spencer's Pole Barn Project
  • Thread Starter
#284  
Re: Spencer\'s Pole Barn Project

Slamfire, I would appreciate any advice you or any others may have. I am by no means an expert on this stuff. I have attached a drawing showing the side view of what I am trying to accomplish.
 

Attachments

  • 312169-Front_View_Valley.jpg
    312169-Front_View_Valley.jpg
    19.3 KB · Views: 578
   / Spencer's Pole Barn Project #285  
Re: Spencer\'s Pole Barn Project

</font><font color="blue" class="small">( I am not a framing carpenter. )</font>
You've certainly done very well so far ... but that's not the way to frame up your valleys and you'll be sorry down the road to leave it like that. Hate to bring you down - but if you'll get a book on framing roofs - it'll show you how to cut jack rafters and install them. All the words of description in the world won't help without pictures - every book store has 'em and you'll end up referring to it constantly. I have one that's 40 years old and still use it. I hate tearing apart hard work - but my advice is to do exactly that, get the book, frame it right, and you'll be glad you did in the end. I have a roof on the house in town - a screen room between the house and garage - that the previous owner framed very similarly to the way you're doing it now ... and I've had nothing but trouble with it. (leaks etc.) He even used old used lumber of different dimensions. Some of the rafters are 2x6 - some are 2x4 and there are braces in there that are plywood! Unfortunately I can't get in there to replace any of it - there's no access. I only discovered it when I cut a small hole to run some wiring. Do it right the first time and you'll never be sorry. (except during the undo) /forums/images/graemlins/crazy.gif
 
   / Spencer's Pole Barn Project #286  
Re: Spencer\'s Pole Barn Project

Looks great! The two previous post have you covered with regard to framing the valley's - no more needs to be said about that. I too have a pole barn going-up. The holes should be drilled on Friday. I am building a dutch gambrel style with a full second floor.

Did you ever consider commercial girts to facilitate electrical and insulation?
 
   / Spencer's Pole Barn Project
  • Thread Starter
#287  
Re: Spencer\'s Pole Barn Project

</font><font color="blue" class="small">( I'm assuming you have a tee into the main building at the spot where you are building your valley. The tee's ridge needs to run to the ridge from the main roof. Then a valley ridge runs from that point down to the corners of the two walls. )</font>

Slamfire, I want to make sure I understand what you are suggesting. I took a new picture of the valley from the side and modified it. Is this the roof layout you are proposing? /forums/images/graemlins/confused.gif

Spence
 

Attachments

  • 312270-Slamfire_Valley.jpg
    312270-Slamfire_Valley.jpg
    92.9 KB · Views: 585
   / Spencer's Pole Barn Project #288  
Re: Spencer\'s Pole Barn Project

Spencer,

Personally, I don't see any problems with the way you are doing it. I think there is the traditional way and the creative way to accomplish something. Both can be good and reliable over the long term.

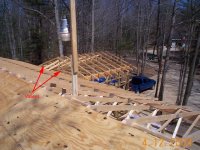
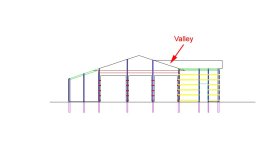
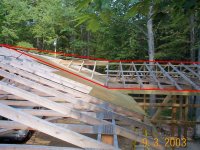
You are tying those rafters into the existing new roof pretty well it appears. Why would that be a problem, if you do a good job flashing the valleys before putting the roofing on?

I'm an amature too...but I have designed my own home and built it with my own hands so I do have a little experience along these lines and perhaps with the non traditional approach too.

I also have a bunch of books on building and read and reread them back in the beginning. That is great advice...

My question would be...why should what you have done so far produce a leaky roof? THe roof you are attaching to is new and solid. Your have things aliigned well from what the photos show. You will certainly flash things properly and use good roofing materials...

Take these comments with a grain of salt as I don't have the building experience that others here do...but I do have some and I can imagine a lot of other ways to do what you are doing...all pretty undesirable.

I would want to hear some very specific "you are doing this, and it is bad to do that because this will happen if you do..." advice before I started ripping things out and doing it differently.

For me saying "that's not good because we don't do it that way..." would not be good enough. I'm not saying anyone said that...just using it as an example of where I am coming from... /forums/images/graemlins/smile.gif

Don't be too quick to pick up that wrecking bar... /forums/images/graemlins/smile.gif
 
   / Spencer's Pole Barn Project #289  
Re: Spencer\'s Pole Barn Project

I agree with Henro, while there is room for improvements what you have done so far will work if you flash it right. Also don't leave your valley exposed. Run one side of the shingles up the other side then just cut the other side so any water runs down onto the other sides shingles. And if for some reason it gets under those shingles it still would have to get under the water barrier you will have underneath the shingles. I would tear it down but make sure you bring your plywood down till it hits the other plywood so there is no gap. Also, DON'T WALK IN THE VALLEY WHEN YOU ARE ROOFING IT. Nothing ruins a good valley like walking thru the centers of them. It breaks the water barrier and also damages the shingles because there is a gap under the center of the shingles in the valley from the curve. Have fun on the rest of your project and one of these days we need to get back to work on ours /forums/images/graemlins/blush.gif
 
   / Spencer's Pole Barn Project #290  
Re: Spencer\'s Pole Barn Project

The last picture clarifies things. I too thought from the first picture that the ridge sloped down hill from the trusses. This would be odd and not a good technique. It's apparent from the last photo that this is an optical illusion and the ridge is horizontal.

I'm sure Spencer could not see anything wrong with the photo because he knew how it was constructed and this over-rode the visual clues that created the illusion (at least for me).

I agree there's nothing wrong with this construction and in fact looks like a good job.

Jim
 

Tractor & Equipment Auctions

TEST BID LOT (A50774)
2006 MACK CV713 KILL TRUCK (A50854)
2006 MACK CV713...
2015 Ford Explorer AWD SUV (A50324)
2015 Ford Explorer...
2015 KUBOTA 1140CPX RTV (A51406)
2015 KUBOTA...
Case 1150G Crawler Tractor Dozer (A50322)
Case 1150G Crawler...
2019 Allmand Light tower (A49461)
2019 Allmand Light...
 
Top