Spliting a L4200

   / Spliting a L4200 #1  

Kenonf

Bronze Member
Joined
May 30, 2005
Messages
68
Location
Central Florida
Tractor
Kubota L4200, B7100, B2920
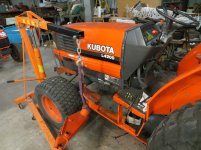
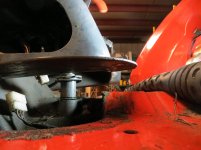
Its seems like only September when I was doing this for the first time. I had a rusted input shaft that was sticking, I could not get it into and out of gear.
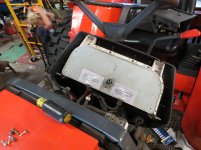
After using the loader on a burn pile. I went to the shed a few days later, and low and behold there was a bit of a puddle. Turns out to be about 1.5 gallons of UDT. Where did that come from.
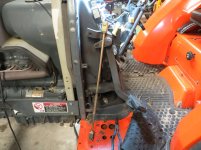
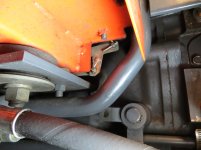
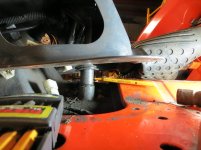
When i pushed up the loose pin under the tractor I found out, it was also leaking out of the FWD (propeller) shaft opening also.
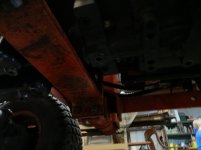
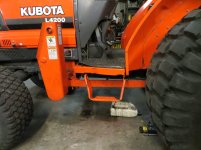
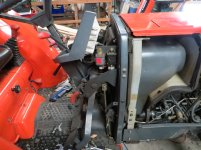
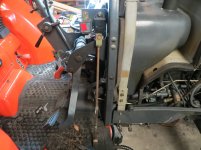
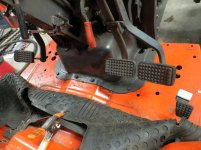
So off with the box blade and the loader. Park and remove the loader side mounts and then to pressure wash the whole thing.
I'll post more as I go along.

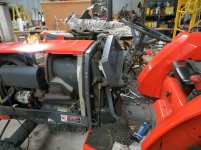
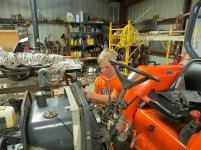
I did find it was easy to maneuver the frame pieces with the engine hoist.

Need to get the repair manual out of the bookcase at home also.
Ken
 

Attachments

  • loader.jpg
    loader.jpg
    925.9 KB · Views: 1,045
  • oil.jpg
    oil.jpg
    515.8 KB · Views: 706
  • Leak.jpg
    Leak.jpg
    846.2 KB · Views: 796
  • IMG_0064.JPG
    IMG_0064.JPG
    322.1 KB · Views: 683
   / Spliting a L4200 #3  
Unfortunately the front driveshaft comes forward from the transmission through the clutch housing on that model I think - maybe the seal there is leaking. On earlier models the front drive shaft and cover tube are external, driving from a gearbox on the bottom of the transmission - much easier to get to for service. But a lot changed when they went for flat operator platforms.
 
   / Spliting a L4200
  • Thread Starter
#4  
Okay here we go, removed the shroud around the dash panel, was easier to unplug the key switch and undo the stop engine pull, remove the shroud, then tip the dash panel forward and remove the 6 screws to open the dash panel up and unplug the dash.
 

Attachments

  • IMG_0361.jpg
    IMG_0361.jpg
    876.3 KB · Views: 551
  • IMG_0362.jpg
    IMG_0362.jpg
    858.3 KB · Views: 657
  • IMG_0364.jpg
    IMG_0364.jpg
    823 KB · Views: 416
  • IMG_0365.jpg
    IMG_0365.jpg
    812.6 KB · Views: 484
   / Spliting a L4200
  • Thread Starter
#5  
I removed the brake adjustment rods, the floor throttle rod, the throttle rod that goes to IP.
 

Attachments

  • IMG_0381.jpg
    IMG_0381.jpg
    842.9 KB · Views: 584
  • IMG_0382.jpg
    IMG_0382.jpg
    841 KB · Views: 461
  • IMG_0383.jpg
    IMG_0383.jpg
    648.1 KB · Views: 625
   / Spliting a L4200
  • Thread Starter
#6  
My assistant and I then proceeded to remove the steering wheel and stuff, while my son removed the bolts, 10 total, I separated the 3 plugs in the little hole on the left side of the lower panel. I also undid the plug from the alternator and the ring terminals from the starter.
 

Attachments

  • IMG_0380.jpg
    IMG_0380.jpg
    875.8 KB · Views: 374
  • IMG_0384.jpg
    IMG_0384.jpg
    848.8 KB · Views: 333
  • IMG_0385.jpg
    IMG_0385.jpg
    925.5 KB · Views: 754
   / Spliting a L4200
  • Thread Starter
#7  
A little tricky part is coming up, I used and engine hoist to lift the dash/ steering console up, but to move it you have to undo the two bolts that attach the forward and reverse lever from the steering column. Once these two bolts are out you can tip the shift level away from the steering wheel and the console can come up about 2 inches. Then you need to drive out the roll pin to release the shift lever.
 

Attachments

  • IMG_0389.jpg
    IMG_0389.jpg
    854.9 KB · Views: 813
  • IMG_0390.jpg
    IMG_0390.jpg
    723.3 KB · Views: 316
  • IMG_0391.jpg
    IMG_0391.jpg
    716.2 KB · Views: 592
   / Spliting a L4200
  • Thread Starter
#8  
Undo the power steering hoses and up and away the console can go.
I have a small leak in the front of the tractor, also I hit it with some Card cleaner and ran it before beginning the teardown. I will check tomorrow ans see if i have any drips up near the steering cylinder. If so maybe a hose replacement is in order.... the PS hoses come up through a boot so it is not necessary to mark them if you are not removing the boot. two open end wrenches and a phillips screwdriver to remove hoses
IMG_0387.jpgIMG_0388.jpg

Ah just figured out too to do this, multiple paragraphs and pictures....

So we have the console ready to pull....
IMG_0392.jpgIMG_0393.jpg

And that leaves us with a tractor ready to separate.
IMG_0394.jpg

I am about 3 hours into this, with the loader removal.
Previously I broke the safety switch, on the direction lever, I will replace it when I do my parts order this time. Of course it broke when I was assembling it last time, it had bullet connectors so I just cross plugged them and it worked.
Metric well nuts... I ordered a box from a company online, all the hood pieces are attached with them, so the one that separated on me this time is no big deal seems like i break one each time i work on it. I do not think the hood really has to come off but the right side lower grey panel has to, it covers the hydraulic connections.
I need to remember to drive a few wedges in the front axle this time before I separate it too.

Please feel free to ask questions or comment, not perfect but trying.
Ken
 
   / Spliting a L4200 #9  
Thanks for these pic's also, Ken,,
what year is your machine, and does it have the gst trans.
 
   / Spliting a L4200
  • Thread Starter
#10  
Probably a 1997-8 L4200 with Shuttle shift not GST.

I positioned the floor jacks and lifted a little. I removed the bolts and nuts, and added a little lift to the front jack. Gave the rear a little pull and apart she came.
No oil from the input shaft, it is leaking from the propeller shaft. I call it the propeller shaft because it is what Kubota calls it. Clutch pack is dry. And looking at the parts diagrams on Kubota's website there were two seals on that shaft.
Now a little carb cleaner and then ospho, wow it is a fast drip. Out come the jack stands and I am good to go.
Spray a little primer and a coat of some paint when I get back.
Off to Kubota I go. I ordered the seals and to o-rings. And need to replace the shaft cover that I bent, a few years back. I forgot the safety switch of course....
Spoke with a service tech and you can pull that shaft out but it drops internal the coupling in the tractor, then yank all the seals and bearings and then fish the coupling out.
Looks like I will just see if I can yank the seals out and leave the shaft in there when I get the new ones to see what they look like.
Anybody else done this?
Sound reasonable?
Ken

IMG_0395.jpgIMG_0396.jpgIMG_0397.jpgIMG_0398.jpg
 

Tractor & Equipment Auctions

NEW 1" AIR IMPACT WRENCH 1900 FT/ LB NEW SUPPORT EQUIPMENT (A40018)
NEW 1" AIR IMPACT...
2015 Ford F750 XL SD S/A Flatbed Truck (A43690)
2015 Ford F750 XL...
2015 JLG 450AJ (A40786)
2015 JLG 450AJ...
Suprex Gold 15W40 Motor Oil 55 Gallon Drum (A39855)
Suprex Gold 15W40...
2024 Ford F-250 4x4 Pickup Truck (A43947)
2024 Ford F-250...
2024 Ford F-250 4x4 Pickup Truck (A43947)
2024 Ford F-250...
 
Top