Excellent! Winston, thanks for posting that illustration.
I just love those old artistic working view drawings. They explain so much.
That certainly is a good page. Is it from the OEM Yanmar workshop manual with the red plastic covers??
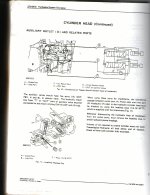
That whole picture is worth studying until understood. I agree that the owner should take a look to see whether that port-blocking screw is in there or not. It could be part of the problem.... and of a possible solution. Note that in the text that headless pressure blocking screw is improperly called out as a NPTF. But in the drawing and as you show it on Amazon the headless screw is actually a NPTM.
A couple of notes:
1. on the illustration, note that the directional valve assembly for the loader is only shown on the upper right in a schematic view. All other views are of the Hydraulic Cylinder Head.
2. The Power Beyond (PB or PBY) port D is shown as being active in that schematic of the loader valve. So in the schematic view there is pressure on the hydraulic cylinder head port A.
3. By the way, that schematic drawing of the directional control valve is an "old school" type of schematic drawing in which some internal return passages are not shown on the control valve schematic. In old school schematics some internal return passages of control valves were considered to be "obvious....."
So don't panic when you mentally move the control levers and find that where ou expect a return passage to show, the flow appears to just end instead of connecting to the return line.
So with the aid of this drawing, the OP may be able to change his hydraulics around so that he can use the PB and not have two competing sources of pressure. Will have to think on that.
Also, I was thinking back to yesterday's video where the OP shows a "T" in the return line. As a general rule, one never wants to "T" into a return line because it causes back pressure on both returns. I don't think that is his problem right now, but it is better to combine both returns into a "Y".
rScotty