YM240D developed clunking at rear wheel

   / YM240D developed clunking at rear wheel #61  
:dance1:Over the years Yanmar has wavered on what they recommend for the front diff. Looking through their literature from then, Yanmar has recommendations for the FRONT DIFF oil ranging from 90wt gear oil to 30 wt motor oil.
I waver too....and in our machines I tend to go back and forth between 20w50 motor oil and 80w90 gear oil in the 4wd front axle - always at least making sure that the gear oil is GL-4 or GL-5 type. Oddly enough, both the multiweight motor oil and multiweight gear oil are pretty close to the same viscosity at the same temperature.

Even though Yanmar invented and patented that tricky bevel gear driven front axle that most all 4wd tractors use today, I sometimes wonder about their choice of front end oil. I'm not sure that that Yanmar put enough thought into folks using their tractors as 4wd snowplows in cold climates. Although for Ag use and ag climates, I'd agree with Yanmar that it the front axle oil could be either type. What I'd really like for cold weather/high stress on the front axle bevel gears would be a 50W90 GL-5 Gear Oil with an anti-foaming additive. But that's being picky. Truth is, I've not heard of any front axle problems happening when there was any kind of oil in the front axle. The problems come from water in the axle and especially from not getting the water drained out well because it sits down under the oil.

The standard shift tranny, rear end, and hydraulics are a different story. They all share a common sump and oil supply and the kind of oil is important to them....which is kinda crazy since the requirements for the type of oil that each one uses are way different. For the transmission and rear end we want high shear strength at all temperatures where for the hydraulics we don't care so much about shear strength as we do about flow characteristics.

Luckily, a whole lot of today's tractor and heavy equipment industry use that nutty shared sump setup & as a result there have been some really good combo Trans/hydraulic oils developed. On the downside, the good ones sure are expensive oils to buy and that has led to a lot of copycats. There are standards, but no enforcement.

JD 303 used to be the oil everyone pointed to as a standard combo trans/hydraulic oil, but not anymore since it was an archaic mix made from materials no longer available. Today, it is mostly the economy oils that reference JD303 and that might be simply because there is no longer a valid JD303 standard.

So what I use in my own tractors is a trans/hydraulic oil that is sold by a company who manufactures their own combo transmissions & hydraulic systems. That's things like JD HyGard, Allis-Chalmers , Kubota, International Harvester, etc. Right now I'm using JD HyGard in some and New Holland Multi-G 134 in others. All today's combo trans/hydraulic systems are pretty similar mechanically & I figure any company that makes their own trans/hydraulic systems probably has a vested interest in specing an oil that works well in them.

Personally I wouldn't use generic non-name-brand trans/hydraulic fluid from the local cut-rate tractor supply store in my own machines.... but I gotta also say that I know plenty who do and don't know of any problem they've had from doing so.
rScotty
Well written. Well said.
 
   / YM240D developed clunking at rear wheel
  • Thread Starter
#62  
So a quick update and more questions. I have as of now, the damaged bull gear removed. It wasn't as easy as I hoped, but still easier than it could have been! I did a quickly put in the donor gear just to check the slop between the pinion & bull gear meshing. I attempted to install the bull gear completely but hit a snag. As it turns out, you have to pull the axle shaft out some to clear the splines of the bull gear as there is not enough clearance inside the rearend housing to remove the gear otherwise. In attempting to put things back together, it appeared that the gear didn't want to slide onto the splines all the way and eventually things got jammed up. I pulled it all apart again and re-installed the axle. When re-installing the axle, I then noticed that the bearing was being forced inward, into the gear housing. I'm afraid the bearing is going to be forced all the way out. I've given up for the evening, but I know I don't have a socket large enough to fit over the spines so that I can gently tap the bearing back in place and onto the splines.
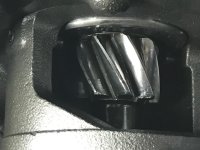
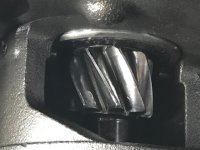
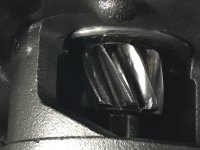
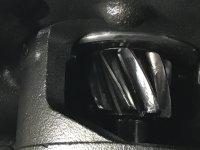
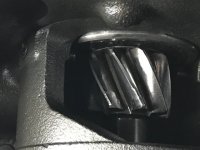
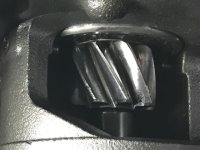
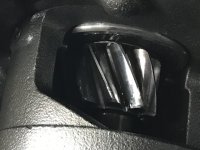
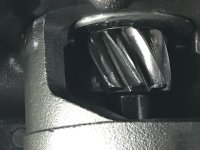
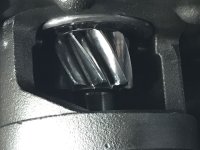
So, that's where I'm at on the R&R. This brings me to a few other questions. The most important question looming over me is whether or not to replace the pinion gear or not. I already have a replacement that was sent with the bull gear. The original pinion gear t has some light scarring and a few burrs on a tooth or two. I'm going to attempt to post fotos again. I find it difficult to post fotos on this forum for some reason.
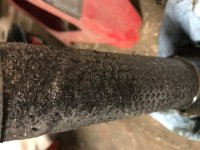
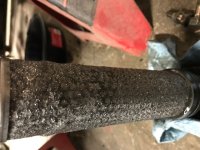
Some of my other questions are OEM paper gaskets or DIY squeeze tube stuff. The other question being hydraulic fluid filter. It is caked with very fine metal shavings. Hoye didn't seem to have a replacement for mine. Again, if I can conquer the posting of pics, there will be foto of the filter in the mix.

Thanks for posting replies and walking me through this whole ordeal this far. I don't think I could have done it without all the help, inspiration and private message help.
 
   / YM240D developed clunking at rear wheel
  • Thread Starter
#63  
IMG_7264.jpg
IMG_7272.jpg
IMG_7271.jpgIMG_7270.jpgIMG_7269.jpgIMG_7268.jpgIMG_7267.jpgIMG_7266.jpgIMG_7265.jpgIMG_7273.jpg

IMG_7278.jpgIMG_7279.jpg
 
   / YM240D developed clunking at rear wheel #64  
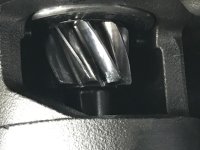
I will start with the pinion gear. Pictures can be deceptive. I want to think I can see considerable wear down at the base of the gear teeth but not sure. Looks like a wear line that you could almost hand a finger nail on. Might be looking at a shadow.

I would use gaskets.

Surprised Hoye didn't have your filter screen. YM24-TRANSMISSION & PTO | YANMAR HYDRAULIC SCREEN | SOUTHERN FARM EQUIPMENT
 
   / YM240D developed clunking at rear wheel #65  
So a quick update and more questions. I have as of now, the damaged bull gear removed. It wasn't as easy as I hoped, but still easier than it could have been! I did a quickly put in the donor gear just to check the slop between the pinion & bull gear meshing. I attempted to install the bull gear completely but hit a snag. As it turns out, you have to pull the axle shaft out some to clear the splines of the bull gear as there is not enough clearance inside the rearend housing to remove the gear otherwise. In attempting to put things back together, it appeared that the gear didn't want to slide onto the splines all the way and eventually things got jammed up. I pulled it all apart again and re-installed the axle. When re-installing the axle, I then noticed that the bearing was being forced inward, into the gear housing. I'm afraid the bearing is going to be forced all the way out. I've given up for the evening, but I know I don't have a socket large enough to fit over the spines so that I can gently tap the bearing back in place and onto the splines.
So, that's where I'm at on the R&R. This brings me to a few other questions. The most important question looming over me is whether or not to replace the pinion gear or not. I already have a replacement that was sent with the bull gear. The original pinion gear t has some light scarring and a few burrs on a tooth or two. I'm going to attempt to post fotos again. I find it difficult to post fotos on this forum for some reason.
Some of my other questions are OEM paper gaskets or DIY squeeze tube stuff. The other question being hydraulic fluid filter. It is caked with very fine metal shavings. Hoye didn't seem to have a replacement for mine. Again, if I can conquer the posting of pics, there will be foto of the filter in the mix.

Thanks for posting replies and walking me through this whole ordeal this far. I don't think I could have done it without all the help, inspiration and private message help.

I'm enjoying just sort of following along with the project.

For a large socket, I've sometimes used short sections of heavy wall exhaust pipe. We have a custom muffler shop in town that makes custom exhausts, and he has a large stock of nearly every size of pipe. He is willing to cut off short pieces and over the years I've accumulated a fair amount of these 1" to 4"long sections of heavy wall exhaust pipe of all diameters to use for just that sort of project. Tell him what you want, and he will cut so that the ends are nice and perpendicular. The heavy wall pipe is more than strong enough. I've even brazed a thick washer to the ends of some pieces specifically for gently tapping with a hammer.

Looking at the pinion gear I hate to say this....but I'd replace it - especially if I had a new or better one. I think that one will work, but it may not last long. Tractors take a lot of stress and I wouldn't want to always be worrying about it.
I haven't looked at the shop manual to see if there is an engagement spec. - which usually means shimming for proper ring-to-pinion engagement. But if there is, I'd be even more inclined to replace them both as a pair. And do the proper shimming. You can buy hardened shim washers by size from a machinery supply - usually McMaster Carr - although our local hardware store carries a surprisingly large stock of hard shim washers.

On the gasket question.... that's worth some discussion on older mechanical projects. use paper gaskets where I can, and even go so far as to wet them and then press them flat until dry if I can find the darn things..... I used to make gaskets but don't since the advent of really good RTV. Back to the paper, after flattening, I coat with a very THIN layer of the best silicon RTV (means Room Temperature Vulcanizing) that I can find and then let that almost completely cure before assembling - but still slightly tacky. The Permatex silicons are good enough for general automotive/MC/Tractor work. Once tacky, the paper gasket doesn't slide around. If it slides, it's too wet.
Right now I've been using Permatex ULTRA GREY Sensor Safe RTV silicone Gasket Maker for doing that.

When I don't have a paper gasket at all, I lean toward Permatex Perma-Shield Fuel Resistant Gasket Dressing & Flange sealant (also an RTV type). It's made just for that purpose.

Permatex also makes a a copper-colored RTV specifically for engines in high heat applications. Frankly, I've used all three of those Permatex RTVs on flanges and they seem to work about the same. Good enough, but there is a whole world of even better Silicon RTVs for commercial and aviation use. More about those below. You might want to consider them...

First a bit about the problem with all and all of these RTVs is that they are really sticky and also slippery when they come out of the tube. The key is to make a thin even layer, and then let them cure until tacky before assembly. AND THE TRICK to doing that is that is that as sticky as they are, they can be smoothed by gently using your finger wetted with saliva to push the RTV around.. That works until you break through the saliva or soap layer and then the RTV starts to stick to your finger. So I keep a whole roll of paper towels right there along with a tub of water and dish soap to keep at least one finger tip clean. Pure water doesn't work as well as spit.
As a chemical family, these RTVs are all moisture-curing type, so wetting them does accelerates the cure rate. Practice on somethng first.

If you just hate the organic acid smell of these RTVs too much to do it this way, there is an even better way which is the commercial and aviation types. These are commercial RTVs available that are also moisture curing, but use a different (platinum) catalyst to begin the reaction. That makes them work easier and they also don't have the acrid odor of the less expensive RTV smelly catalyst types. They better RTVs work the same way but smear much more easily and evenly, cure more reliablly, and last longer. Cure to tacky is in about 30 minutes. However they are way more expensive - but worth it because of how well they work, resistance to most solvents, and extended temperature range. No out-gassing. It's the go-too sealant goo for hi-tech and aerospace. Lots of uses. Non-reactive, non-poisonous.
My favorite in these is Dow Corning 3145 Gray in the 3 oz. tube for $33.00 from Pilot Gear Online. That is enough to do this project several times and if treated right a tube will last for years. IMHO, this stuff is worth the high cost for the way it works and lasts.
Also good for all kinds of weather-proof repair for anything vinyl or rubber which needs to adhere well and stay flexible. Fishing gear, vinyl seats, rifle scabbards.....Comes in clear as well as gray. Gray is easier to apply to flange surfaces because you can see it. I use both.
https://www.pilotgearonline.com/brands/Dow-Corning.html?sort=featured&page=2

Well, that's enough on goo....but you did ask!

OK, nice job on figuring out TBN's arcane but effective photo posting. And I see that you found the hydraulic filter. Yep, it caught the crud and hopefully saved the system. That filter is cleanable and re-usable. BTW, so is the air filter. Yanmar's Operator Manual says to clean the hydraulic oil filter carefully in solvent with a soft brush and gently blow dry with compressed (not hot) air.
I've seen some where the filter material itself was made of wound SS filter mesh, and others that seemed to use a nylon slip on mesh cover. If I remember right, the SS mesh was #600 - this is standard filter material 0 I've posted on that before - the mest itself is available from science houses, our local hardware store, or from McMaster Carr online. if you tear the filter and need to replace the mesh just do so... don't throw that basic filter assembly away no matter how bad it looks. Clean it or repair it. Replacements are hard to find.

I'd expect that you will have to clean it again - maybe several times - in the first hours of operation after this job.
That is the only filter in the trans/hydraulic system. There isn't a replaceable screw-on filter in those older YM155/195/240 Yanmars - although the newer 3 cylinder like the YM186 & YM276 have a replaceable screw on type in addition to the cleanable one.

Hope all this helps, good luck.
rScotty
 

Attachments

  • Oil capacity_Filter # & Service Items.JPG
    Oil capacity_Filter # & Service Items.JPG
    177.2 KB · Views: 69
   / YM240D developed clunking at rear wheel #66  
That small gear does look chewed at the ends, possibly even distorted? Would it probably work as is forever.. probably, it would depend on what has to be done to get it out if it we're me.
I would advise replacing since your this far though.

The filter is washable or does it have holes torn in it? Wash it with diesel.

If you had paper gaskets I'd use one with light coat of rtv on each side. I'd prefer ultra black for stuff like that. That said I would not be afraid to just put it back togeather with RTV in a thicker coating. Read directions on it's use most don't and do not follow proper procedure.

Basically with RTV if I had forethought enough to order them and realized I needed them depending on price and I bought them I would use them. If I had to wait another week for a gasket or they were like $20 I would just use RTV .
 
   / YM240D developed clunking at rear wheel #67  
I'm enjoying just sort of following along with the project.

For a large socket, I've sometimes used short sections of heavy wall exhaust pipe. We have a custom muffler shop in town that makes custom exhausts, and he has a large stock of nearly every size of pipe. He is willing to cut off short pieces and over the years I've accumulated a fair amount of these 1" to 4"long sections of heavy wall exhaust pipe of all diameters to use for just that sort of project. Tell him what you want, and he will cut so that the ends are nice and perpendicular. The heavy wall pipe is more than strong enough. I've even brazed a thick washer to the ends of some pieces specifically for gently tapping with a hammer.

Looking at the pinion gear I hate to say this....but I'd replace it - especially if I had a new or better one. I think that one will work, but it may not last long. Tractors take a lot of stress and I wouldn't want to always be worrying about it.
I haven't looked at the shop manual to see if there is an engagement spec. - which usually means shimming for proper ring-to-pinion engagement. But if there is, I'd be even more inclined to replace them both as a pair. And do the proper shimming. You can buy hardened shim washers by size from a machinery supply - usually McMaster Carr - although our local hardware store carries a surprisingly large stock of hard shim washers.

On the gasket question.... that's worth some discussion on older mechanical projects. use paper gaskets where I can, and even go so far as to wet them and then press them flat until dry if I can find the darn things..... I used to make gaskets but don't since the advent of really good RTV. Back to the paper, after flattening, I coat with a very THIN layer of the best silicon RTV (means Room Temperature Vulcanizing) that I can find and then let that almost completely cure before assembling - but still slightly tacky. The Permatex silicons are good enough for general automotive/MC/Tractor work. Once tacky, the paper gasket doesn't slide around. If it slides, it's too wet.
Right now I've been using Permatex ULTRA GREY Sensor Safe RTV silicone Gasket Maker for doing that.

When I don't have a paper gasket at all, I lean toward Permatex Perma-Shield Fuel Resistant Gasket Dressing & Flange sealant (also an RTV type). It's made just for that purpose.

Permatex also makes a a copper-colored RTV specifically for engines in high heat applications. Frankly, I've used all three of those Permatex RTVs on flanges and they seem to work about the same. Good enough, but there is a whole world of even better Silicon RTVs for commercial and aviation use. More about those below. You might want to consider them...

First a bit about the problem with all and all of these RTVs is that they are really sticky and also slippery when they come out of the tube. The key is to make a thin even layer, and then let them cure until tacky before assembly. AND THE TRICK to doing that is that is that as sticky as they are, they can be smoothed by gently using your finger wetted with saliva to push the RTV around.. That works until you break through the saliva or soap layer and then the RTV starts to stick to your finger. So I keep a whole roll of paper towels right there along with a tub of water and dish soap to keep at least one finger tip clean. Pure water doesn't work as well as spit.
As a chemical family, these RTVs are all moisture-curing type, so wetting them does accelerates the cure rate. Practice on somethng first.

If you just hate the organic acid smell of these RTVs too much to do it this way, there is an even better way which is the commercial and aviation types. These are commercial RTVs available that are also moisture curing, but use a different (platinum) catalyst to begin the reaction. That makes them work easier and they also don't have the acrid odor of the less expensive RTV smelly catalyst types. They better RTVs work the same way but smear much more easily and evenly, cure more reliablly, and last longer. Cure to tacky is in about 30 minutes. However they are way more expensive - but worth it because of how well they work, resistance to most solvents, and extended temperature range. No out-gassing. It's the go-too sealant goo for hi-tech and aerospace. Lots of uses. Non-reactive, non-poisonous.
My favorite in these is Dow Corning 3145 Gray in the 3 oz. tube for $33.00 from Pilot Gear Online. That is enough to do this project several times and if treated right a tube will last for years. IMHO, this stuff is worth the high cost for the way it works and lasts.
Also good for all kinds of weather-proof repair for anything vinyl or rubber which needs to adhere well and stay flexible. Fishing gear, vinyl seats, rifle scabbards.....Comes in clear as well as gray. Gray is easier to apply to flange surfaces because you can see it. I use both.
https://www.pilotgearonline.com/brands/Dow-Corning.html?sort=featured&page=2

Well, that's enough on goo....but you did ask!

OK, nice job on figuring out TBN's arcane but effective photo posting. And I see that you found the hydraulic filter. Yep, it caught the crud and hopefully saved the system. That filter is cleanable and re-usable. BTW, so is the air filter. Yanmar's Operator Manual says to clean the hydraulic oil filter carefully in solvent with a soft brush and gently blow dry with compressed (not hot) air.
I've seen some where the filter material itself was made of wound SS filter mesh, and others that seemed to use a nylon slip on mesh cover. If I remember right, the SS mesh was #600 - this is standard filter material 0 I've posted on that before - the mest itself is available from science houses, our local hardware store, or from McMaster Carr online. if you tear the filter and need to replace the mesh just do so... don't throw that basic filter assembly away no matter how bad it looks. Clean it or repair it. Replacements are hard to find.

I'd expect that you will have to clean it again - maybe several times - in the first hours of operation after this job.
That is the only filter in the trans/hydraulic system. There isn't a replaceable screw-on filter in those older YM155/195/240 Yanmars - although the newer 3 cylinder like the YM186 & YM276 have a replaceable screw on type in addition to the cleanable one.

Hope all this helps, good luck.
rScotty
I will leave the long quote as I am on a phone and editing to a small part is more of a pain than worth.

I also use ultra grey. The permatex ultra grey and ultra black are my go too. Black has the best oil resistance, but grey says higher torque so it would resist squeezing out I guess.

I did notice on Amazon while browsing the other day they make a "Super Ultra Black" now. It was a smaller tube and cost 1.5-2x as much. I will buy some one day though.


Back on the gasket or no thing. I out my filter in like 9 years or so ago with Ultra Grey as the gasket. I don't see it leaking at all these days. I am going to pull it out and clean it soon. I will do it with black. I actually will follow the instructions this time where you finger tighten the item wait an hour or so till it firms up then torque it and don't refill with oil for a day.
 
   / YM240D developed clunking at rear wheel
  • Thread Starter
#68  
Thanks for all the input guys! I apologize for any typo's in my last post. I was head bobbing at 1am trying to update so that I had answers to read by morning.

I have a matching set of bull & pinion gear that were purchased used. I too think that even though this gear may very well last me a lifetime, I don't know that I can operate day in and day out knowing that it has potential to fail. The guy I got the used parts from confirmed for me that the pinion gear is removed from the brake housing, along with the drum and not by removing the carrier, ring gear, etc. After looking at the replacement pinion, the gear is machined into the shaft itself, not a pressed on gear like I had envisioned. I also see no evidence of it needing shimming for pinion alignment, but that will be revealed when I remove to old unit. Unfortunately, this is the side with the working brake hub, which is the passenger side. My driver side brake does not seem to be grabbing at all. Guess I'll be opening up both sides to inspect/repair. Just more work is all.

As for the gaskets, it seems there is a fairly agreeable consensus. Use paper in conjunction with a high end RTV. That would resemble closest to old material used from what I assume is factory seal. I'm still torn on whether or not to do both or just use the gasket maker... I suppose since I've never liked to cut corners, I'll order up the paper ones that are available and use RTV as needed. I've used the orange RTV back in the late 90's/early 00's on water pumps, egr's and such. Never was all that impressed with the quality. Probably some ignorance in use of the product, I admit. Now that i've been advised of the proper install techniques, I'm more inclined to give it another shot.

I really do appreciate all the input from everyone out there. Especially the knowledge that it all yields. I hate learning! In school (english, science, math) was always brutal, but when it comes to anything automotive or trade related, I seem to just dive in and research the heck out of it. For instance, a plumber came out to quote me for a replacement of a water spigot that froze this winter. While here he said my water heater expansion tank was shot. Quoted me $320 to replace it. I googled and googled. Turns out, the tank was never charged at the proper PSI to hold back the water pressure. It took me 2 hours of google & youtube, but only 5 minutes to resolve the situation and it cost me absolutely nothing!
I loved the "article" ;) on the RTV stuff. Very interesting rScotty! I used to tinker and work on old VW Bugs as a teenager. My Grandfather and I were very close and VW's were always a passion of his and as a result is now one of mine as well. He always let me help any way I could and I always cherished that time together and the knowledge He conveyed to me. My Father was always into VW's also. A few years after my Grandfather passed, my Dad's small business was really starting to grow rapidly. Thats when we decided to build a VW drag car. We had lots of fun, especially myself since I was the lone driver of the car. Who would've thought a little old Beetle could do the 1/4 mile in 9.90@126mph. Anyways, unfortunately my Grandfather lost his battle of Leukemia when I was only 16 years old. Hardest thing I have ever dealt with in life so far. I really do love a good challenge like this. At times its frustrating to not always have the necessary time or space to tackle it, but in the end it's always such a sense of accomplishment. In a sense, you guys have taken me back to my childhood, back when I was tinkering on Grandpa's VW in the garage.

Thanks again for all the help along the way. I will keep posting updates as they come.

-Nick
 
   / YM240D developed clunking at rear wheel #69  
I'm enjoying just sort of following along with the project. ...
rScotty
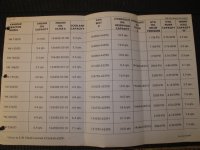
RScotty thanks for all the excellent advice in your post above and in particular thank you for posting that Yanmar capacities chart. I've never seen it before.

Everyone - download and save that chart!

I've never seen a comparison of the various hydraulic pump capacities listed anywhere before.
 
   / YM240D developed clunking at rear wheel #70  
Use Ultra Black or Ultra grey. In these applications if you read the tube and follow the directions. I will promise you they will work, no paper gasket needed. If I was you and don't have them on hand I would just use the two I mentioned. There the best I have found for oil....black being the best.

I have grey RTV on my hydraulic too, no leaks. I use black I am pretty sure on brakes....but it's just a seal to hold out the weather. There SHOULD be no water in there or oil, if there is oil in there your brake shaft seal has failed.
 

Tractor & Equipment Auctions

Bill 528 Grain Cart (A50774)
Bill 528 Grain...
2015 Chevrolet Express 4500 Shuttle Bus (A50323)
2015 Chevrolet...
2016 Chrysler 200 Limited Sedan (A50324)
2016 Chrysler 200...
Bobcat Skidloader PHD (A50774)
Bobcat Skidloader...
2008 Mazda CX9 SUV (A50324)
2008 Mazda CX9 SUV...
IF YOU BID ON AN ITEM YOU MUST PAY FOR IT!! NO BACKING OUT AFTER IT IS SOLD!! (A50774)
IF YOU BID ON AN...
 
Top