I had a small leak in my fuel injector pump and read that self-repair of these units is impossible, or at least strongly discouraged. Having a brother that is a good mechanic and can bail me out of most of the messes I create, I figured I would give it a shot. My repair was to a 3 cylinder Kubota (D722), but I think the same basic process would work on any Kubota diesel engine. This seems to be a fairly common problem so I hope it saves some time and money for others.
The leak was around the base where the injector lines connect to the pump. Slow leak, but over time builds up oily junk down the side of the engine. The problem is failing O-rings on the shaft of the injector. 2 O-rings on each shaft. Here's what I did:
1. Remove the three fuel lines, disconnecting at the head on one end and the injector pump at the other. 17mm wrench on mine.
2. Remove Torx screws that hold injector shaft into the pump. I suppose the reason for the security Torx is to discourage owners from attempting a repair. Can't think of any other reason. 5 of 6 came out easy with a T30 security Torx bit. Last one, of course, stripped. I used a Dremel cutting blade to cut a slit in the head just large enough to get a good flathead screwdriver into. Borrowed a tool from my brother (told you he was handy) made for just such a case - tap it with a hammer and it impacts and rotates the bit ever so slightly, just enough to break the screw loose.
3. Before going any further, mark the position of the flanges that held the Torx screws. There is a small amount of adjustment possible and it's important that they go back exactly where they were. I used my Dremel blade to etch a small mark on the flange and the housing below it. A marker wouldn't work on the oily surface.
4. After removing Torx screws, use a 17mm wrench to twist the shaft and loosen it.
5. Use pliers to grip the shaft and slowly pull it out of the pump.
***IMPORTANT*** As the injector comes out watch for a really small pin that will fall out of a hole at the bottom end of the injector. I didn't know it was there until I happened to see it fall out of the third injector I pulled. It was a real pain to try to find the other two tiny, tiny pins. Does anybody know what the pin does? See pics.
6. Cover the injector holes with clean cloth so nothing falls into them while you're working.
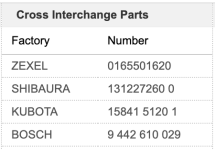
7. Remove and replace the O-rings, 2 per injector. Here are three part numbers I found for replacement O-rings: KUBOTA 1584151201, SHIBAURA 1312272600,ZEXEL 0165501620. I couldn't find anything in stock in my area so I just pulled out my box of assorted metric O-rings and matched as closely as possible. The ones I used have the following dimensions: ID = 11.8, OD 16.6, Section 2.4
8. Reinsert injector, being careful that the little pin stays in the hole. It's little and slippery so keep an eye on it. Lubricate the O-rings with a bit of oil before inserting. Mine was pretty snug so I used pliers to seat them and line up flange marks ensuring they went back to the position they were originally in.
9. Connect fuel lines, but leave the last one on top, toward the front of the machine, loose to bleed air when you start engine.
10. Start engine and when you see fuel start to spew from the open line, tighten it. I had to crank a couple of times before it started. Cloud of white smoke went away quickly. No leaks, no drips, success!
11. Try not to wonder why a relatively easy repair is discouraged by Kubota. Keep telling yourself that their warnings are nothing more than the opinions of educated men.
Old topic, but I thank you for the detailed information. You saved me a small fortune when my
B2400 recently began leaking. I feared I was looking at a major bill to have it hauled to a dealer and for labor. Even the Kubota shop manual has very little info about this repair.
I found the Zexel rings online at
Engine Parts Superstore for only $0.76 each vs $5.15 each at local dealers. Shipping ran $17

, but it was still a savings.
I was a bit nervous about losing the "tiny pin", so I took the time to get good access. Hood and side panel off, air cleaner and mounting bracket removed.
I used a very thin sharp scribe to mark the housing at the edges of the flanges to insure they went back in the exact same positions. Also discovered "Zexel" is cast into the housing!
I found I also needed to remove the air intake manifold to get access to two of the flange mounting screws.
I used a hand impact tool to loosen all the flange mounting screws. Four of the six required more force than I expected. I'm pretty sure I would have stripped a few heads if I had not used the impact tool.
I held a paper towel around each body as I twisted them out with pliers - no tiny pin losses.
The top o-rings were the problem, all were very dried out, two had actually split and the third crumbled when I began to remove it.
Everything went back together very smoothly. Working carefully, total time about 90 minutes, including lots of cleaning as I worked and time spent figuring out the right combo of tools to use. Started on the first crank after bleeding. No more leaks.
Finished, except the hood is still off, waiting for Amazon to deliver a new fan belt. I found a couple chunks of the original on the floor, and a quite few gaps when I inspected the belt. I guess a belt life of 26 years is acceptable?