selector valve

   / selector valve #51  
Bob, your handle is shaping up nicely. Since I don't have any wood (cherry or otherwise) suitable to make a handle, I plan on making one with a metal skeleton for strength with auto body filler to fill out the shape. So far all I have is a piece of pipe that fits over my joystick lever. I will drill and tap that for a setscrew, then bend up some pieces out of my scrap bin and weld to it, then cover it all with the body filler. Pics as soon as I get started.
jp

I like that take pictures. When My wood handle splits I will have to do something else.
 
   / selector valve #52  
I get an amazing amount done now that I am retired even after working off the items on my wife's list. More pictures.
I hit a soft spot on the block , a buried branch , that's the tear out at the bottom of the recess for the valve handle. When I clamped the handle in a vise to hold it while creating the recess I started getting some splits so I stopped and soaked it glue over night. Today I got some hardening preservative and will let some of that soak in as well. I drilled a long hole down the center axis for the wires. You can see a center line on two faces I was trying to follow with a hand drill and a 5/16 12: bit. Not a high spiral so there was a lot of back and forth to clear the chips. I felt it drift when the bit hit another soft spot about 2/3 of the way down but by that time I just kept going with a little prayer. Exit hole was about 3/8 up and to the right but did not break out so it will work fine. The Deutch connectors came in and I wired up the solinoid end. Nice weather tight connectors.
I was thinking the handle was going to be 90d from where it is but when I sat in the seat this felt much better. I think I will deepen the socket for the handle a little more and use a couple of band clamps to hold it on. It looks like it could be a lot shorter than it is but that would be either start over of cut it down and add some material , or maybe cut a section out of the middle.
Well that can wait a bit. Coming up on the bracket for the valve I think.
 

Attachments

  • IMG_5715.JPG
    IMG_5715.JPG
    301.7 KB · Views: 177
  • IMG_5716.JPG
    IMG_5716.JPG
    286.7 KB · Views: 138
  • IMG_5717.JPG
    IMG_5717.JPG
    320.5 KB · Views: 177
  • IMG_5718.JPG
    IMG_5718.JPG
    405 KB · Views: 181
  • IMG_5721.JPG
    IMG_5721.JPG
    321.3 KB · Views: 259
  • IMG_5720.JPG
    IMG_5720.JPG
    411 KB · Views: 199
  • IMG_5719.JPG
    IMG_5719.JPG
    367.4 KB · Views: 184
   / selector valve #53  
I get an amazing amount done now that I am retired even after working off the items on my wife's list. More pictures.
I hit a soft spot on the block , a buried branch , that's the tear out at the bottom of the recess for the valve handle. When I clamped the handle in a vise to hold it while creating the recess I started getting some splits so I stopped and soaked it glue over night. Today I got some hardening preservative and will let some of that soak in as well. I drilled a long hole down the center axis for the wires. You can see a center line on two faces I was trying to follow with a hand drill and a 5/16 12: bit. Not a high spiral so there was a lot of back and forth to clear the chips. I felt it drift when the bit hit another soft spot about 2/3 of the way down but by that time I just kept going with a little prayer. Exit hole was about 3/8 up and to the right but did not break out so it will work fine. The Deutch connectors came in and I wired up the solinoid end. Nice weather tight connectors.
I was thinking the handle was going to be 90d from where it is but when I sat in the seat this felt much better. I think I will deepen the socket for the handle a little more and use a couple of band clamps to hold it on. It looks like it could be a lot shorter than it is but that would be either start over of cut it down and add some material , or maybe cut a section out of the middle.
Well that can wait a bit. Coming up on the bracket for the valve I think.


Sunset,
You could not fit the two new switches in your existing joystick handle? Look like there is a lot of room there...
 
   / selector valve #54  
Thats the wrong valve. I suppose I could have put toggles in the Fel joystick handle but then I would have to set that , move my hand to the remote valve , do what ever and then remember to dump the toggle.
I am using the switches for a selector valve for T and T.
The joy stick is a little tight inside I think unless you get real midget switches.
I had what I had around plus hugh blocks of cherry. Used to make toys for all my friends kids but they are all out of college now, Guess I better finish this handle before I have to make toys for their kids kids.
There seems to be many ways to skin this cat. I am interested in the steel skelton with Bondo if this does not work out.
 
   / selector valve #56  
I like that take pictures. When My wood handle splits I will have to do something else.

OK, finally had some time to start on a "Bondo" knob. But first...

I called the local Cat dealer to satisfy my curiosity on the valve price. $734.82, based on the part number in the Surplus Center description. That makes the valve from SC quite a bargain IMHO.

So, on to a handle to hold the switch. I have a Massey with the Dyna QPS transmission. What does that have to do with hydraulics, you ask? Nothing, except to complicate my knob fabrication. I like the way the Dyna QPS shift knob fits my hand, and how easy it is to use the buttons on top to shift. So I thought it might be a good template to copy for the joystick knob. Here is what the shift knob looks like:


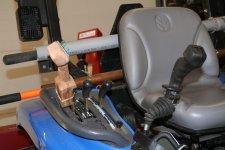
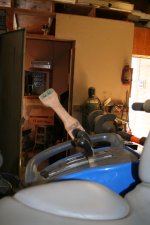
This is my joystick lever, with the stock knob removed. It just pushes on, no threads, no setscrew. So it just pulls right off, leaving a smooth shaft.


Notice also, it angles back and inward toward the driver. That is fine for the round knob that comes on it, but for a knob like the shifter I am trying to copy, not so good. For that knob (really "grip" seems a better term for that shape) it should be sitting straight upright. At least it seems that way to me. I am pointing all this out so when you see my grip skeleton you will understand why it is angled on its 3/8" pipe base. Actually, this wire form was only a trial skeleton to just get ideas on how to bend up some 1/4" rod for the final form. But it turned out to be more sturdy than I anticipated, so I went ahead and welded it to the pipe. At first it only had two "legs" and would flex some in relation to the pipe, so I added two more and that stiffened it up a lot. The pipe is a 3/8" X 4" nipple. To get it to fit the joystick lever I ran a 1/2" drill bit through it to clean up the rough inside.


Next I used fiberglass reinforced auto body filler to cover the skeleton. You could use regular bondo, but I felt like the fiberglass would give it extra strength. I am not sure if it is necessary or not, but I figure it can't hurt. I also think the fiberglass will keep it from cracking. Regular bondo will crack with age if it is very thick, hopefully this reinforced stuff will hold up better. I used Bondo brand reinforced for this project, but another brand is Tiger Hair. It took about two applications for it to start to take shape. Sorry, I didn't get any pics of the formative stages. I will say I had most of the knob at the top filled in, then cut it out with a Dremmel to make room for a little cardboard "box" I made to create a cavity for the switch. The next pics are after I covered it with the box in place.


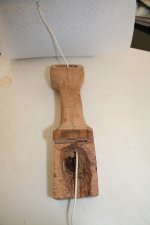
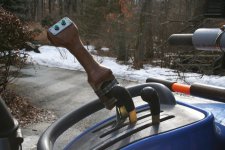
After filing it to shape I drilled a hole from the bottom of the switch recess down to the pipe at the base. Here you can see the hole at the bottom of the recess.


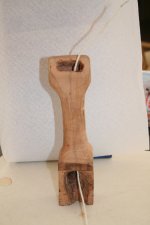
Then I put a piece of clear tubing through the hole and fastened it to the pipe. The cable ties are just temporary. This will be a conduit for the wires. Then I "buried" the conduit with bondo, filed and sanded to the (almost) final shape you see in the last pics.


Next I will make an oval shaped aluminum plate to fit on the flat top of the knob for mounting the rocker switch. More pics when I get that done.
jp
 
   / selector valve #57  
Progress on the grip...

I have the grip finished sanded and ready for primer.


Next pic shows the aluminum plate mounted on top. The hole for the switch doesn't show up because the plate is covered with masking tape. I had mounted the plate on top so I could sand the grip shape to match the oval shape of the plate, the tape was to protect it from sandpaper.


Here it is primed and ready for glazing putty to fill in the pinholes that are always present in body filler. If you enlarge the first pic you can see the pinholes on the back of the grip.


Now to find some paint that matches the existing shift knob. This may be sacrilege to my fellow Massey owners... but it looks like Kobota Orange might be what I need:eek:
jp
 
   / selector valve #58  
I like that grip. But if I made one like that it would come out looking like my wooden one. I am almost finished with mine. Pictures show all the parts in the kit. I generally do not like to modify the tractor so I like band clamps. I did drill two holes in the cross bar that holds the tool box and SMV sign. Figured the ROPS police would not come calling. I had an interesting process for the hollow in the handle to make it fit around the tractor valve handle. I roughed it out with a drill and then chisel. The I used carbon paper between the grip recess and the valve handle and used a Dremel with a rasp bit to remove material where ever the carbon paper touched. when it touched all around it was finished. I really like the Deutch connectors and was well along with cables ends when I realized one end had to go through the slot where the valve handle protrudes through, so I had to make one end a 4 pin flat trailer connector. I did not want to cut off the ends on the solenoids plus Deutch has a really nice hold down bracket for the connector. Pretty heavy duty bracket to hold the selector valve but I had to get past the toolbox , over 8 inches. The cross bar on the Rops is not plumb and the valve looked not right with the plumb not correct. I have not decided whether to make a wedge or just use washers. It's about .5 inch spacer to make the valve plumb. It is plumb in the picture. Grip is installed , wiring is done , paint is drying on the valve bracket. I have to check for shorts at the last connector , mount the valve , and then it's hoses. What a great price on those valves, wonder why they were surplus. I see they are selling about one a week.
Long story about why there is a plow and a snow blower. 12 years ago smaller tractor then plow then big snow storms then blower then bigger tractor. If I was starting over it would be a cab and blower om front ,I guess.
 

Attachments

  • IMG_5726.jpg
    IMG_5726.jpg
    397.5 KB · Views: 185
  • IMG_5727.jpg
    IMG_5727.jpg
    378.7 KB · Views: 165
  • IMG_5725.JPG
    IMG_5725.JPG
    477 KB · Views: 192
  • IMG_5724.JPG
    IMG_5724.JPG
    636.6 KB · Views: 178
  • IMG_5723.JPG
    IMG_5723.JPG
    894 KB · Views: 237
   / selector valve #59  
I have a couple of questions I was hoping someone could help with, I'm trying to decide which valve would be better for me. With this valve you take one double remote (my case would use the up/down of the FEL) and have two additional circuits plus the up/down of the FEL? I'm running a Kubota L3410 with out any rear remotes and I'm building a grapple for my FEL, and was thinking this electric valve would be great for running off the FEL up/down circuit, but also would be nice to use the third out put as a rear remote for a drag scraper or a disc maybe but was wondering what type of duty cycle the electric coils would have? I would like to be able to flip a switch and have say circuit 2 or 3 stay active for a period of time without having to press a switch each time to activate them.

Or I was thinking of using this type of valve.

Burden Sales Surplus Center Item Detail
 
   / selector valve #60  
Generally I don't think it is a good idea to pick and hold these coils. That said my front selector for a thumb on the bucket was a kit from Fasse and it had two switches on the grip one momentary and the other a toggle. The toggle allowed hold . But I still would not do it.
 

Tractor & Equipment Auctions

2017 Ford F-250 Enclosed Knapheide KUV Service Truck (A50323)
2017 Ford F-250...
2012 Ram 4500 Versalift TEL29N 29ft Bucket Truck (A50323)
2012 Ram 4500...
(4) Montreal ST 205/75 R15 Tires (A50121)
(4) Montreal ST...
TAKEUCHI TL150 SKID STEER (A51242)
TAKEUCHI TL150...
2013 East Manufacturing 45ft T/A Walking Floor Trailer (A50323)
2013 East...
2011 Kubota R520S Articulated Wheel Loader (A51691)
2011 Kubota R520S...
 
Top