At Home In The Woods

   / At Home In The Woods #441  
You were right about the headers being a low r value area if they only give you r 4.5 in a 2x4 wall. This forum is a great place for memory exercize..

I've seen it happen, but it's hard to be wrong about everything LOL
Dave
 
   / At Home In The Woods #442  
Thanks, guess my memory is over 50 :).

No sweat. My memory's getting there quick, and my eyes have been there for years. I had cataracs when I was 24 or 25. The new eyes still work good though. Maybe they'll find something similar for our memory? LOL
 
   / At Home In The Woods #443  
For shorter headers in exterior walls, where you are willing or can give up some strength, putting extruded styrofoam between the inner and outer header boards will add considerable R value to that section of wall. R-5 per inch. A header is a low R-value location.
Dave.

This is what I do, sub foam for the ply and you have a header with decent r-value.

On short headers in 2x6 walls 3 2x12's is plenty strong with foam in lieu of ply.
 
   / At Home In The Woods
  • Thread Starter
#444  
Checking the Level of the Floor
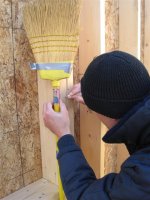
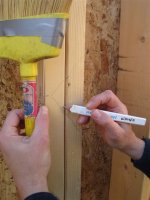
Yesterday the wife and I measured the basement walls to check level. We used a water level similar to the one described at Making and Using a Water Level . The article in the link claims a water level is more accurate than a laser level or transit. I bought 75 feet of 1/2" inside diameter clear plastic tubing at Lowes for $25.

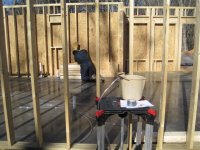
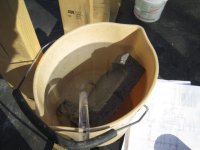
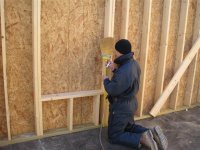
I taped the hose to the handle of a broom to simplify the measuring. When moving from one measuring point to another I would drag the end of the broom handle along the concrete floor to keep the hose raised at almost the same level as I moved around. This technique kept the water level at the same spot in the hose so I didn't have to wait very long for the water level to equalize before taking the measurement. At each spot I marked the water level of the hose on the wall. If done correctly, every mark I made on the walls would be level with all the other marks. My wife measured the distance from each mark on the wall to the top of the wall and recorded the measurement on a house plan drawing. If you look closely at the third picture, you can see the water level in the clear plastic hose just above my left thumb.

I used 1/2" tubing instead of the 3/8" specified in the article because we would be using 75' of hose instead of 20' of hose mentioned in the article. I figured a bigger diameter hose would make it easier to get all the air bubbles out of the hose than the smaller hose. A few years ago I tried to make a water level out of a 1/8" inside dia. hose but could not get the air bubbles out of such small of a hose. The temp was in the low 20's F while we performed the measuring so I filled the bucket and water hose with warm water to prevent freezing.

We took a bunch of measurements to get an idea of how much leveling would need to be done when installing the floor trusses.
 

Attachments

  • IMG_2978.JPG
    IMG_2978.JPG
    59.2 KB · Views: 337
  • IMG_2979.JPG
    IMG_2979.JPG
    52.6 KB · Views: 303
  • IMG_2980.JPG
    IMG_2980.JPG
    43.3 KB · Views: 345
  • IMG_2981.JPG
    IMG_2981.JPG
    63.8 KB · Views: 314
  • IMG_2982.JPG
    IMG_2982.JPG
    135.2 KB · Views: 412
  • IMG_2983.JPG
    IMG_2983.JPG
    93.5 KB · Views: 291
   / At Home In The Woods #445  
I'm confused.

If the slab is level and the studs are all the same size, then why would you check the walls to see if they are level?

What did you find?

Eddie
 
   / At Home In The Woods
  • Thread Starter
#446  
Cold Weather Stretch Causing Camper Challenges
The weather forecast is showing we will have at least a solid week with temperatures staying below freezing. The lows are in the low teens with the highs in the mid to upper twenties most days. These temps are colder than normal for this area.

Two days ago, we could tell the water to the camper was trying to freeze by the way the water was coming out of the kitchen faucet (i.e. the water initially came out of the faucet at a trickle but eventually came out at full force as we ran the partially frozen water out of the line). The 100 watt light bulb in the well house had burned out causing the water to start freezing in the well house. Replacing the light bulb fixed that issue. We are dripping the faucets in addition to running a small electric space heater in the camper's storage area where the pipes are susceptible to freezing.

This morning it was 14 degrees F. Our oil-filled electric space heaters could only warm the trailer to 60 F so we turned on the propane furnace. We have had some issues with the furnace in the past so we try not to use it. Fortunately the furnace worked and we were able to warm up the camper.

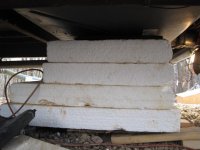
The biggest problem we are facing is freezing in the black (sewage) tank of the camper. Until the black tank thaws out, we can't use the toilet. For a toilet, we are currently using a chamber pot that used to be our grandmother's. That's how the old-timers did it. That's how my father-n-law grew up in rural Tennessee. Right now, it really does feel like were camping. For winter temps common to this area, hanging a 100W drop light near the black tank normally keeps the valve from freezing and is adequate. The drop light can be seen hanging from the sewage drain pipe in the far-right side of the first picture. However, with the cold weather we're having, I doubt the light is enough. Until the weather gets into the 40's, the black tank contents will never get a chance to thaw without help.

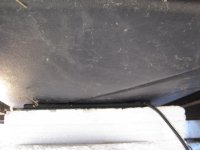
So, I'm attempting a work-around. Living in the camper gives one many opportunities to jury-rig stuff. We have a heating pad that is designed to be used to create a warm bed for pets. Under the black tank, I stacked up some left-over styrofoam that had been used during the concrete wall pour. On the top of the styrofoam I placed the heating pad. I then wedged some boards under the styrofoam to get the heating pad snug up against the black tank. We ran an extension cord and plugged in the heating pad. In the second picture, you can see the black heating pad between the top of the styrofoam and the black tank. Tomorrow evening we'll see if we can dump the black tank. If the heating pad thaws the black tank so it can be dumped, then we can start using the toilet again.

The third picture shows what my wife did to show her gratitude for my working on the black tank in the 15 degree F weather. Blueberry pancakes, biscuits and sausage gravy, and fried apples. All made from scratch. As I type this post, the wife is making a pumpkin pie with homemade pie dough. I sure have a wonderful wife!

Obed
 

Attachments

  • IMG_2987.JPG
    IMG_2987.JPG
    103.9 KB · Views: 299
  • IMG_2988.JPG
    IMG_2988.JPG
    94.4 KB · Views: 254
  • IMG_2989.JPG
    IMG_2989.JPG
    137.3 KB · Views: 386
   / At Home In The Woods #447  
Obed,

Sorry the winter chill is dipping south on you. Could you get some bales of straw or hay and surround your camper? If so, you could trap a sheet of plastic on the outside of the bales to really cut the breeze under there. Then your heating pad would have a better chance of keeping the black tank thawed. The straw/hay will be useful in your garden or lawn seeding this Spring.

Or, do you have a porta-potty service in your area? They generally come weekly and pump/clean the units. If you get one, anchor it to the ground, they are famous for blowing over in a big storm. Not a good result. :)

It's nice to have one for the construction workers anyways.
Dave.
 
   / At Home In The Woods
  • Thread Starter
#448  
I'm confused.

If the slab is level and the studs are all the same size, then why would you check the walls to see if they are level?

What did you find?

Eddie
The slab has some unlevel spots so some adjustments will need to be made.

Obed
 
   / At Home In The Woods #449  
Sorry to hear the slab is off.

Are you going to add to the height of the top plates or life the wall and build up the concrete below the sill plates?

What is the distance that you need to make up?

Does this affect the slab?

Given a choice, and depending on how much you need to correct for, I'd much rather bring up the concrete to where it needs to be and have my top plates all the same height without any shims.

Eddie
 
   / At Home In The Woods
  • Thread Starter
#450  
Are you going to add to the height of the top plates or life the wall and build up the concrete below the sill plates?

What is the distance that you need to make up?

Does this affect the slab?

Given a choice, and depending on how much you need to correct for, I'd much rather bring up the concrete to where it needs to be and have my top plates all the same height without any shims.
Actually, the slab is too high in one corner and at two spots along the center load bearing wall. We need to shorten the wall at these spots by approx 1/2" to 3/4". A contractor friend of my recommended running a chalk line and using a sawzaw to cut the top of the studs just below the top plate by the needed amount. That approach seems reasonable to me.

Obed
 

Tractor & Equipment Auctions

2000 FREIGHTLINER CC CONVENTIONAL(INOPERABLE) (A52472)
2000 FREIGHTLINER...
City of Lakeland (A51691)
City of Lakeland...
2019 Nissan Sentra Passenger Car (A51694)
2019 Nissan Sentra...
Godwin CD150M 6in Dri-Prime Pump S/A Trailer (A51691)
Godwin CD150M 6in...
2021 Kubota RTV-X1140RL-A (A47384)
2021 Kubota...
2003 Lincoln LS Sedan (A50324)
2003 Lincoln LS...
 
Top