Welding Table Build

   / Welding Table Build
  • Thread Starter
#41  
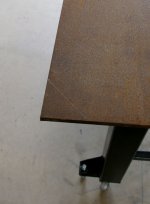
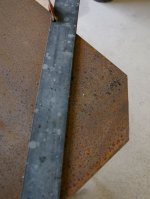
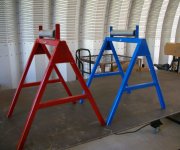
Next came the removal of those, as Harv described them, "owie" causing corners.
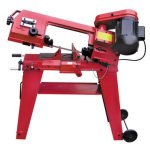
Using one of the tools from HF that don't suck, a 7 1/4" Metal Cutting Saw, off they came. The saw was also used to cut 1/4" plate used to build the mounting plates for the casters and the gussets to reinforce the angle used for the brake/levellers. That saw cut through the 1/4" and 3/8" plate better than my DeWalt circular saw cuts wood. Definitely a bargain, especially with the 20% off coupon. And, HF doesn't even list it on their Website.:confused:
 

Attachments

  • WT 16.jpg
    WT 16.jpg
    71.1 KB · Views: 245
  • WT 17.jpg
    WT 17.jpg
    90.5 KB · Views: 249
   / Welding Table Build
  • Thread Starter
#42  
In an earlier posting, I mentioned that I was going to add a six-outlet electrical extension to the table. Well there it is. Just wish power tool makers put longer cords on their products. :mad: The cord on the DeWalt 4 1/2" Angle Grinder is the only tool that will reach all four corners. :)
 

Attachments

  • WT 18.jpg
    WT 18.jpg
    90.3 KB · Views: 336
   / Welding Table Build
  • Thread Starter
#43  
Almost there. We cleaned the surface rust off of the table top using a combination of a belt sander, palm sander and angle grinder with a wire cup brush. Wow! that was some dirty work, especially with the unwanted but welcome breeze blowing through the barn.

The project is now officially completed.

Looking back on it, if I was to change anything it would be to weld the brake/levellers to the inside rather than the outside of the legs. It hasn't happened yet, but I can see myself kicking them as I work at the table. Guess that is why I wear steel-toe boots.

Sure hope y'all enjoyed watching this project progress as much as I enjoyed building it. Thanks for all your help, critics and suggections. :thumbsup:
 

Attachments

  • WT 19.jpg
    WT 19.jpg
    104.6 KB · Views: 448
  • WT 20.jpg
    WT 20.jpg
    71.2 KB · Views: 363
   / Welding Table Build #44  
In an earlier posting, I mentioned that I was going to add a six-outlet electrical extension to the table. Well there it is. Just wish power tool makers put longer cords on their products. :mad: The cord on the DeWalt 4 1/2" Angle Grinder is the only tool that will reach all four corners. :)

Put a second power strip on the opposite side so you can plug in which ever side is closest to what you're working..

Nice work. I have a couple of tables I want to put casters on, I will steal your design (putting the bolts to the inside as suggested)...
 
   / Welding Table Build
  • Thread Starter
#45  
Put a second power strip on the opposite side so you can plug in which ever side is closest to what you're working..

Nice work. I have a couple of tables I want to put casters on, I will steal your design (putting the bolts to the inside as suggested)...

Thanks for the suggestion. Duh, why couldn't I have thought of that?:confused2:

I appreciate your comment.
 
   / Welding Table Build #46  
Good job.

If that Miller challenge thing is a table I'll know what to do. I will just have to do it in five hours, gulp!
 
   / Welding Table Build
  • Thread Starter
#47  
Good job.

If that Miller challenge thing is a table I'll know what to do. I will just have to do it in five hours, gulp!

Go with a smaller version. I've seen your work. A table will be no problem for you. Good luck and thanks.:thumbsup:
 
   / Welding Table Build #48  
Looking back on it, if I was to change anything it would be to weld the brake/levellers to the inside rather than the outside of the legs. It hasn't happened yet, but I can see myself kicking them as I work at the table. Guess that is why I wear steel-toe boots.

Sure hope y'all enjoyed watching this project progress as much as I enjoyed building it. Thanks for all your help, critics and suggections. :thumbsup:

I just started reading this thread last night. Very nice.. I wish I had space for something like that. For now, it is the old trailer ramp between 2 sawhorses... :eek:

I have to concur with your point above. You are going to wish you had turned those in pretty soon. Probably the best side would be on the ends as you will probably stand there less often. It will be an annoyance but it will still work fine, no doubt.

Nice job!
 
   / Welding Table Build #49  
Was looking at my table last night and remembering that rip in my pants pocket (and beneath) from backing into the corner of the table. I like the looks of your work, think I'm going to cut my corners with the plasma. Now to decide if I want to go at a 45 or round them off. Have a power strip mounted like you did, works great. Nice clean and organized shop.
 
   / Welding Table Build #50  
Nice job Weldingisfun, you'll be liking that table for years to come. Be sure you post the projects that come off that table....
 
   / Welding Table Build #52  
WIF,

That is a nice looking table. Good job.

You may be OK on the leveller placement. My caster pads stick out a little and I thought I'd be kicking them, but the table top overhang keeps me far enough away.

I agree with your assessment of the HF metal cutting saw blade too.

Thanks for posting.
 
   / Welding Table Build
  • Thread Starter
#53  
Put a second power strip on the opposite side so you can plug in which ever side is closest to what you're working...

Hawkeye08, I added a second power strip as you suggested. Wonder why the obvious answer to a problem is so elusive? Thanks for your suggestion.

Nice job Weldingisfun, you'll be liking that table for years to come. Be sure you post the projects that come off that table....

Dts1449, ask an you shall receive.
The first projects to come off the table were two roller stands. I already had one, without a roller, that was picked up at an auction and used everytime I used the HF bandsaw. That bandsaw is another HF tool that does not suck. Especially when it has a good blade.
SWMBO picked up two HF roller stands for me, 132 Lb. Capacity Roller Stand on sale for $14.99 then discounted another 20% with a coupon to $11.99. The rollers were removed and used for the project stands.
Just in case anyone is wondering why the HF stands were not used instead of building two new stands, well, they are just too tall.
Added a couple of pieces of 1" flat stock to keep things from falling off to the sides.
The finishing touch was to paint them, one red and one blue. The old one was painted white. Why the patriotic paint jobs you ask? The answer is twofold: The paint hides my amateur welds and; it makes it easier for my "helpers" to know which stand to move when they are asked to move one.:rolleyes:
 

Attachments

  • S1.jpg
    S1.jpg
    111.1 KB · Views: 372
  • S2.jpg
    S2.jpg
    93 KB · Views: 310
  • S3.jpg
    S3.jpg
    152.7 KB · Views: 341
   / Welding Table Build #54  
Good job on the stands... and on the table. A welding table is one of my "Someday" projects.

FWIW, Another good source for rollers is a treadmill. Usually there's a good, heavy duty roller on either end of the belt. Used treadmills are pretty easy to find. There's lots of good stuff in them, rollers, rubber belting to line tool drawers, DC motors, linear actuators, and lots more depending on what the next project is.
 
   / Welding Table Build #55  
...I used the HF bandsaw. That bandsaw is another HF tool that does not suck. Especially when it has a good blade.

LOL, IMHO, they suck in a major way! In the Horrible Freight thread I've had a standing offer to give anyone the POS portable bandsaw I got from HF. Each one toasted during it's first use. After 3, the store said "no more" and refused to refund my money. Of course, the 4th rolled snake eyes on it's first use as well. I spent the money needed to buy a quality one and have probably have put 40 hours of cutting time on it with zero problems.

If you want another Horrible Freight band saw free, just come and pick it up, no strings attached, or pay shipping and it's yours. Less than 2 minutes run time and in it's original box. Considering it was #4, I have zero faith in that product from them. Now, if you want to talk about their yellow handled hammers, that's a completely different story... :)
 
   / Welding Table Build
  • Thread Starter
#56  
Dargo, sorry to hear you had so much trouble with your bandsaw, but I don't think we are both talking about the same saw. This is the one I think is a good one. Horizontal/Vertical Metal Cutting Bandsaw
 

Attachments

  • Bandsaw.jpg
    Bandsaw.jpg
    27.6 KB · Views: 220
   / Welding Table Build #57  
Dargo, sorry to hear you had so much trouble with your bandsaw, but I don't think we are both talking about the same saw. This is the one I think is a good one. Horizontal/Vertical Metal Cutting Bandsaw

You are correct; different saw. Bummer. I suppose you don't want the POS I have. :laughing:

BTW, you gave me a good idea. Several times a year I seem to be in need of some saw horses on steroids. I think I'm going to root in my scrap stack and see if I have enough to build me a set of super heavy duty saw horses.
 
   / Welding Table Build #59  
I have the same bandsaw weldingisfun has, and mine toasted the motor on the first use.

I have heard some HF tools described as "do it yourself" tools, meaning you have to be willing to modify and work on them and this was the case with this saw. But with a decent motor, it is now working well and I have used it on a lot of projects.
 
   / Welding Table Build #60  
I picked up one of the HF saws last year when I decided cutting parts with a reciprocating saw was too much work. I found it on Craig's list, one of my favorite stores. The thing was covered in some kind of red coolant and lots of metal cuttings, pretty filthy. The guy said he got it from his brother but never used it. Well, I covered the motor with a plastic bag, sprayed it down with de-greaser and power sprayed it. Then I replaced a few missing screws and fired it up. It didn't cut too well, but I found the guy had the blade on backward. The blade was showing some wear, cracks and such so I replaced it with one from TSC. While I was going over it I replaced the gear oil and guide bearings. I'm lucky enough to have an Industrial Bearing store a few blocks from work. The 6 bearings cost about 12$. I got it cutting pretty square and have been using it without a problem. One of the best finds I've had.
 

Tractor & Equipment Auctions

KBH Tender Trailer (A56438)
KBH Tender Trailer...
2008 TRANSCRAFT 48X102 STEEL FLATBED (A58214)
2008 TRANSCRAFT...
GEARMATIC WINCH CABLE DRUM (A58214)
GEARMATIC WINCH...
2009 CHEVROLET C8500 CREW CAB FLATBED TRUCK (A59823)
2009 CHEVROLET...
2017 Freightliner M2 106 AWD Terex Hi-Ranger 5TC-55 55ft Insulated Material Handling Bucket Truck (A60460)
2017 Freightliner...
2016 Ford F-150 Ext. Cab Pickup Truck (A59230)
2016 Ford F-150...
 
Top