Welding a Small Part

   / Welding a Small Part #41  
For anyone wanting to learn more about tempering, etc, here is an excellent "starter" book - the author (now deceased) was, among other things, a sculptor and he traveled around the world making friends and his own sculpting tools, many locally in various home shops.

Book is mostly black and white, but the back page has an excellent "oxidation color" chart showing various latent heat colors (necessary for differing degrees of temper) - I've had a copy of this since the '70's, re-read it every so often and learn something new each time -

The Making of Tools: Alexander G. Weygers: 9780442293604: Amazon.com: Books

...Steve
 
   / Welding a Small Part #42  
Cool. Thanks, Steve. There's a few used copies available, but I'm just tryin to find one that ships to Canada for less than the items purchase price. :(

Terry
 
   / Welding a Small Part #43  
Wonder what others would do here.

My first bit of advice after reading these 5 pages is to use the tools you have as opposed to tools you don't have. Your MIG is perfect, and fits the above recommendation. It's much more efficient that way. :D Good reading though, lots of subjects mentioned.

But back to the title subject,,,,,

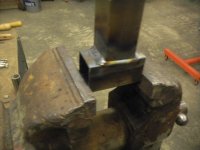
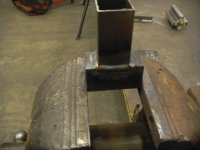
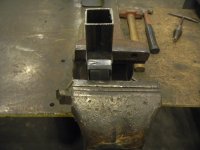
Don't jam it all the way into your counterbore, leave a little room to true it up in case it 'pulls". I'd tack one side. A good tack on a corner. Then screw it on and watch it rotate to decide if it's as straight as it needs to be, bend it straighter if necessary. Then weld up the opposite side and go all the way around. Nothing sequential is necessary beyond tack, inspect, weld. 3 steps.

Setting the MIG at 1/8 would be the MAX I'd use for this part, it's 1/16" thick. The little part barely has enough mass to absorb all the heat at a 1/8 setting. I enjoyed the comment where some fella advises about "not enough penetration". I make stuff like this all the time and the only recommendation regarding penetration is to do a test-weld first so you don't melt that pretty little thing. If you are unsure about wrecking it start at the next lower setting, like for 14ga, but 1/8 can work. Doing a couple test parts will tell you what setting you need.

Don't worry about it being "strong enough" just 3 welds (on 3 flats) is far stronger than it could possibly need to be. And could look nice too.

If those parts are mild steel you can't get any temper no matter what you do, so cool it however is convenient (or entertaining). Possibly you can get some carbon to absorb into the surface though, but what is its function? Would it benefit from a harder surface a few molecules deep?

View attachment 428128
 
Last edited:
   / Welding a Small Part #44  
My first bit of advice after reading these 5 pages is...........Setting the MIG at 1/8 would be the MAX I'd use for this part, it's 1/16" thick. The little part barely has enough mass to absorb all the heat at a 1/8 setting. I enjoyed the comment where some fella advises about "not enough penetration". I make stuff like this all the time and the only recommendation regarding penetration is to do a test-weld first so you don't melt that pretty little thing. If you are unsure about wrecking it start at the next lower setting, like for 14ga, but 1/8 can work. Doing a couple test parts will tell you what setting you need.

Don't worry about it being "strong enough" just 3 tacks is strong enough (which you can do too,,,, could look nice)

If those parts are mild steel you can't get any temper no matter what you do, so cool it however is convenient (or entertaining). Possibly you can get some carbon to absorb into the surface though, but what is its function? Would it benefit from a harder surface a few molecules deep?

View attachment 428128

Where are you coming up with "1/16 inch thick?" Please look at both photos. Try some of the things suggested, like tempering or quenching with used oil- then critique.
 
   / Welding a Small Part #45  
Fawken I admit I'm making assumptions. If this item is made of heat-treatable steel (like spring steel) then yes it can be tempered. If it's mild steel then it can't, although it can be surface hardened with some home shop processes, perhaps dirty oil works, and you are right in assuming I've never tried it. Haven't needed it, but I am interested.

My assumption that it's mild steel is because OP was able to drill a fairly large counterbore (the 1/16" thick welding area). Folks with home shops usually find heat treatable steels difficult to work with and their posts often include details related to that difficulty.

Also yeah its thicker than 1/16, that 1/16 lip will burn back and disappear, and your weld will move down the part from where you start, which could be dicey if you want a pretty weld. But in any case the heat has nowhere to go on this small part so you don't want to weld too hot. You can penetrate to (or disrupt a little) the fine threads of that 3/8 nut easily. You may need to run a chaser thru it.

And on that note, using 3 (or 6) short, quick welds is safer than what I wrote earlier about welding all around. With regards to penetration you should worry about "too much" (not "too little"). Often in these small parts welding I have a good idea how it will go, but then I know a lot more once after the first tack.

As said I'd recommend a couple mockups first if you're unsure. I've seen the finish quality that Pat likes, and it's very feasible for this part to look nice when done. It's all good experience (which you will have, shortly).
 
Last edited:
   / Welding a Small Part #46  
These "disappearing lip" and melt that thing, comments are why those of us with simple inexpensive TIG equipment would TIG that in a heartbeat. I have welded with TIG down to around 5 to 8 amps. Yes it is hard to get the arc started, but it can be done. I would start around 17 to 20 amps with that piece and see how it runs, Turn up or down if need be.

You have such fine control with TIG, I would never be without one again. And mine is nothing fancy, just a 17V torch on my little DC stick welder. Scratch start and go. Yes I know he doesn't have TIG, and I would use my MIG if that is what I had too. And I am sure he can git-er-done with what he has with the proper technique as many have pointed out and offered good advice..

All I am saying is TIG would be the preferred method for this. At least in my simple mind:) And it is not all that complicated nor expensive to get started in doing it. If it was.. I would not be doing it.
 
   / Welding a Small Part #47  
James, my dearly departed dad use to have a saying about some people.
"You can ask them anything, but you can't tell them a thing!"
 
   / Welding a Small Part
  • Thread Starter
#48  
I try to keep track of what steel I am using. And I have read up a bit on quenching and tempering in the last couple days. The nut is Grade 5 which I understand to be 3-4% carbon and is tempered. So would benefit from quenching and re tempering. The tube is 1026 ie 2.6% carbon, on the low side for heat treating, but possibly capable of being strengthened a bit by quenching in dirty oil. So all in all I think it is worth doing.

On process. I started gas welding at age 14 and I know I could do a nice job on that part. Maybe I am the last known gas welder.

I guess I was really looking for feedback on MIG technique. Still learning MIG - I have satisfied myself I can do .120 - 3/8. This is smaller, so I thought it worthwhile to ask for advise. And I got lots of very good advice, thanks again to all.

If I blow it up I will just use another dollar of material and 30 minutes of time and make another. If I make a glue stick weld I will clean it up and do it over.

I understand the value and purpose of TIG, and am appreciative of the guidance offered here. At some point I will follow up on the scratch start option. TBN is always an amazing source of expertise and help.
 
   / Welding a Small Part #49  
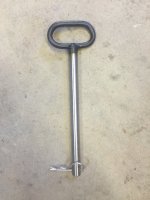
Don't know how this is relevant and not trying to hijack... but this I am sure doesn't deserve its own thread. That said, I just finished making a couple of 8in long QA pins for a project I am working on. I had to make my own because I couldn't find anything long enough off the shelf and I needed a close fit. I used drill rod for the pin and bent some simple 1/4in rod for the loop handle and coated with plastic dip. I think they came out pretty well MIGing it. Curious if anyone knows the material for 'drill rod'?

IMG_5357.jpg
 
   / Welding a Small Part #50  
Drill rod is harder than the hubs of he!!. Even harder if you heat treat it.
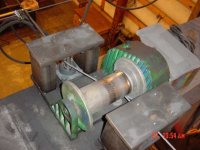
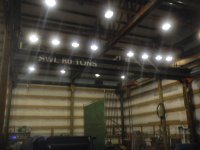
I used drill rod in the fair leads for the power travel on my bridge crane. They have been in use for 12-years with 3/8" wire rope running on them. And they were not heat treated. ;)
 

Attachments

  • winch.jpg
    winch.jpg
    40.6 KB · Views: 189
  • Span Beam 28.JPG
    Span Beam 28.JPG
    240.8 KB · Views: 154

Tractor & Equipment Auctions

BUSH HOG 2810CD SINGLE FLEX WING ROTARY MOWER (A51406)
BUSH HOG 2810CD...
2007 Astec RT-360 Ride-On Trencher Backhoe (A50322)
2007 Astec RT-360...
2016 Ford F-450 Ext. Cab Knapheide Flatbed Truck (A50323)
2016 Ford F-450...
2008 Ford F-250 Pickup Truck (A50323)
2008 Ford F-250...
John Deere 6410 Loader Tractor (A50514)
John Deere 6410...
New Kivel 4200 lb. Skidloader Forks (A50774)
New Kivel 4200 lb...
 
Top