Yet another pole barn build

   / Yet another pole barn build
  • Thread Starter
#11  
Nice seeing the notches on the tops of the posts!!!

I am a believer in fasteners ( nails, screws or bolts ) were not meant to support loads. It takes an extra hour to notch the posts and you have a direct load on the posts instead of the carriage bolts.
 
   / Yet another pole barn build #12  
Nice seeing the notches on the tops of the posts!!!

I agree! Looking good Woody.

What we did on my barn, and again on the lean-to I am adding, is to notch the post for just one of the headers, and then sister the second to it (with a lot of nails down the length). That way the second header sticks out and is on the same plane as the wall girts and you can attach siding directly to it. The first header has more than enough bearing area on the notched post to carry the roof load on down. Even the picky building inspector was happy with this when I showed him the loads. He was not going to let us just face nail the headers on as is standard practice with pole barns.

IMG_7050.jpg

I need to get some fill to level inside my lean-to, but it's been raining nonstop here for about 8 days, so I am stalled at that part. I built a redneck retaining wall out of pine logs on the back end of the lean-to to minimize the amount of fill I need on the outside. When that rots away in 5-6 years I'll add more logs or more fill.
 
   / Yet another pole barn build #13  
S219, looks good, but if it was mine, I would install a piece of vertical blocking on your posts under the 2x12s
 
   / Yet another pole barn build
  • Thread Starter
#14  
I agree! Looking good Woody. What we did on my barn, and again on the lean-to I am adding, is to notch the post for just one of the headers, and then sister the second to it (with a lot of nails down the length). That way the second header sticks out and is on the same plane as the wall girts and you can attach siding directly to it. The first header has more than enough bearing area on the notched post to carry the roof load on down. Even the picky building inspector was happy with this when I showed him the loads. He was not going to let us just face nail the headers on as is standard practice with pole barns. <img src="http://www.tractorbynet.com/forums/attachment.php?attachmentid=467605"/> I need to get some fill to level inside my lean-to, but it's been raining nonstop here for about 8 days, so I am stalled at that part. I built a redneck retaining wall out of pine logs on the back end of the lean-to to minimize the amount of fill I need on the outside. When that rots away in 5-6 years I'll add more logs or more fill.

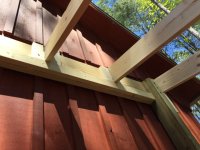
Thanks s219. Notching for 1 beam works also. I will be adding another girt to flush out the wall once I get the trusses on.

I am having the same problem with weather here. Lost a whole day due to weather. Spent the day drinking beer with my neighbor. The rest of the time I worked through drizzle.
 
   / Yet another pole barn build #15  
I am having the same problem with weather here. Lost a whole day due to weather. Spent the day drinking beer with my neighbor. The rest of the time I worked through drizzle.

Doesn't sound to me like you lost a day. :drink:
 
   / Yet another pole barn build #16  
Woody, what's your approximate cost per square foot there? I've heard it's about $10 a foot here. Just curious. Just the building, no electrical or concrete. Thx.

Sent from my iPhone 2.0 using TractorByNet
 
   / Yet another pole barn build
  • Thread Starter
#17  
Woody, what's your approximate cost per square foot there? I've heard it's about $10 a foot here. Just curious. Just the building, no electrical or concrete. Thx. Sent from my iPhone 2.0 using TractorByNet

That's about right. I have 1280 sq ft and right now I am at $10,000 in materials. I haven't purchased the man door, (4) windows, or calculated the cost of the barn doors which I will custom make and have them on a slide trolley. In the end, notwithstanding the gravel base, it should come out to about $10 per sq ft.
 
   / Yet another pole barn build #18  
S219, looks good, but if it was mine, I would install a piece of vertical blocking on your posts under the 2x12s

That couldn't hurt, but theoretically it shouldn't be needed. When we ran the calculations, the biggest factor was having the two headers sistered. Normally with pole barns, they nail one header board to each side of the post, but the roof rafters/trusses cannot truly bear down on both equally, so it adds uncertainty and reduces the effective beam capacity. With the two sistered, that problem goes away, so then it becomes a matter of how the header transfers loads onto the posts. I am sure there are bolts large enough to do it (in fact, when building piers we depend on bolts holding beams to pilings all the time) but like you and Woody, I prefer a direct bearing surface with notching. Then it becomes a matter of the compressive ability in the post and header wood grain and how much compressive psi the roof load creates on that contact point in the notch. As long as you're well within the capability of the wood, you're OK. Adding more bearing surface makes it better, but not better enough to matter in this case. Now, all situations are different, so without the calculations, you are better off making a full notch and/or supporting both boards.
 
   / Yet another pole barn build #19  
I don't know enough to argue with what you are saying. I'm more of a simple builder and will do what I can to build everything either to code, or to the best method I'm aware of. I always ask myself how I can make it stronger, or last longer. Most of the time, adding another board here or there is all it takes. When I repair the framing on a clients house, it's always because somebody tried to save $20 in materials. Rarely would it have cost more to have done it right the first time.
 
   / Yet another pole barn build #20  
I don't know enough to argue with what you are saying. I'm more of a simple builder and will do what I can to build everything either to code, or to the best method I'm aware of. I always ask myself how I can make it stronger, or last longer. Most of the time, adding another board here or there is all it takes. When I repair the framing on a clients house, it's always because somebody tried to save $20 in materials. Rarely would it have cost more to have done it right the first time.

To be honest, though I had done a lot of engineering loads calculations in school and grew up the son of a builder, it wasn't until the building inspector pressed me on my barn design that I really learned about "tributary" loads that start with the roof load and then work down through all the structural components and their bearing surfaces, on down to the posts and then the footings and the soil. There is a lot more to it than I appreciated.

The only way to know for sure is to follow the load path and look at each component. Any of these things can be a weak link and make overbuilding a different part meaningless. For example, your next weak link might be the truss/rafter bearing surface onto the header. A flaw in a lot of designs is having too small of a "seat" when cutting a rafter bird's mouth, which can exceed the compressive strength of the woodgrain there. Very rarely will a rafter seat sit perfectly on a double header, so there needs to be at least 200% factor of safety there. If there isn't, the grain can compress and lead to the rafter failing. A lot of people still toenail rafters, which is not only bad for uplift but can weaken the seat and accelerate splitting. And many people fail to constrain rafters from rotating, which accelerates failure.

Here are a couple shots of how I blocked both ends of my rafters in response to things I learned:

IMG_7055.jpg

IMG_7056.jpg

The blocking is there to provide nailing across the grain and avoid toe-nails, and prevent the rafter from rotating. You can't see it, but the uphill side of the rafter has a metal bracket under the blocking. The downhill side will get a hurricane clip.

I also put a ledge board under the uphill end of the rafter, mainly for convenience when installing them by myself, but it also adds a very healthy margin for loads.
 

Tractor & Equipment Auctions

2015 CATERPILLAR 305E2 CR EXCAVATOR (A51242)
2015 CATERPILLAR...
2011 International School Bus (A49461)
2011 International...
2015 John Deere 35G Mini Excavator (A49461)
2015 John Deere...
2018 FREIGHTLINER CASCADIA TANDEM AXLE SLEEPER (A51222)
2018 FREIGHTLINER...
2016 New Holland Boomer 47 4WD Front Loader Utility Tractor with Bush Hog BH16-2 (A50322)
2016 New Holland...
2007 JOHN DEERE 310SJ BACKHOE (A50458)
2007 JOHN DEERE...
 
Top